
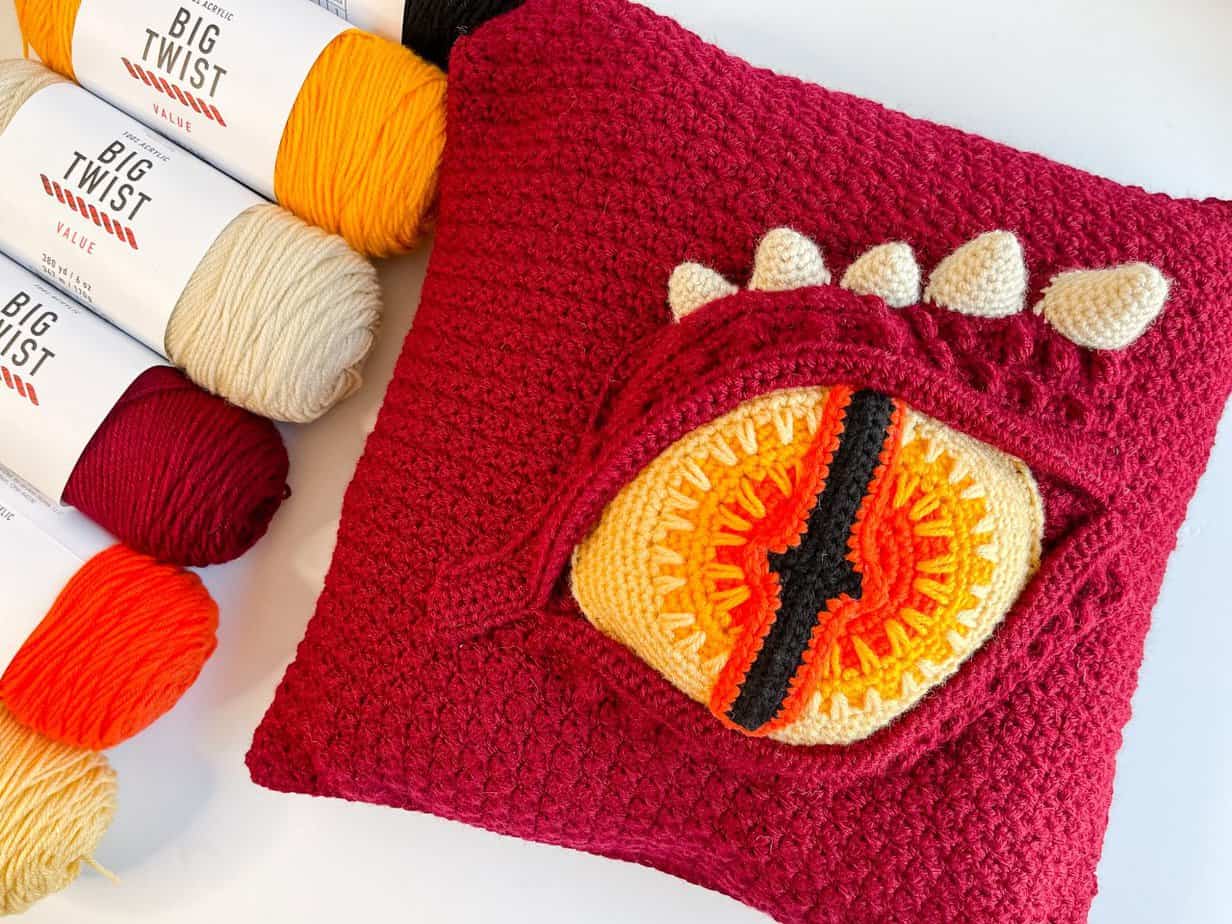
Overview & Inspiration
Welcome, cozy crafters! Today we are stepping into a realm of myth and magic with the enchanting Dragon Eye Pillow. This mesmerizing project transforms a standard accent cushion into a striking piece of fantasy art that adds mystery to any reading nook, gaming corner, or bedroom decor.
By blending rich color gradients with raised 3D stitchwork, you will create a watchful dragon’s eye that feels genuinely alive. Whether you choose fiery embers, cool sapphire, or vivid emerald tones, this pattern offers a wonderfully rewarding adventure for intermediate makers and courageous beginners alike.
Materials & Supplies Needed
- Yarn: Worsted weight (#4 medium) yarn in 4 shades: Black (pupil), Gold/Amber (inner iris), Emerald or Crimson (outer iris), Dark Slate or Brown (eyelids/scales), and your choice of Base Color for the main pillow body.
- Crochet Hook: Size 5.0 mm (US H/8).
- Tapestry Needle: For weaving in ends and embroidering details.
- Stitch Markers: Essential for tracking continuous rounds.
- Scissors: Sharp yarn snips.
- Stuffing / Insert: Polyfill fiberfill stuffing or a 14-inch round pillow insert.
- Optional Accents: White embroidery floss or DK yarn for eye highlight gleams.
Stitches & Abbreviations
- ch: chain
- sl st: slip stitch
- sc: single crochet
- hdc: half double crochet
- dc: double crochet
- fpdc: front post double crochet
- inc: increase (work 2 stitches into the same stitch)
- dec: decrease (single crochet 2 stitches together)
- MR: magic ring
- st(s): stitch(es)
Step-by-Step Pattern Instructions
Part 1: The Dragon Iris (Make 1)
Start with Black yarn to form the central pupil.
- Round 1: Work 6 sc into a MR. Sl st to join. [6 sts]
- Round 2: Switch to Gold yarn. Work 2 sc in each st around. [12 sts]
- Round 3: (1 sc, inc) 6 times. [18 sts]
- Round 4: Switch to Emerald yarn. (2 sc, inc) 6 times. [24 sts]
- Round 5: (3 sc, inc) 6 times. [30 sts]
- Round 6: (4 sc, inc) 6 times. [36 sts]
- Round 7: (5 sc, inc) 6 times. Fasten off leaving a long tail for sewing. [42 sts]
Using Black yarn and a tapestry needle, surface-embroider a sharp vertical slit over the central black circle to extend the dragon’s pupil across the gold layer. Add a tiny white stitch to create an eye highlight.
Part 2: The 3D Eyelids & Brow (Make 1)
Attach Dark Slate yarn to the top edge of your finished Iris piece.
- Row 1 (Upper Lid): Work 1 hdc in next 3 sts, 1 dc in next 12 sts, 1 hdc in next 3 sts along the upper curve. Turn. [18 sts]
- Row 2: Ch 1, 1 sc in first st, (1 fpdc in next st, 1 sc in next st) 8 times, 1 sc in last st. Turn. [18 sts]
- Row 3: Ch 1, sc across to build structural depth. Fasten off. [18 sts]
- Row 4 (Lower Lid): Reattach yarn to the bottom curve of the Iris. Work 1 sc in next 4 sts, 1 hdc in next 10 sts, 1 sc in next 4 sts. Fasten off. [18 sts]
Part 3: Pillow Base Panels (Make 2)
Using your chosen Base Color yarn, create two identical large circular panels.
- Round 1: Work 8 hdc into a MR. [8 sts]
- Round 2: 2 hdc in each st around. [16 sts]
- Round 3: (1 hdc, inc) 8 times. [24 sts]
- Round 4: (2 hdc, inc) 8 times. [32 sts]
- Round 5: (3 hdc, inc) 8 times. [40 sts]
- Round 6: (4 hdc, inc) 8 times. [48 sts]
- Rounds 7–16: Continue increasing by 8 stitches each round until your circle measures approximately 14 inches across. Fasten off the back panel; keep the tail long on the front panel.
Assembly & Finishing Touches
Center the complete dragon eye motif onto the middle of the front pillow panel. Pin it carefully in place to prevent shifting during seaming.
Using your tapestry needle and long yarn tails, stitch the bottom edges of the eyelids securely to the front panel, allowing the raised fpdc ridges to pop forward for maximum 3D texture.
Place the front and back pillow panels wrong-sides together. Single crochet evenly around the outer edge through both layers, inserting fiberfill stuffing firmly before working the final 10 stitches closed. Fasten off and weave in all remaining ends.
Pro Tips for Flawless Results
- Play with Metallic Threads: Carry a thin strand of metallic copper or gold thread alongside your iris yarn to give the eye a magical glow under light.
- Maintain Firm Tension: Keep your stitches tight around the eyelids so the scaly texture holds its shape after stuffing.
- Block the Eyelids: Lightly steam-block your eyelid motifs before sewing them onto the pillow base to shape the curves effortlessly.
Frequently Asked Questions
Can I make this cover removable for easy washing?
Yes! Instead of stitching the front and back panels permanently together, crochet an envelope-style back using two overlapping half-circle panels so your pillow insert can be removed easily.
Is this project suitable for ambitious beginners?
Absolutely. As long as you know basic single and double crochet stitches, the step-by-step eye motif is straightforward to follow with a little patience.
What type of yarn works best for scaly textures?
Acrylic or acrylic-cotton blends are ideal because they retain clear stitch definition, ensuring your front post double crochet scale details stay crisp over time.