
Overview & Design Inspiration
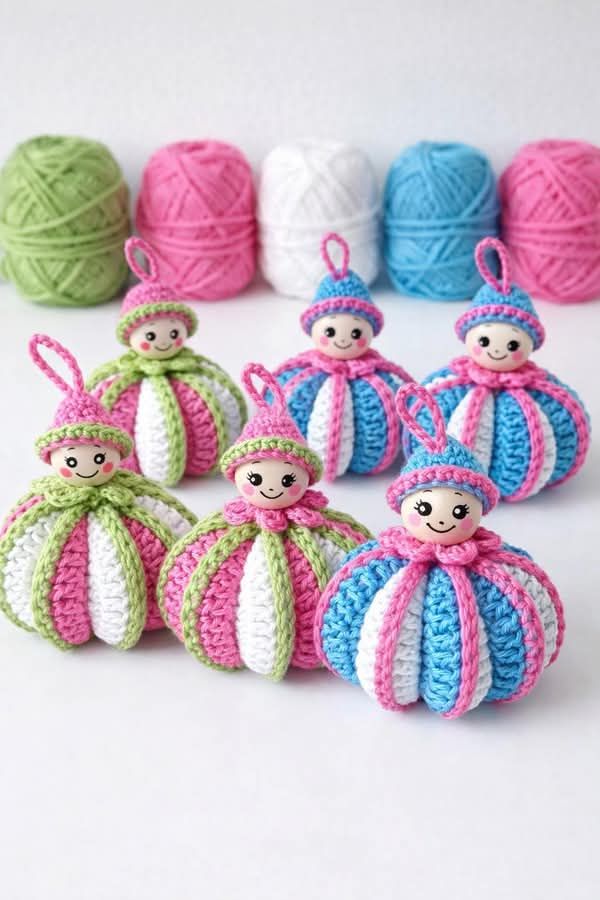
Welcome, fellow yarn lovers, to one of the most charming and whimsical projects to grace our hooks this season! The crochet pumpkin-shaped doll pattern effortlessly combines classic amigurumi techniques with the deeply ribbed, plump appearance of a decorative autumn squash.
Inspired by the sweet, handmade heirloom dolls we adore, this design features a delightfully round body, a petite head, a fitted hat, and a cute hanging loop. Whether you are crafting for seasonal decor or handmade gifts, this little cutie is guaranteed to steal your heart.
Materials & Recommended Supplies
Gathering your supplies is half the fun of any new crochet adventure! To achieve that crisp stitch definition and structured shape, medium-light cotton or cotton-blend yarns are your absolute best friends.
- Yarn: Medium-light weight cotton or cotton-blend yarn in three coordinating colors (e.g., a primary body shade, a contrasting accent, and a green or neutral tone for ribs and hat details).
- Crochet Hook: 2.5 mm to 3.5 mm crochet hook (depending on your personal tension and desired doll size).
- Notions: Stitch markers, sharp scissors, and a yarn needle for seamless weaving.
- Stuffing & Details: High-quality polyester fiberfill, embroidery thread for facial features, and optional safety eyes (or embroidery floss for child-safe stitched eyes).
Essential Techniques & Stitch Highlights
If you know your basic U.S. crochet fundamentals, you are already well-equipped to bring this doll to life! This project relies on standard stitches like the chain (ch), single crochet (sc), half double crochet (hdc), double crochet (dc), and slip stitch (sl st).
You will also practice fundamental shaping methods, including increases (inc) to build the spherical body and decreases (dec) to taper the head and base. Mastering the magic ring (MR) ensures a tight, seamless start for all your circular components.
Construction & Assembly Highlights
While this doll looks wonderfully intricate, the construction is a breeze when broken down into individual, manageable components. You will begin by crocheting the plump main body in a continuous spiral, gradually increasing and then decreasing to form a firm, round shape.
Next, you will create the charming raised surface ribs that give the pumpkin its classic segmented silhouette. After crafting the sweet little head, the whimsical hat, and the decorative collar, you will assemble the pieces with secure stitches and finish with a handy hanging loop for easy display.
Customization & Styling Ideas
The true magic of this pattern lies in its incredible versatility! By simply swapping out your yarn palette, you can completely transform the vibe of your finished doll.
Try soft pastel pinks and whites for a whimsical nursery ornament, traditional oranges and olives for autumn decor, or bright blues and creams for a playful pop of color. You can also experiment with yarn weights to create an entire family of miniature and oversized pumpkin dolls!
Pro Tips for Flawless Results
- Stuff Gradually: Add your fiberfill in small, incremental amounts as you work to ensure an even, lump-free shape.
- Keep Tension Consistent: Maintain a firm, even tension so your stuffing doesn’t peek through the stitches.
- Secure Your Ribs: When attaching the raised surface sections, pull them just tight enough to create natural indentations without distorting the overall body shape.
Frequently Asked Questions
Is this project suitable for ambitious beginners?
Absolutely! If you are comfortable working in the round and understand basic increases and decreases, you will find this project to be a wonderfully rewarding skill-builder.
Can I make these dolls child-safe?
Yes, simply embroider the facial features using sturdy embroidery floss instead of using plastic safety eyes or buttons, and ensure all yarn ends are securely woven in.
How do I get the exact pattern and step-by-step instructions?
You can easily access the full printable PDF pattern and our comprehensive video tutorial by clicking the download links at the bottom of this post!
Watch the Full Step-by-Step Video Tutorial
Prefer visual guidance? Follow along with the complete video tutorial below at your own pace: