
Overview & Design Inspiration
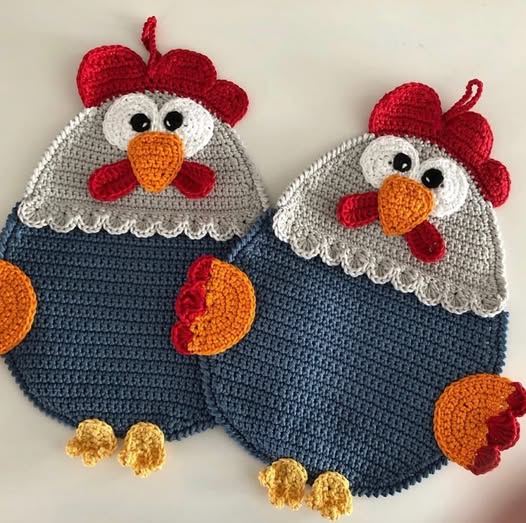
Welcome back to the studio, my fiber-loving friends! If you are looking to infuse a bit of cozy, country charm into your culinary space, I have just the project for you. The Crochet Rooster Potholder Pattern is a delightful blend of rustic style and everyday kitchen utility that will instantly brighten your hearth and home.
Featuring a classic farmhouse-inspired design complete with a vibrant comb, a textured beak, and cascading tail feathers, this cheerful project is as fun to make as it is to display. Whether you are prepping for a seasonal kitchen refresh or putting together a heartfelt housewarming gift, this adorable rooster is sure to bring a smile to your face every time you brew your morning coffee.
Materials & Recommended Supplies
Choosing the right fibers is the secret to creating a kitchen accessory that is both stunning and safe. Here is everything you need to gather before casting on:
- Yarn: Worsted weight 100% cotton yarn in light gray, dark denim blue, white, bright red, orange, yellow, and a small scrap of black for the eyes.
- Crochet Hook: 4.0 mm (G/6) hook for tight, clean stitch definition.
- Notions: Tapestry needle for weaving in ends, sharp scissors, and stitch markers.
- Extras: Optional polyester stuffing for slight dimension on the facial features, and an optional heat-resistant lining if you plan on handling scorching cookware.
Essential Techniques & Stitch Highlights
One of the absolute best parts of this pattern is how wonderfully engaging it is to stitch. You will work with foundational US crochet basics like single crochets, half double crochets, and double crochets, making it wonderfully approachable for adventurous beginners.
Instead of working everything flat in one boring piece, this design introduces you to the magic of modular crochet. You will master working in the round for facial elements, building charming textured shells for the rooster’s comb, and creating delightful picot-style chains for the tiny feet, all while keeping your stitch tension neat and consistent.
Construction & Assembly Highlights
The magic of this rooster comes together through thoughtful, modular construction. The sturdy base of the potholder begins with the main body worked in flat rows of single crochet before transitioning into gentle shaping to achieve those classic rounded shoulders and an oval base.
To ensure your potholder actually protects your hands from hot pans, you will crochet two identical body panels and seam them together along the outer edges. Once your sturdy double-layer base is ready, you will crochet the colorful facial features, comb, wattles, and tail feathers separately, pin them perfectly into place, and secure them with invisible, sturdy stitches.
Customization & Styling Ideas
Handmade decor is all about making the piece your own, and this pattern is wonderfully adaptable! Swap out the traditional gray for a soft cream to get a vintage cottagecore vibe, or play with deep burgundy and mustard tones for a gorgeous autumn kitchen aesthetic.
You can also experiment with surface slip stitches to mimic feathered layers, or scale the foundation chain up if you prefer a larger hot pad. Whip up a matching set of dishcloths or mug rugs using the same cheery color palette to give your entire kitchen a cohesive, handcrafted farmhouse look.
Pro Tips for Flawless Results
- Prioritize Cotton: Always stick with 100% cotton yarn to ensure your potholder handles heat safely and washes like a dream.
- Pin Before You Stitch: Take your time pinning the facial features, beak, and comb to the body before sewing to guarantee perfect symmetry.
- Double Up for Safety: Never skip making the second body panel; the double-layer construction is what gives your potholder true kitchen-ready insulation.
- Gentle Blocking: Lightly steam block your finished piece (avoiding high direct heat on the cotton) to smooth the edges and let your appliques settle naturally.
Frequently Asked Questions
Is this crochet rooster potholder suitable for confident beginners?
Yes, absolutely! As long as you are comfortable with basic stitches like single crochet, working in the round, and simple seaming, you will breeze right through this fun project.
Can I use acrylic yarn instead of cotton for this pattern?
We strongly recommend avoiding acrylic fiber for functional kitchen items. Acrylic yarn can soften, warp, or even melt when exposed to the high heat of hot pots and pans.
Why do we make two separate body panels for the design?
Crocheting two identical body panels and joining them together creates a thick, double-layered pad that provides essential insulation and superior durability for everyday kitchen use.