
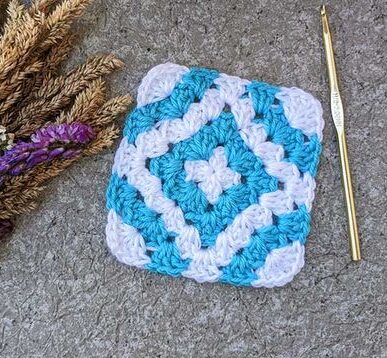
Welcome, fellow crafters! Today, we’re diving into the delightful world of the Granny Square, a true icon in the realm of crochet. This versatile motif isn’t just a pattern; it’s a creative cornerstone that has inspired countless beautiful projects for generations.
Whether you’re picking up a hook for the very first time or you’re a seasoned pro looking for a relaxing, rhythmic make, mastering the classic Granny Square is an absolute joy. It’s an essential skill that unlocks endless possibilities for creating vibrant, personalized pieces.
Introduction & Project Overview
The Granny Square is more than just a simple square; it’s a small crocheted motif that blossoms from the center outwards, worked in easy-to-learn rounds. Its charm lies in its simplicity, making it perfect for blankets, scarves, bags, or even clothing.
You’ll love how quickly these squares come together using just a few basic stitches: double crochet, chains, and slip stitches. These stitches combine to form those characteristic “clusters” that give the Granny Square its unique, textured appeal. Plus, the magic of color changes allows you to transform each square into a unique work of art!
Materials & Yarn Suggestions
Ready to gather your crafting essentials? The beauty of the Granny Square is how little you need to get started!
- Yarn: Medium-weight (worsted weight) yarn is ideal for beginners. Choose a solid color to focus on the stitches, or grab a few different shades to play with color changes right away!
- Crochet Hook: A 5mm (H/8) hook is a fantastic starting point. Feel free to adjust based on your yarn choice or personal tension – a slight difference can create a unique fabric.
- Scissors: A small pair is perfect for snipping your yarn ends.
- Tapestry Needle: This handy tool is crucial for neatly weaving in those loose ends, giving your finished squares a polished look.
These affordable, easy-to-find materials make the Granny Square a wonderful, budget-friendly project for everyone. Experienced crocheters might enjoy experimenting with different yarn fibers for new textures and effects!
Technique Breakdown & Step-by-Step Guide
Let’s grab our hooks and yarn! Building a Granny Square is all about creating clusters of stitches in rounds, expanding from a central ring. We’ll start with the heart of your square and build outward, creating those iconic corners.
First, you’ll create a foundational ring – a small loop that serves as the center of your square. Into this ring, you’ll work your very first round of double crochet clusters, separated by chain stitches, which begin to form the four corners.
As you move to the second round, you’ll build directly into those chain spaces from the previous round. The corners will continue to be formed by sets of double crochets, chains, and more double crochets into the same corner space. Between these corners, you’ll start to introduce single chain spaces and more double crochet clusters along the “sides” of your square.
Each subsequent round expands upon this idea: you’ll always place your corner stitches (cluster-chain-cluster) into the chain-2 spaces of the previous round’s corners. Along the sides, between the corners, you’ll work a cluster of double crochets into every chain-1 space, ensuring your square grows evenly and beautifully.
It’s a wonderfully rhythmic process! You’ll quickly get the hang of identifying where your clusters and chains need to go, watching your square take shape before your eyes.
Finishing, Assembly & Styling Ideas
Once your Granny Square reaches your desired size, simply snip your yarn, pull it through the loop on your hook to secure, and then use your tapestry needle to neatly weave in all those loose ends. This makes all the difference for a tidy finish!
The magic truly begins when you have a collection of squares! Join them together to create a stunning, one-of-a-kind blanket, a stylish scarf, or even a chic tote bag. Individual squares make adorable coasters or charming decorative accents.
Don’t be afraid to experiment! Try making solid-colored squares for a modern, minimalist look, or go wild with multi-colored designs for an explosion of joy. Consider a “solid Granny Square” variation for a denser fabric, or even a “circle in a square” for a fun twist on the classic.
Pro Crafter Tips
Embrace Your Tension
Everyone crochets a little differently! Your personal tension will affect the size and drape of your square. Don’t worry about being “perfect” – simply aim for a consistent tension throughout your project for a cohesive look.
Color Palette Play
Granny Squares are fantastic for using up yarn scraps! Try a monochromatic palette for elegance, or mix contrasting brights for a playful vibe. Remember, the colors you choose tell a story!
The Power of Blocking
This often-skipped step is a game-changer! Blocking your finished squares by lightly dampening and pinning them flat helps them maintain their shape and size. This is especially important if you’re joining multiple squares, ensuring they fit together beautifully for a truly professional finish.
Frequently Asked Questions
Can I use different yarn weights for Granny Squares?
Absolutely! While worsted weight is great for beginners, you can use anything from delicate lace weight for doilies to super bulky yarn for chunky blankets. Just be sure to adjust your hook size accordingly to match your yarn.
How do I change colors in my Granny Square?
To change colors, simply join the new color with a slip stitch at the end of the previous round, or in a corner space as you begin a new round. You can also join a new color right before the last yarn over of your final stitch in the old color, pulling through with the new yarn to create a seamless transition.
The Granny Square truly is a timeless pattern, offering both comforting simplicity and endless avenues for creative expression. We hope this guide inspires you to pick up your hook and start crafting your own collection of these wonderful motifs.
Happy crocheting, makers! Share your Granny Square creations with us – we can’t wait to see what you make!
Watch the Full Step-by-Step Video Tutorial
Prefer visual guidance? Follow along with the complete video tutorial below at your own pace: