
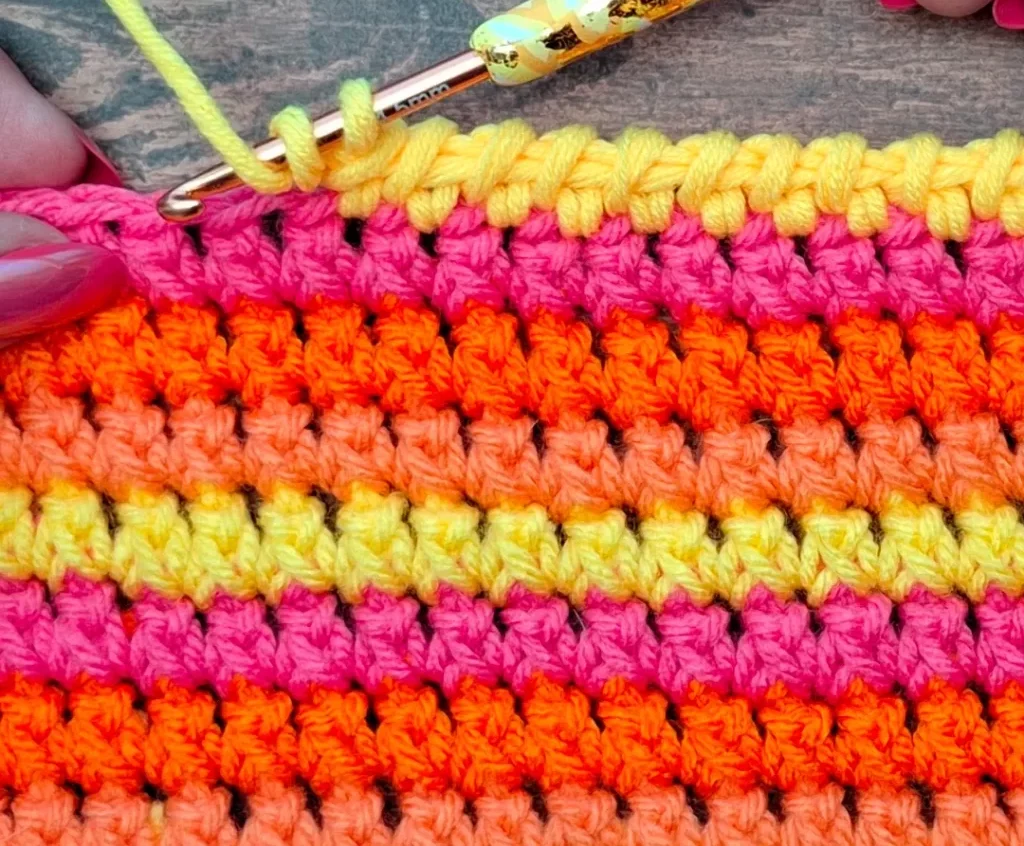
Oh, hello there, fellow crafters! Are you ready to add that coveted “designer touch” to your handmade crochet pieces? You know, that little something extra that makes a project truly unforgettable?
Today, we’re diving into the wonderful world of crochet wrap edging, a technique that promises to transform your blankets, scarves, and even home decor items from lovely to absolutely luxurious. It’s simpler than it sounds and creates the most beautiful, textured finish!
Imagine your cozy throw, your elegant shawl, or that adorable baby blanket with a delicate, raised border that speaks volumes about your craftsmanship. That’s the magic of wrap edging!
This decorative finish adds not just style, but also structure, helping your edges stay neat and preventing curling. It’s like giving your project a warm, stylish hug.
Ready to unlock this secret to polished perfection? Let’s get our hooks ready!
Materials & Yarn Suggestions
Before we begin our creative journey, let’s gather our essential supplies. Having the right tools makes all the difference for a smooth and enjoyable crafting experience.
- Yarn: Choose a yarn that beautifully complements your main project. You might opt for the same yarn for a seamless look, or pick a contrasting color or slightly different texture to make your wrap edging truly pop! Medium-weight yarn (worsted) is a fantastic choice for beginners.
- Crochet Hook: Make sure your hook size matches your chosen yarn. A 4.0mm to 5.0mm hook often works well with medium-weight yarn, but always check your yarn label for recommendations.
- Scissors: A sharp pair for clean cuts.
- Yarn Needle: Essential for weaving in those pesky ends neatly.
Starting with high-quality, easy-to-handle materials will allow you to focus on mastering the stitches, not wrestling with your supplies!
Technique Breakdown & Step-by-Step Guide
Now for the exciting part! Let’s walk through creating a beautiful crochet wrap edging. Don’t worry, I’ll guide you every step of the way.
Preparing Your Base Edge
First, we want a nice, even foundation for our special edging. This step is crucial for a professional finish.
If your project’s edge isn’t perfectly neat, start by creating a foundation row of single crochet stitches. Attach your yarn with a slip stitch in any corner of your project.
Work single crochet stitches evenly all around the edge. When you reach a corner, place three single crochets in that corner stitch to keep your work flat and prevent puckering.
Once you’ve crocheted around the entire piece, join with a slip stitch to the very first single crochet you made. This forms a clean, uniform base.
Creating the Wrap
This is where the magic happens and our signature “wrap” texture comes to life!
Chain 3, which will act as your first wrap. Then, insert your hook into the next single crochet stitch along your base.
Yarn over and pull through, as if you’re starting a regular stitch. But instead of completing it, gently wrap the yarn around the entire stitch (the one you just inserted your hook into) from front to back.
This creates that lovely, raised ridge. Repeat this wrapping motion for every single crochet stitch along your row.
You’ll quickly see that beautiful, textured border emerging! Take your time and enjoy the process.
Finishing with Flourish
Almost there! A neat finish ensures your wrap edging stays perfect for years to come.
When you reach the last stitch, simply slip stitch into the base of your initial chain 3 to join the round securely.
Cut your yarn, leaving a tail of about 6 inches. Now, thread this tail onto your yarn needle.
Carefully weave in the end along the base of your new edging. This hides the tail beautifully and locks your work in place.
And just like that, you’ve mastered the crochet wrap edging! Stand back and admire your stunning work.
Finishing, Assembly & Styling Ideas
Now that you’ve got this gorgeous edging down, how will you use it? The possibilities are endless!
Imagine it gracing the edges of a cozy baby blanket, transforming it into a cherished heirloom. Or adding a touch of sophistication to a simple scarf or shawl, making it look much more intricate.
This technique also works wonders for home decor! Think cushion covers, table runners, or even wall hangings. The textured edge instantly elevates these pieces.
Don’t be afraid to experiment with different yarn colors and textures. A contrasting color can make your edging truly pop, while a subtle variegated yarn can add playful dimension.
Pro Crafter Tips
Even seasoned crafters sometimes face little wobbles. Here are some pro tips to ensure your wrap edging is always flawless:
- Tension is Key: Aim for consistent tension throughout. If your edging feels too tight, try going up a hook size or slightly relaxing your grip. If it’s too loose, a smaller hook or a firmer grip can help.
- Even Stitch Count: An uneven base can lead to wavy edging. If you notice this, gently unpick and redistribute your single crochet stitches more evenly along the foundation row.
- Corner Cues: Remember those extra stitches in the corners of your foundation row? They’re essential for keeping your corners flat and crisp, preventing your project from pulling inward.
Frequently Asked Questions
Can I use wrap edging on any crochet project?
Absolutely! While it works beautifully on projects with straight edges like blankets and scarves, you can adapt it for intricate patterns too. Just ensure your base edge is clean and even.
What if my wrapping doesn’t look neat?
Practice makes perfect! Ensure each wrap is snug around the stitch and that your tension is consistent. Don’t be afraid to unravel a few stitches and try again – that’s how we learn!
Watch the Full Step-by-Step Video Tutorial
Prefer visual guidance? Follow along with the complete video tutorial below at your own pace: