
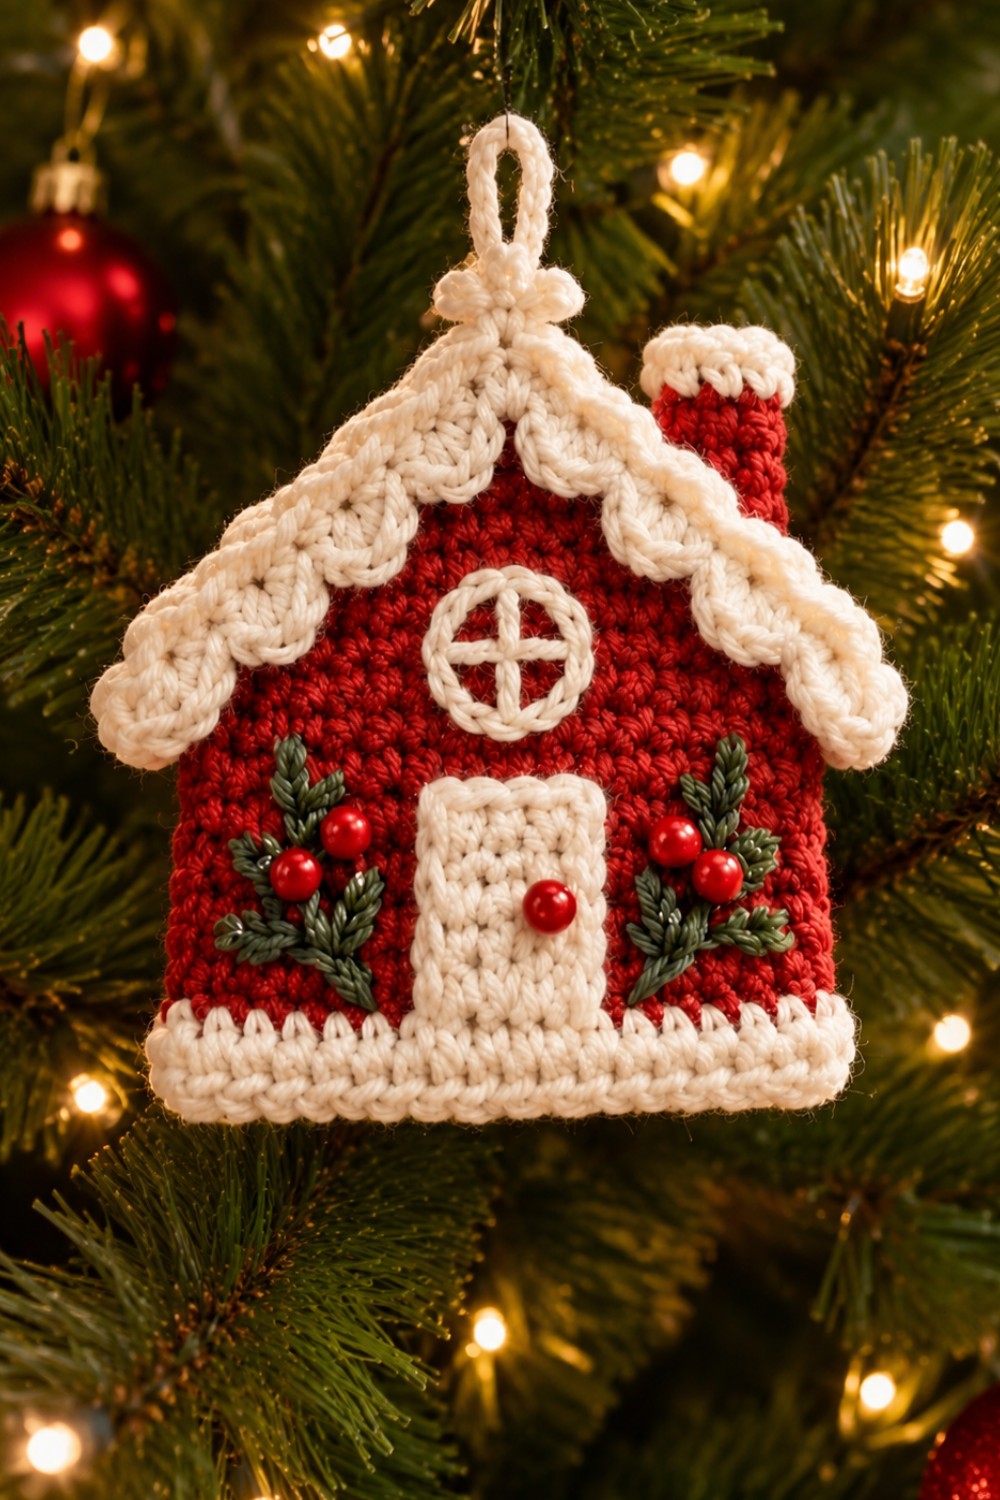
One of the most appealing features of this crochet Christmas house ornament is its combination of simplicity and elegance. The textured stitches create the appearance of a miniature gingerbread cottage, while the white roof resembles thick layers of freshly fallen snow. Small red berries, green embroidered branches, a tiny round window, and a welcoming front door give the house a cheerful personality that makes it especially attractive among traditional holiday decorations.
Whether you are an experienced crocheter or a confident beginner looking for a creative seasonal project, this handmade gingerbread house ornament is an excellent choice. It requires relatively small amounts of yarn, allows plenty of customization, and makes a thoughtful Christmas gift. In this tutorial, you will learn how to crochet a similar decorative house, assemble its individual pieces, create the snowy roof, and finish it with beautiful holiday embellishments.
Materials and Preparation for the Crochet Gingerbread House
Before beginning your crochet gingerbread house, gathering the proper materials will make the entire process smoother. This design uses basic crochet techniques, making it approachable for anyone already familiar with single crochet, increasing, decreasing, and sewing crochet pieces together.
The finished ornament measures approximately 13–15 cm (5–6 inches) tall and 11–13 cm (4.3–5.1 inches) wide, including the roof. These dimensions are approximate and may change depending on your yarn, hook size, and crochet tension.
Materials Needed
-
Worsted-weight cotton or acrylic yarn in Christmas red
-
Cream or ivory yarn for the snowy roof, door, window, and base
-
Small amount of forest-green yarn for decorative branches
-
3.5 mm (US E/4) crochet hook
-
Yarn needle for sewing and embroidery
-
Stitch markers
-
Scissors
-
Polyester fiberfill or a small piece of felt for optional structure
-
Small red decorative beads or crocheted berries
-
Strong sewing thread for attaching embellishments
Choose yarn that provides clear stitch definition, especially around the roof and window. Cotton yarn gives the ornament a firm, structured appearance, while acrylic yarn produces a slightly softer texture. Both work beautifully when paired with an appropriately sized crochet hook.
Crochet Abbreviations (US Terms)
| Abbreviation | Meaning |
|---|---|
| ch | Chain |
| sc | Single crochet |
| hdc | Half double crochet |
| dc | Double crochet |
| sl st | Slip stitch |
| inc | Increase (2 sc in one stitch) |
| dec | Single crochet decrease |
| st(s) | Stitch(es) |
| BLO | Back loop only |
| FO | Fasten off |
The main structure uses single crochet stitches worked in rows. This creates a dense, stable fabric that helps maintain the shape of the miniature house. A consistent tension is particularly important when making the front and back panels.
A sample gauge is approximately 18 single crochet stitches and 20 rows per 10 cm (4 inches). Your gauge does not need to match exactly, but both house panels should have identical measurements before assembly.
For the traditional Christmas appearance shown in the design, use deep red as the primary color and warm ivory for the roof. Alternatively, burgundy, emerald green, soft pink, or gingerbread brown can create a completely different holiday atmosphere.
Before assembling the ornament, lightly block the individual crochet pieces if necessary. This helps straighten the edges and makes sewing easier, particularly when attaching the roof to the house.
Step-by-Step Crochet Gingerbread House Pattern
The gingerbread house crochet pattern begins with two flat house-shaped panels. These panels are joined around the edges to create a slightly dimensional ornament. The roof, chimney, door, and window are worked separately and attached afterward.
Step 1: Crochet the Front House Panel
Using red yarn, begin with a foundation chain of 21 stitches.
Row 1: Work 1 sc in the second chain from the hook and in each remaining chain. You should have 20 sc.
Rows 2–20: Ch 1, turn, and work 1 sc in each stitch across. Maintain 20 stitches per row.
These rows form the rectangular portion of the house. The fabric should be firm, with straight sides and a relatively even surface.
Now begin shaping the triangular upper section that supports the roof.
Row 21: Ch 1, turn, sc2tog, sc across until 2 stitches remain, sc2tog. You should have 18 stitches.
Rows 22–29: Repeat the same decrease pattern at both ends of every row. The stitch counts will decrease to 16, 14, 12, 10, 8, 6, 4, and finally 2 stitches.
Row 30: Ch 1, turn, sc2tog. Fasten off, leaving a short tail to weave in.
You now have a panel with a rectangular bottom and a pointed triangular roofline. This shape serves as the central foundation of the ornament.
Step 2: Make the Back Panel
Repeat the instructions for the front panel using the same red yarn and hook.
Compare the two finished pieces and make sure their edges line up. If one panel is slightly larger, adjust your tension or block the pieces before sewing.
The back panel can remain plain because most of the visible decorative details will be attached to the front. However, you may also add a small embroidered snowflake or Christmas greeting if desired.
Step 3: Assemble the House Body
Place the front and back panels together with their right sides facing outward.
Using red yarn and a yarn needle, sew around the side edges, pointed top, and bottom using a neat whipstitch or mattress stitch.
Before closing the final edge, insert a very small amount of polyester fiberfill if you want the ornament to have a gently padded appearance.
Avoid overstuffing. The ornament should remain relatively flat so it can hang comfortably against the branches of a Christmas tree.
For a flatter decoration, omit the stuffing completely and place a lightweight felt insert between the panels instead.
Step 4: Crochet the Snowy Roof Panels
The white crochet roof is one of the most recognizable elements of this project. Its thick border and soft, textured appearance help create the impression of snow resting on a miniature Christmas cottage.
Using ivory yarn, chain 25.
Row 1: Work 1 sc in the second chain from the hook and in each chain across. You should have 24 sc.
Rows 2–5: Ch 1, turn, and work 1 sc across.
Fasten off and make a second identical strip.
These two strips form the sloping roof sections. Position one along each side of the triangular top so they meet near the peak and extend slightly beyond the red house walls.
To create a scalloped snowy border, join ivory yarn along the lower exposed edge of each roof strip.
Work a repeated pattern of sl st, skip 1 st, 5 dc in the next st, skip 1 st, adjusting the spacing at the end as needed.
This creates soft decorative curves that resemble layers of snow or icing. The exact number of scallops will depend on your stitch placement and roof length.
Sew the roof strips securely to the house, overlapping them slightly at the center. Add a few extra embroidery stitches along the roofline for a thicker, more textured finish.
Step 5: Crochet the Small Chimney
Using red yarn, chain 7.
Rows 1–8: Work 6 sc across each row, chaining 1 and turning between rows.
Fasten off and weave in the ends.
For the snowy chimney cap, attach ivory yarn along one short edge of the rectangle. Work one row of single crochet, followed by a row of slightly raised stitches or small bobbles.
Attach the chimney behind the right roof section so that its red body rises above the snowy roof.
The chimney should be partly hidden by the roofline, creating the charming appearance of a traditional holiday cottage.
Step 6: Create the Front Door
Using ivory yarn, chain 9.
Row 1: Work 8 sc across.
Rows 2–13: Ch 1, turn, and work 8 sc across.
Fasten off, leaving a long tail for sewing.
The door should be a small rectangle positioned at the bottom center of the front house panel.
Before attaching it, you can embroider two or three vertical lines with ivory yarn to suggest wooden door panels.
Sew the door onto the house using small, even stitches. Add a miniature red crocheted berry or a securely stitched red bead as the doorknob.
For a more dimensional effect, work one round of slip stitches around the door after attaching it.
Decorative Details and Professional Finishing Techniques
The tiny decorative elements transform a simple house-shaped crochet piece into a charming Christmas gingerbread cottage ornament. The window, greenery, berries, and snowy foundation provide the finishing touches that make the project especially festive.
Begin by creating the round window above the door. Using ivory yarn, make a magic ring and work 12 sc into the ring. Join with a slip stitch, then create a second round of 2 sc in each stitch for a total of 24 stitches.
This produces a small circular shape. Adjust the circle to your preferred size, then sew it onto the upper central portion of the house. Use ivory yarn to embroider one vertical and one horizontal line across the circle, dividing the window into four sections.
For the Christmas greenery, thread a yarn needle with forest-green yarn. Embroider small branches on both sides of the front door, using short diagonal stitches that extend outward from a central stem. The decorative sprigs should resemble pine branches or holly leaves.
Add several small red crocheted berries or decorative beads among the green stitches. If making crocheted berries, work 5 sc into a magic ring, pull the ring closed, and fasten off securely. These tiny accents create a festive contrast against the rich red house walls.
Next, create the snowy bottom border. Join ivory yarn at one lower corner and work a row of single crochet along the bottom edge, distributing approximately 20 stitches evenly. Work two additional rows, then add a slightly raised decorative edge using slip stitches or reverse single crochet.
Finally, create the hanging loop by joining ivory yarn near the roof peak. Chain approximately 18–22 stitches, depending on your preferred loop length, and slip stitch back into the attachment point. Reinforce the loop with several sewing stitches to ensure that it can support the ornament.
Tips for a Beautiful Finished Ornament
-
Maintain consistent tension: Even stitches make the house appear polished and symmetrical.
-
Use contrasting colors: Deep red and ivory create the classic Christmas appearance.
-
Secure all decorations: Embroidered details and stitched berries are preferable for ornaments accessible to children or pets.
-
Keep the stuffing light: Too much filling can distort the triangular roofline.
-
Shape the roof carefully: Position both strips before sewing to achieve balanced overhangs.
-
Finish with a gentle steam block: Light blocking can improve the shape, provided the yarn care instructions permit it.
For a more rustic look, replace the bright red walls with cinnamon-brown yarn and use white yarn for the icing details. This variation creates a more traditional gingerbread-cookie appearance while maintaining the same construction.
For a luxurious Christmas theme, add small touches of gold embroidery around the window or door. Metallic yarn can also be used sparingly along the roof edge to reflect the glow of Christmas lights.
You can even make several houses in different sizes by changing the yarn weight and hook size. A collection of miniature crochet cottages looks especially beautiful when displayed together on a Christmas tree or holiday garland.
Creative Uses, Gift Ideas, and Christmas Decorating Inspiration
The crochet gingerbread house ornament is much more versatile than a simple Christmas tree decoration. Its charming cottage shape and classic holiday colors make it suitable for numerous handmade gifts, festive displays, and seasonal craft projects.
One of the most popular ways to display this ornament is on a traditional green Christmas tree. The red walls stand out beautifully against dark evergreen branches, while the ivory roof complements warm white fairy lights. Hanging several houses at different heights creates a cozy winter-village atmosphere.
Another wonderful idea is to use these houses as handmade gift decorations. Instead of attaching a standard ribbon to a wrapped present, tie a miniature crochet cottage to the package. The recipient receives both a beautifully decorated gift and a keepsake ornament that can be enjoyed for years.
These ornaments can also be incorporated into Christmas wreaths. Attach three or four houses to a wreath decorated with pinecones, red berries, and fabric ribbons. The combination of crochet textures and natural greenery produces a welcoming holiday decoration for an entryway or living room.
For holiday craft fairs, this pattern offers an attractive option because it uses relatively small quantities of yarn. Makers can create coordinated collections in traditional Christmas red, gingerbread brown, evergreen, and soft winter pastels.
Personalization adds another layer of meaning. Small embroidered initials, the year, or a tiny heart can make each house feel unique. Matching ornament sets can become thoughtful gifts for neighbors, teachers, friends, and family members.
Another creative possibility is to make an entire crochet Christmas village. Use this house design as the starting point, then experiment with different roof colors, window shapes, chimneys, and decorative arrangements. Display the finished houses on a mantelpiece or hang them together along a festive garland.
Frequently Asked Questions
Is this crochet gingerbread house pattern suitable for beginners?
Yes. Confident beginners who understand single crochet, decreasing, and basic sewing techniques should be able to complete this project. The decorative roof and embroidery require a little patience but use manageable techniques.
How long does it take to crochet one gingerbread house ornament?
Most crocheters can complete a single ornament in approximately three to five hours. Beginners may need additional time to assemble the pieces and embroider the decorative details.
Can I use different yarn weights?
Absolutely. DK-weight yarn will produce a smaller and more delicate ornament, while bulky yarn will create a larger decoration. Adjust the hook size to maintain a firm fabric and remember that the finished measurements will change.
How do I prevent the ornament from losing its shape?
Use a slightly smaller crochet hook than usual, maintain even tension, and avoid excessive stuffing. A lightweight felt insert can provide additional support without adding significant weight.
Can I wash the finished ornament?
If the ornament contains only washable yarn and polyester stuffing, gentle handwashing may be possible. However, ornaments with beads, metallic decorations, felt inserts, or glued embellishments should generally be spot-cleaned.
Can I make the gingerbread house without a chimney?
Yes. The chimney is purely decorative and can be omitted without affecting the structure of the ornament. You may also place it on the opposite side of the roof or replace it with a miniature crocheted snowflake.
What is the best yarn for a Christmas ornament?
Cotton yarn is an excellent choice because it provides clear stitch definition and maintains its shape. Acrylic yarn is also suitable, particularly if you prefer a softer and lighter ornament.
How can I make the gingerbread house look more realistic?
Use warm ivory yarn for the icing, add textured stitches along the roof, and embroider carefully placed greenery. Subtle details such as a small chimney, an outlined window, and a raised door make the miniature cottage appear more dimensional.
Conclusion
The Crochet Gingerbread House Pattern is a delightful way to bring handmade warmth and traditional Christmas charm into your holiday decorations. With its colorful walls, snowy roof, miniature window, and festive greenery, this little cottage captures the cozy atmosphere of the season.
The project is enjoyable, customizable, and practical for using leftover yarn. Whether you create one special ornament or an entire collection of miniature Christmas houses, the finished pieces will add a meaningful handmade touch to your celebrations.
Best of all, every stitch becomes part of a decoration that can return year after year, bringing back memories of holiday crafting, thoughtful gifts, and the simple joy of creating something beautiful by hand.