
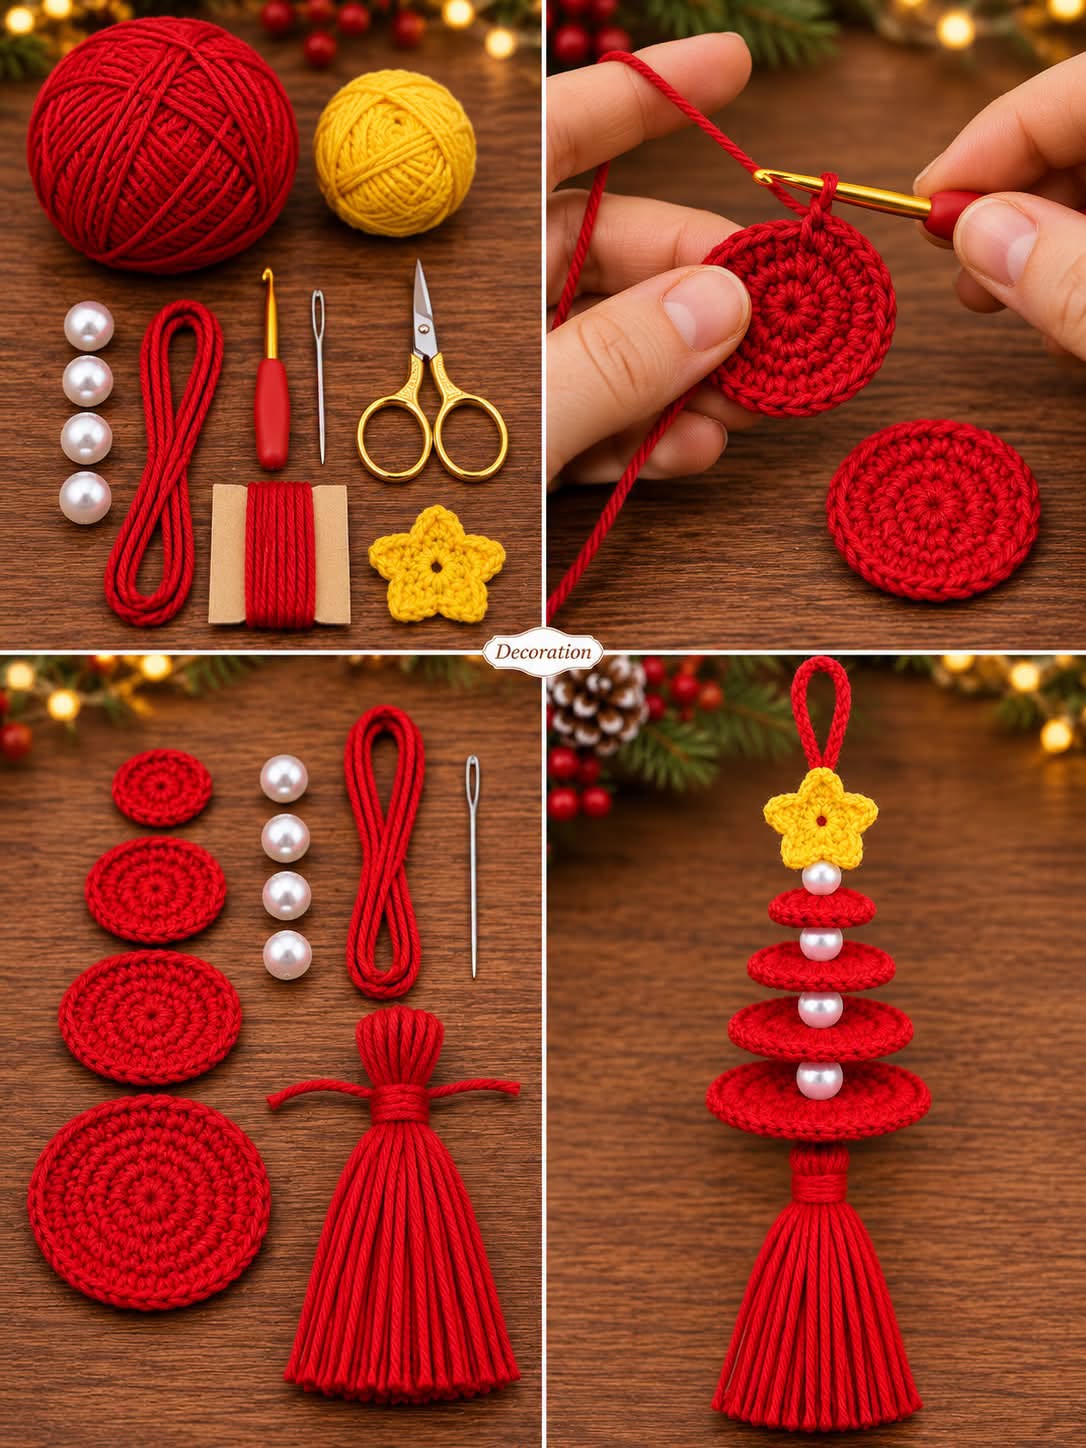
One of the most appealing features of this handmade crochet Christmas ornament is its simple yet sophisticated construction. Instead of creating a complicated three-dimensional tree, this design uses several crocheted circles in gradually increasing sizes. The circles are stacked vertically, with pearl beads separating each layer to create a floating effect. A small yellow crochet star crowns the ornament, while a matching red tassel completes the bottom. The combination of vibrant red, golden yellow, and white pearls produces a traditional Christmas color palette that looks particularly lovely against evergreen branches.
Whether you are a beginner learning basic crochet techniques or an experienced crafter searching for a quick holiday project, this easy crochet Christmas tree pattern offers an enjoyable opportunity to create something special. The design is customizable, requires relatively small amounts of yarn, and can be completed using common crochet supplies. In this detailed tutorial, you will learn how to choose the appropriate materials, crochet the circular layers, make the decorative star, assemble the ornament, and finish it professionally. You will also discover helpful techniques for adjusting the size, selecting beautiful color combinations, and creating handmade Christmas gifts.
1. Materials and Preparation for the Crochet Christmas Tree Ornament
Before beginning your crochet Christmas decoration, gather all the necessary materials and prepare a comfortable workspace. Having everything organized makes the crafting process easier, especially because this ornament includes several small pieces that will eventually be assembled into one decorative tree.
The ornament shown in the reference design consists of four red circular layers, four pearl-style beads, one yellow crochet star, a hanging loop, and a red yarn tassel. These elements work together to create a lightweight decorative ornament that can be suspended from a Christmas tree branch without weighing it down.
Materials Needed
-
Red cotton yarn, approximately 25–35 grams.
-
Golden yellow cotton yarn, approximately 5–10 grams.
-
Crochet hook, 3.0 mm or 3.5 mm.
-
Four white pearl-style beads, approximately 8–10 mm in diameter.
-
Yarn needle with a large eye.
-
Small embroidery scissors.
-
Stitch markers, optional.
-
Small piece of cardboard for creating the tassel.
-
Measuring tape.
-
Strong cotton thread or additional yarn for assembling the layers.
For the best results, choose DK or light worsted-weight cotton yarn. Cotton provides excellent stitch definition and helps the circles maintain their shape. Acrylic yarn can also be used, although the finished ornament may feel slightly softer and more flexible.
The crochet hook should be appropriate for the yarn thickness. A 3.0 mm hook creates relatively compact stitches, helping the circular pieces remain firm. If your stitches are naturally tight, a 3.5 mm hook may provide a more comfortable working experience.
Suggested Finished Measurements
| Component | Approximate size |
|---|---|
| Smallest crochet circle | 2.5 cm diameter |
| Second crochet circle | 3.5 cm diameter |
| Third crochet circle | 4.5 cm diameter |
| Largest crochet circle | 5.5–6 cm diameter |
| Yellow crochet star | 3–3.5 cm wide |
| Decorative tassel | 5–6 cm long |
| Hanging loop | 6–8 cm long |
| Complete ornament | 18–22 cm long |
These measurements are approximate and depend on yarn thickness, stitch tension, bead size, and the arrangement of the decorative elements.
Understanding the Crochet Abbreviations
The pattern uses standard US crochet terminology, which is especially helpful when following crochet instructions commonly published in the United States and Canada.
| Abbreviation | Meaning |
|---|---|
| MR | Magic Ring |
| ch | Chain |
| sl st | Slip Stitch |
| sc | Single Crochet |
| hdc | Half Double Crochet |
| dc | Double Crochet |
| tr | Treble Crochet |
| inc | Increase (2 sc in one stitch) |
| st | Stitch |
| sts | Stitches |
| FO | Fasten Off |
The majority of the circular layers are created using single crochet stitches worked in continuous rounds. This technique produces a dense, flat fabric with a neat spiral appearance.
If you are unfamiliar with the magic ring technique, practice it before beginning the ornament. A properly closed magic ring prevents an unwanted opening from appearing at the center of the circles.
2. Step-by-Step Crochet Instructions for the Circular Christmas Tree Layers
The main structure of this crochet Christmas tree ornament is made from four circles of different sizes. Each circle uses the same basic construction method, but the number of rounds increases to create the graduated shape.
Begin with the smallest circle and gradually work toward the largest. Keeping the pieces arranged in order on your table will make the final assembly considerably easier.
Step 1: Crochet the Smallest Circle
Using red yarn and a 3.0 mm crochet hook, create a magic ring.
Round 1: Work 6 sc into the magic ring. Pull the yarn tail gently to close the center. (6 sts)
Round 2: Work 2 sc into each stitch around. (12 sts)
Round 3: Repeat 1 sc in the next stitch, 2 sc in the following stitch around. (18 sts)
Fasten off and weave in the yarn ends carefully.
This small crochet circle will form the uppermost red layer of the Christmas tree ornament. It should remain flat and circular, without curling or developing noticeable waves around the edges.
Step 2: Crochet the Second Circle
Create another magic ring using the same red yarn.
Round 1: Work 6 sc into the magic ring. (6 sts)
Round 2: Work 2 sc into every stitch. (12 sts)
Round 3: Repeat 1 sc, inc around. (18 sts)
Round 4: Repeat 1 sc in each of the next 2 stitches, inc around. (24 sts)
Fasten off and secure the yarn ends.
This second circle should be slightly larger than the first. The gradual increase in size helps establish the distinctive triangular silhouette associated with a Christmas tree.
Step 3: Crochet the Third Circle
Begin another magic ring and follow the same instructions through Round 4.
Round 5: Repeat 1 sc in each of the next 3 stitches, inc around. (30 sts)
Fasten off and weave in the ends.
The third circle should have a clearly larger diameter, creating a balanced transition between the smaller upper pieces and the broad lower section.
Maintain a consistent crochet tension throughout the process. Uneven stitches can make the circles appear distorted when the ornament is assembled.
Step 4: Crochet the Largest Circle
Start the fourth and final red crochet circle.
Work Rounds 1–5 following the previous instructions.
Round 6: Repeat 1 sc in each of the next 4 stitches, inc around. (36 sts)
Round 7: Repeat 1 sc in each of the next 5 stitches, inc around. (42 sts)
Fasten off and weave in the yarn ends.
This circle will form the broadest section of the tree, positioned immediately above the decorative tassel.
If the circle begins to curl, inspect your tension and confirm that the increases have been distributed evenly. Lightly blocking the finished circles can also improve their appearance.
Step 5: Shape and Prepare the Circles
Place all four crochet circles on a flat surface, arranging them from smallest to largest.
Check that each piece is approximately centered and that the edges form an attractive progression in size.
For additional firmness, lightly dampen the circles and pin them flat on a blocking mat. Allow them to dry completely before assembly.
You can also use a small amount of fabric stiffener if you prefer a more structured ornament. Apply it sparingly to prevent the crochet pieces from becoming excessively rigid.
Step 6: Create a Decorative Edge
For a slightly more polished finish, add an optional final round of slip stitches around each circle.
Insert the hook into each stitch along the outer edge and work one slip stitch, keeping the tension relaxed.
This technique creates a subtle border that visually defines the edges without making the circles significantly larger.
For a more luxurious Christmas crochet ornament, you may use metallic gold yarn for this decorative edging.
3. How to Crochet the Star, Make the Tassel, and Assemble the Ornament
The finishing elements are what transform the individual crochet pieces into a recognizable miniature Christmas tree ornament. The star, pearl beads, hanging loop, and tassel introduce texture, elegance, and movement.
Take your time during assembly. Proper alignment is essential for creating a balanced ornament that hangs vertically rather than leaning to one side.
Step 1: Crochet the Golden Christmas Star
Using yellow yarn, create a magic ring.
Round 1: Work 10 sc into the magic ring and join with a sl st to the first sc. (10 sts)
To form the five star points, work the following sequence five times:
Ch 3, work 1 sc into the second chain from the hook, work 1 hdc into the next chain, skip the next stitch of the center ring, and sl st into the following stitch.
Fasten off, leaving a yarn tail approximately 15 cm long.
Gently stretch and shape the five points of the star using your fingers.
The finished star should be small enough to sit comfortably above the uppermost red circle without overwhelming the ornament.
Step 2: Make the Red Decorative Tassel
Cut a rectangular piece of cardboard approximately 6 cm wide.
Wrap the red yarn around the cardboard 25–35 times, depending on the desired fullness of your tassel.
Carefully slide a separate piece of yarn beneath the upper wrapped strands and tie it securely to gather the loops.
Remove the yarn bundle from the cardboard and wrap another strand of red yarn around the upper section, approximately 1 cm below the top.
Tie a secure knot and conceal the loose ends within the tassel.
Cut through the loops at the bottom using sharp scissors. Trim the strands evenly to create a smooth, professional finish.
A full, neatly trimmed tassel adds softness to the ornament and balances the circular crochet layers above it.
Step 3: Prepare the Pearl Beads
Arrange four pearl beads on your workspace.
Select beads with openings large enough to accommodate the assembling yarn or thread.
If the beads have very small holes, use strong cotton thread and a fine beading needle rather than forcing thick crochet yarn through them.
The pearls should be uniform in size to maintain balanced spacing between the crochet circles.
White pearls create a classic appearance, while gold or champagne-colored beads can introduce a more luxurious holiday aesthetic.
Step 4: Assemble the Crochet Christmas Tree
Cut approximately 45–55 cm of strong assembling thread or red yarn and thread it through a suitable needle.
Begin at the bottom by securing the upper tie of the tassel to the center underside of the largest crochet circle.
Pass the needle upward through the center of the largest circle, keeping the tassel securely attached underneath.
Thread one pearl bead onto the assembling strand, then pass the needle through the center of the third-largest crochet circle.
Continue this process by alternating a pearl bead and a progressively smaller crochet circle until all four red circles are stacked.
After the smallest circle, add the final pearl bead and then attach the yellow crochet star at the top.
The final arrangement, from top to bottom, should be:
-
Red hanging loop and yellow crochet star.
-
First pearl bead.
-
Smallest red circle.
-
Second pearl bead.
-
Second red circle.
-
Third pearl bead.
-
Third red circle.
-
Fourth pearl bead.
-
Largest red circle.
-
Red decorative tassel.
This order creates the floating, tiered appearance visible in the finished Christmas ornament.
Step 5: Make and Attach the Hanging Loop
Cut a piece of red yarn approximately 16–20 cm long.
Fold it in half and tie the ends securely, creating a hanging loop approximately 6–8 cm long.
Attach the loop to the upper center of the yellow crochet star.
Make several secure stitches through the star’s center to prevent the loop from loosening during use.
The hanging loop should be strong enough to support the entire ornament without stretching excessively.
Step 6: Adjust the Final Shape
Hold the ornament by the hanging loop and allow it to hang freely.
Carefully adjust the circles so they remain centered above one another.
Avoid pulling the assembling thread too tightly, as this can compress the beads and distort the layered tree shape.
A little flexibility between the components helps the ornament move naturally while maintaining its distinctive silhouette.
4. Creative Variations, Decorating Ideas, and Helpful Crochet Tips
One of the greatest advantages of this DIY crochet Christmas tree ornament pattern is its versatility. Once you understand the basic construction method, you can experiment with different yarns, colors, sizes, and decorative accessories.
For a traditional Christmas appearance, combine deep forest green circles with a golden star and red beads. This variation closely resembles a classic evergreen tree and looks especially attractive among warm white Christmas lights.
For a winter-inspired design, use white or ivory crochet circles with silver beads and a pale blue star. This elegant combination works beautifully with Scandinavian, snowy, and minimalist holiday decorations.
If you enjoy colorful Christmas ornaments, consider creating each circle in a different shade. Red, pink, turquoise, purple, and bright green can produce a playful rainbow effect.
A beautiful vintage variation can be achieved using cream-colored cotton yarn, antique gold beads, and a muted burgundy tassel. This combination is particularly suitable for rustic holiday decorations.
How to Customize the Ornament Size
The ornament can be made larger by adding additional rounds to each circle.
For example, increase the largest circle to eight or nine rounds while maintaining the standard six-increase pattern.
You may also add a fifth crochet circle to create a taller and fuller Christmas tree.
For smaller ornaments, work with lightweight cotton thread and a 2.0 mm crochet hook.
Miniature versions are especially useful for decorating gift packages, holiday wreaths, and small tabletop Christmas trees.
Always adjust the size of the pearl beads and the hanging loop to maintain harmonious proportions.
Using the Crochet Ornament for Christmas Decorations
These handmade Christmas tree ornaments look beautiful when displayed individually or grouped in coordinated sets.
Hang several ornaments along a staircase garland to create a charming handmade holiday display.
Attach them to wrapped presents as reusable decorative gift toppers.
You can also hang them from window frames, decorative branches, or festive wall arrangements.
Another creative option is to make a collection of matching ornaments in different colors and use them to decorate a small Christmas tree.
For handmade holiday markets, coordinated sets of three or five ornaments can make attractive seasonal craft products.
Tips for Achieving a Professional Finish
Consistent stitch tension is one of the most important factors in creating smooth crochet circles.
If the circles become too wavy, check whether you have accidentally added extra increases.
If the edges curl upward, your stitches may be too tight, or the circle may need additional increases.
Use a yarn needle to hide all loose ends securely within the crochet fabric.
When attaching the beads, make sure the assembling thread passes directly through the center of each circle.
Finally, trim the tassel with sharp scissors so the strands form a clean, even edge.
For ornaments that will be handled frequently, secure the knots with several additional stitches rather than relying on a single knot.
Caring for Your Handmade Crochet Christmas Ornaments
Proper storage helps preserve the appearance of your crochet decorations year after year.
After Christmas, inspect the ornaments for loose threads, damaged beads, or stretched hanging loops.
If cleaning is necessary, gently spot-clean the yarn using a damp cloth and a small amount of mild detergent.
Avoid pulling on the tassel or soaking decorative beads that may have delicate finishes.
Allow the ornaments to dry completely before storing them.
Place them in a clean, dry storage box, preferably separated by tissue paper to prevent tangling.
With appropriate care, these reusable handmade decorations can become treasured parts of your family’s Christmas traditions.
Frequently Asked Questions About the Crochet Christmas Tree Ornament Pattern
Is this crochet Christmas tree ornament suitable for beginners?
Yes. The design mainly uses single crochet stitches, basic increases, and simple assembly techniques. Beginners who understand magic rings and working in rounds should be able to complete the project.
How long does it take to make one ornament?
Depending on your experience, the ornament may take approximately one to two hours to complete. Experienced crocheters may finish it more quickly, especially when making several ornaments in a batch.
What is the best yarn for this project?
Cotton yarn is an excellent choice because it provides defined stitches and helps the circles maintain their shape. Light worsted or DK cotton yarn works particularly well.
Can I make this ornament without pearl beads?
Absolutely. You can replace the pearls with wooden beads, small crocheted balls, or other lightweight decorative spacers. The most important consideration is maintaining enough separation between the circular layers.
Can I use different colors for each circle?
Yes. Using different colors is an easy way to personalize the ornament. Traditional Christmas colors, pastels, metallic-inspired shades, and rainbow combinations can all produce attractive results.
How can I prevent the crochet circles from curling?
Use evenly distributed increases, maintain consistent tension, and check your stitch counts after each round. Blocking the finished circles can also help them lie flat.
Can these ornaments be used as handmade Christmas gifts?
Yes. They make thoughtful gifts for friends, family members, coworkers, and crochet enthusiasts. You can create personalized color combinations or package several ornaments together as a coordinated holiday set.
Are the pearl beads safe for decorations around small children?
Small beads may present a choking hazard if they become detached. Keep beaded ornaments out of reach of young children and pets, and inspect them regularly for loose components.
Conclusion
The Crochet Christmas Tree Ornament Pattern is a delightful holiday project that combines simple crochet techniques with an elegant decorative design. Its layered red circles, delicate yellow star, white pearl beads, and soft tassel create a charming miniature Christmas tree that brings warmth and personality to seasonal decorations.
Because this pattern requires only a small amount of yarn and uses familiar crochet stitches, it is an excellent choice for beginners and experienced crocheters alike. The individual components are easy to prepare, and the assembly process offers plenty of opportunities for creative customization.
Whether you choose classic Christmas red, sophisticated winter white, traditional evergreen, or bright modern colors, these easy handmade crochet Christmas ornaments are a wonderful way to celebrate the holiday season. Each finished piece reflects the care and creativity that make handmade decorations so meaningful, creating something beautiful to display, share, and enjoy for many Christmases to come.