
The beauty of this Christmas crochet pattern lies in its simplicity and versatility. Whether you are an experienced crocheter or a beginner looking to improve your skills, these handmade reindeer coasters offer an enjoyable opportunity to practice working in rounds, shaping decorative details, and joining small crochet pieces. The design looks especially beautiful when displayed alongside Christmas mugs, wooden tables, evergreen branches, and warm holiday decorations. Their charming appearance also makes them wonderful gifts for friends, family members, teachers, and anyone who appreciates handmade creations.
Another wonderful advantage of making crochet reindeer coasters is the opportunity to personalize every detail. You can experiment with different yarn colors, adjust the coaster dimensions, and create matching sets for your Christmas dinner table. The combination of ivory, chocolate brown, and festive red creates a timeless holiday palette that complements rustic, farmhouse, Scandinavian, and traditional Christmas decorations. In this complete tutorial, you will learn how to recreate these adorable coasters, choose suitable materials, crochet each component, assemble your decorations, and achieve a beautiful handmade finish.
1. Materials and Preparation for Crochet Christmas Reindeer Coasters
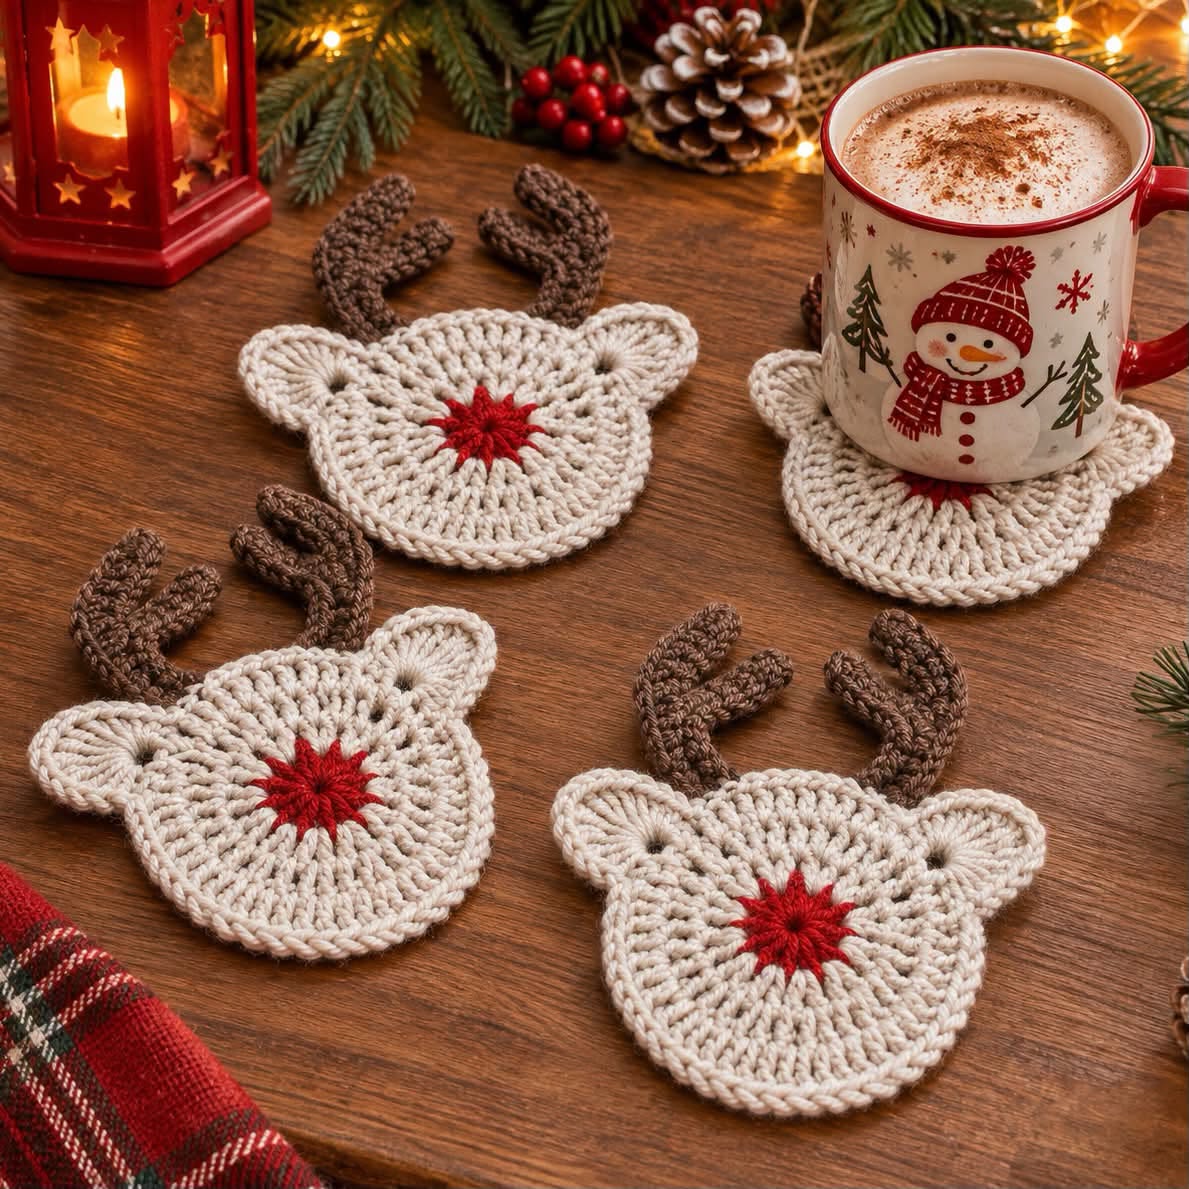
Before beginning your handmade Christmas coaster project, it is important to gather the necessary materials and understand the basic construction. The design consists of a circular or slightly oval crocheted base, two decorative ears, two curved antlers, and a red center representing the reindeer’s nose.
The coasters shown in the inspiration image feature a beautiful textured surface created with taller crochet stitches. This technique gives the fabric a slightly raised appearance while maintaining enough flexibility to sit comfortably beneath a mug. Choosing the correct yarn and hook combination is essential for achieving this effect.
Materials You Will Need
-
Worsted-weight cotton yarn in cream or ivory, approximately 25–35 g per coaster.
-
Brown cotton yarn, approximately 8–12 g per coaster.
-
Bright red cotton yarn, approximately 3–5 g per coaster.
-
4.0 mm or 4.5 mm crochet hook.
-
Yarn needle for sewing the decorative pieces.
-
Sharp scissors.
-
Stitch markers.
-
Measuring tape.
-
Blocking mat and rustproof pins, optional.
Cotton yarn is particularly suitable for crochet cup coasters because it absorbs moisture, offers good stitch definition, and generally tolerates washing better than many decorative fibers. For functional coasters, choose a firm, absorbent cotton rather than highly stretchy or fuzzy yarn.
Finished Measurements
The following measurements are approximate and depend on your yarn, hook size, and tension.
| Component | Approximate size |
|---|---|
| Reindeer face | 11–12 cm wide |
| Face height | 9–10 cm |
| Each ear | 3–4 cm |
| Each antler | 4–5 cm tall |
| Complete coaster | 13–15 cm wide |
| Complete height | 13–14 cm |
These measurements produce a coaster suitable for most standard coffee mugs and hot chocolate cups. If you prefer a larger version, add an additional round to the main base before attaching the decorative elements.
Crochet Abbreviations – US Terms
| Abbreviation | Meaning |
|---|---|
| MR | Magic Ring |
| ch | Chain |
| sl st | Slip Stitch |
| sc | Single Crochet |
| hdc | Half Double Crochet |
| dc | Double Crochet |
| tr | Treble Crochet |
| inc | Increase |
| st | Stitch |
| sts | Stitches |
| FO | Fasten Off |
The pattern uses US crochet terminology throughout. If you are familiar with British crochet instructions, remember that a US double crochet is equivalent to a UK treble crochet.
Choosing the Perfect Christmas Colors
Traditional reindeer colors are ideal for this project. Cream creates a soft, elegant base, brown adds natural contrast to the antlers, and red gives the center a cheerful Christmas accent.
You can also create more sophisticated variations using warm beige, caramel, cinnamon brown, or burgundy. For a playful holiday collection, try different nose colors while keeping the reindeer faces coordinated.
The most important preparation tip is to maintain consistent tension. Even stitches will help all your Christmas reindeer coasters look uniform when arranged together.
2. Step-by-Step Crochet Reindeer Coaster Pattern
The following instructions create a reindeer-inspired coaster based on the main features of the photograph. This is an original, simplified construction rather than an exact stitch-by-stitch transcription of the pictured work.
The coaster begins with a red circular center, followed by several rounds of cream crochet. The ears and antlers are worked separately and attached during finishing.
Step 1: Crochet the Red Nose Center
Begin with your bright red cotton yarn and a 4.0 mm crochet hook.
Round 1: Make a magic ring. Ch 2, then work 12 dc into the ring. Pull the ring closed and join with a sl st to the first dc. (12 dc)
Fasten off the red yarn, leaving a short tail for weaving.
This small red center creates the signature Rudolph-inspired Christmas nose.
For a slightly more pronounced center, use a contrasting red shade and maintain firm tension so the stitches remain close together.
Step 2: Create the Cream Circular Face
Join the cream yarn into any stitch of the red center.
Round 2: Ch 2, work 2 dc in each stitch around, and join with a sl st. (24 dc)
Round 3: Ch 2, work 1 dc in the next stitch, 2 dc in the following stitch. Repeat around and join. (36 dc)
Round 4: Ch 2, work 1 dc in each of the next 2 stitches, 2 dc in the next stitch. Repeat around and join. (48 dc)
Round 5: Ch 2, work 1 dc in each of the next 3 stitches, 2 dc in the next stitch. Repeat around and join. (60 dc)
In this pattern, the beginning ch 2 does not count as a stitch. The increases are distributed evenly to produce a flat circle.
If your work begins to curl upward, your tension may be too tight. If the coaster develops noticeable ripples, you may need a smaller hook or a more even stitch tension.
Step 3: Shape the Reindeer Face
The inspiration image features a gently rounded lower face and decorative ears positioned near the upper sides.
To create a similar appearance, flatten your circular base and identify the top and bottom edges.
Work one finishing round of sc around the circular base, placing one sc in each stitch. Join with a sl st and fasten off.
This edging reinforces the coaster and creates a tidy, defined outline.
The base should measure approximately 11–12 cm across after light blocking. If your circle is smaller, adjust your hook size or work another increase round before adding the border.
Step 4: Crochet the Reindeer Ears
The ears are essential to giving this crochet animal coaster its recognizable silhouette.
Make two identical ears using cream yarn.
Row 1: Ch 7. Starting in the second chain from the hook, work 1 sc, 1 hdc, 2 dc, 1 hdc, and 1 sc.
Continue around the opposite side of the foundation chain, working 1 sc, 1 hdc, 2 dc, 1 hdc, and 1 sc.
Join with a sl st, then fasten off, leaving a long sewing tail.
This creates a small elongated oval. Pinch one end gently when attaching it to the coaster to achieve a subtle ear shape.
For a more prominent ear, work an additional round of sc around the oval, placing extra stitches near the rounded outer tip if needed to keep the edge smooth.
Step 5: Crochet the Brown Antlers
The brown antlers add personality and dimension to the Christmas design.
Each antler is worked as a narrow main stem with two shorter branches.
Start with brown yarn.
Main stem: Ch 12. Starting in the second chain from the hook, work 1 sc in each chain across. (11 sc)
Ch 1, turn, and work 1 sc in each stitch across. Repeat once more to create a sturdy strip.
For the first branch, attach brown yarn approximately four stitches from the upper end of the stem. Ch 5, then work 1 sl st in the second chain from the hook and 1 sc in each remaining chain.
Secure the branch back to the main stem.
For the second branch, attach yarn approximately seven stitches from the upper end. Ch 4 and return along the chain with 1 sl st followed by 1 sc in each remaining chain.
Fasten off and weave in the ends securely.
Make a second antler, arranging the branches in the opposite direction so the pair looks balanced.
These antlers create a simple, flat silhouette suitable for a coaster. If you want extra texture, work a row of sc along the antler edges before assembly.
Step 6: Assemble the Reindeer
Lay the cream circular base on a flat surface with the red center facing upward.
Position one ear at the upper-left edge and the other at the upper-right edge. Place the brown antlers slightly inward from the ears.
Use stitch markers or pins to hold the components in their desired positions.
Thread the long yarn tails through a yarn needle and sew each component securely to the back or outer edge of the coaster.
Keep the attachment stitches discreet so they do not interfere with the attractive front surface.
The finished project should resemble a cheerful reindeer face with a bright red nose, rounded cream ears, and two rustic brown antlers.
3. Finishing Techniques, Decorations, and Creative Variations
Once all the components are attached, the next step is to refine the overall appearance of your Christmas crochet coaster set. Small finishing details can make a significant difference, especially if you plan to give these handmade pieces as gifts.
Begin by examining the circular base. Make sure it sits flat and that the stitches appear evenly distributed. If necessary, gently reshape the fabric with your hands before blocking.
Blocking Your Crochet Coasters
Blocking helps improve the shape and definition of the finished piece.
Lightly dampen the coaster with clean water and place it on a blocking mat or a towel-covered flat surface.
Adjust the circular face, ears, and antlers until they are symmetrical. Pin the outer edges if necessary, taking care not to stretch the stitches excessively.
Allow the piece to dry completely before removing the pins.
This technique is particularly useful when making several coasters because it helps maintain a consistent appearance throughout the set.
Creating a Beautiful Matching Set
A single crochet reindeer coaster is charming, but a collection of four or six makes an especially lovely Christmas table decoration.
You can create matching sets using identical colors or introduce subtle variations.
For example, one coaster could feature a traditional bright red nose, while another could use a deeper cranberry shade.
The antlers can also be made in different shades of brown, ranging from soft caramel to dark chocolate.
Keeping the cream base consistent will help the entire collection look coordinated.
Adding Decorative Borders
For a more defined finish, consider adding a decorative border around the main face before attaching the ears and antlers.
A simple round of slip stitches creates a neat, understated edge.
Alternatively, a round of reverse single crochet, sometimes called the crab stitch, produces a slightly twisted, rope-like border.
Choose a cream or ivory yarn that matches the base for an elegant appearance.
Avoid adding excessive thickness around the bottom of the coaster because a flat surface is important for supporting mugs securely.
Making the Reindeer More Festive
If you plan to use the finished pieces primarily as decorations rather than functional coasters, you can add more creative details.
Tiny embroidered eyes can give each reindeer a cheerful personality.
You could also attach a small crochet bow near one ear or introduce a festive green border.
For functional coasters, however, keep embellishments flat and away from the area where the mug rests.
Raised decorations, buttons, beads, and bulky appliqués can make a cup unstable.
Handmade Christmas Gift Ideas
These crochet Christmas decorations make thoughtful seasonal presents because they are practical, attractive, and easy to personalize.
A set of four coasters paired with a festive mug can become a beautiful handmade gift.
You could also combine them with hot chocolate packets, tea sachets, or homemade holiday treats.
Wrap the coasters together with cotton ribbon and a small handwritten gift tag for a simple, rustic presentation.
Because the pattern uses relatively small quantities of yarn, it is also an excellent project for using leftover materials from larger crochet creations.
4. Tips for Beginners, Care Instructions, and Holiday Styling
One of the most appealing characteristics of this easy Christmas crochet pattern is that it can be adapted to different skill levels. Beginners can work with the basic circular construction, while more experienced crocheters can experiment with textured stitches and advanced shaping techniques.
If this is your first time making crochet coasters, begin with one practice piece. Focus on achieving even tension and understanding how increases affect the shape of the fabric.
Common Crochet Mistakes to Avoid
An uneven circular base is one of the most common challenges when crocheting flat rounds.
If you accidentally skip an increase, the coaster may begin to form a shallow bowl instead of remaining flat.
If you add too many increases, the outer edge may become wavy.
Count your stitches at the end of every round and compare the total with the instructions.
Another common issue is attaching the antlers at different heights. To avoid this, place both pieces on the coaster before sewing either one permanently.
Careful positioning will create a more balanced and professional-looking result.
Choosing Cotton for Practical Coasters
Cotton is generally an excellent choice for handmade crochet coasters because it absorbs condensation and provides a comfortable fabric surface.
Choose smooth, tightly spun cotton yarn whenever possible.
Very loose stitches may create large gaps, while excessively bulky yarn can produce an uneven surface beneath your cup.
For hot mugs, use heat-appropriate cotton yarn and ensure the finished fabric is sufficiently dense and stable.
Crocheted cotton coasters are not substitutes for heat-resistant trivets and should not be used beneath cookware or extremely hot dishes.
Washing and Maintaining Your Coasters
Proper care will help your Christmas coasters retain their shape and color for many holiday seasons.
Check the yarn manufacturer’s washing recommendations before cleaning.
For most washable cotton yarns, gentle washing in cool or lukewarm water is appropriate.
Use mild detergent and avoid harsh bleaching agents that could affect the red and brown colors.
After washing, gently press out excess moisture without twisting the fabric.
Lay each coaster flat, reshape the ears and antlers, and allow it to dry naturally.
Avoid exposing the finished pieces to excessive heat unless the yarn care instructions specifically allow it.
Decorating Your Christmas Coffee Table
The reindeer design looks especially inviting when incorporated into a cozy holiday setting.
Arrange your coasters on a wooden coffee table with evergreen branches, pinecones, and warm Christmas lights.
Pair them with ceramic mugs featuring snowflakes, snowmen, or traditional seasonal illustrations.
The cream-colored crochet base creates a beautiful contrast against natural wood, while the brown antlers complement rustic holiday decorations.
A red plaid table runner or napkin can tie the entire arrangement together.
For a minimalist Christmas display, use plain white mugs and simple evergreen decorations instead.
Selling Handmade Crochet Reindeer Coasters
If you enjoy making handmade items, this project can also become part of a seasonal craft collection.
Customers who appreciate festive home accessories may enjoy purchasing coordinating coaster sets.
Consider preparing packages of two, four, or six coasters in attractive holiday color combinations.
When estimating a selling price, include the cost of yarn, packaging, your time, and any selling fees.
Photograph your pieces in natural light so potential buyers can clearly see the stitch texture, decorative antlers, and bright red center.
Consistent measurements, secure stitching, and neat finishing are particularly important when creating items for sale.
Frequently Asked Questions About Crochet Reindeer Coasters
Are these crochet Christmas reindeer coasters suitable for beginners?
Yes. The project uses basic stitches such as single crochet, half double crochet, double crochet, chains, and slip stitches. Beginners who already know how to work in rounds should find the construction manageable.
What is the best yarn for crochet coasters?
Medium-weight cotton yarn is a practical choice because it is absorbent, durable, and offers clear stitch definition. Avoid yarns that melt under heat or become excessively fuzzy with regular use.
How long does it take to make one reindeer coaster?
Depending on experience and the amount of finishing involved, one coaster may take approximately 45–90 minutes. Beginners may need additional time to shape the antlers and attach the decorative parts.
Can I make these coasters larger?
Yes. You can increase the size by adding another evenly increased round to the main base. Keep the finished coaster flat and adjust the ears and antlers proportionally if needed.
Can I use acrylic yarn instead of cotton?
Acrylic yarn can be used for decorative versions, but cotton is generally a better choice for functional coasters. Acrylic is less absorbent and can soften or melt when exposed to excessive heat.
How many coasters should I make for a Christmas gift set?
Sets of four or six are practical for household use. A smaller set of two can also be a charming gift when paired with festive mugs or a hot chocolate gift basket.
Can I wash my crochet reindeer coasters in a washing machine?
That depends on the yarn label and how securely the decorative pieces are attached. Gentle handwashing is a cautious choice for preserving the ears, antlers, and overall shape.
How can I prevent the antlers from curling?
Use firm stitch tension, weave in the ends carefully, and block the completed antlers before or after attachment. Working a narrow second row along the stem can also improve stability.
Conclusion
Making Crochet Christmas Reindeer Coasters is a delightful way to combine creativity, seasonal decorating, and practical handmade craftsmanship. With their soft cream faces, textured brown antlers, and cheerful red noses, these adorable accessories capture the welcoming atmosphere of Christmas while adding personality to any holiday table.
The pattern offers plenty of opportunities for personalization, making it suitable for beginners who enjoy simple projects and experienced crocheters who love experimenting with new details. Whether you make a single coaster for your favorite mug or an entire coordinated set for holiday gatherings, each finished reindeer brings a special handmade touch to your home.
Most importantly, these DIY crochet Christmas coasters celebrate the joy of creating something meaningful with your own hands. With a few basic materials, thoughtful color choices, and careful finishing, you can transform ordinary cotton yarn into beautiful seasonal decorations that can be enjoyed, gifted, and treasured throughout many Christmas celebrations.