
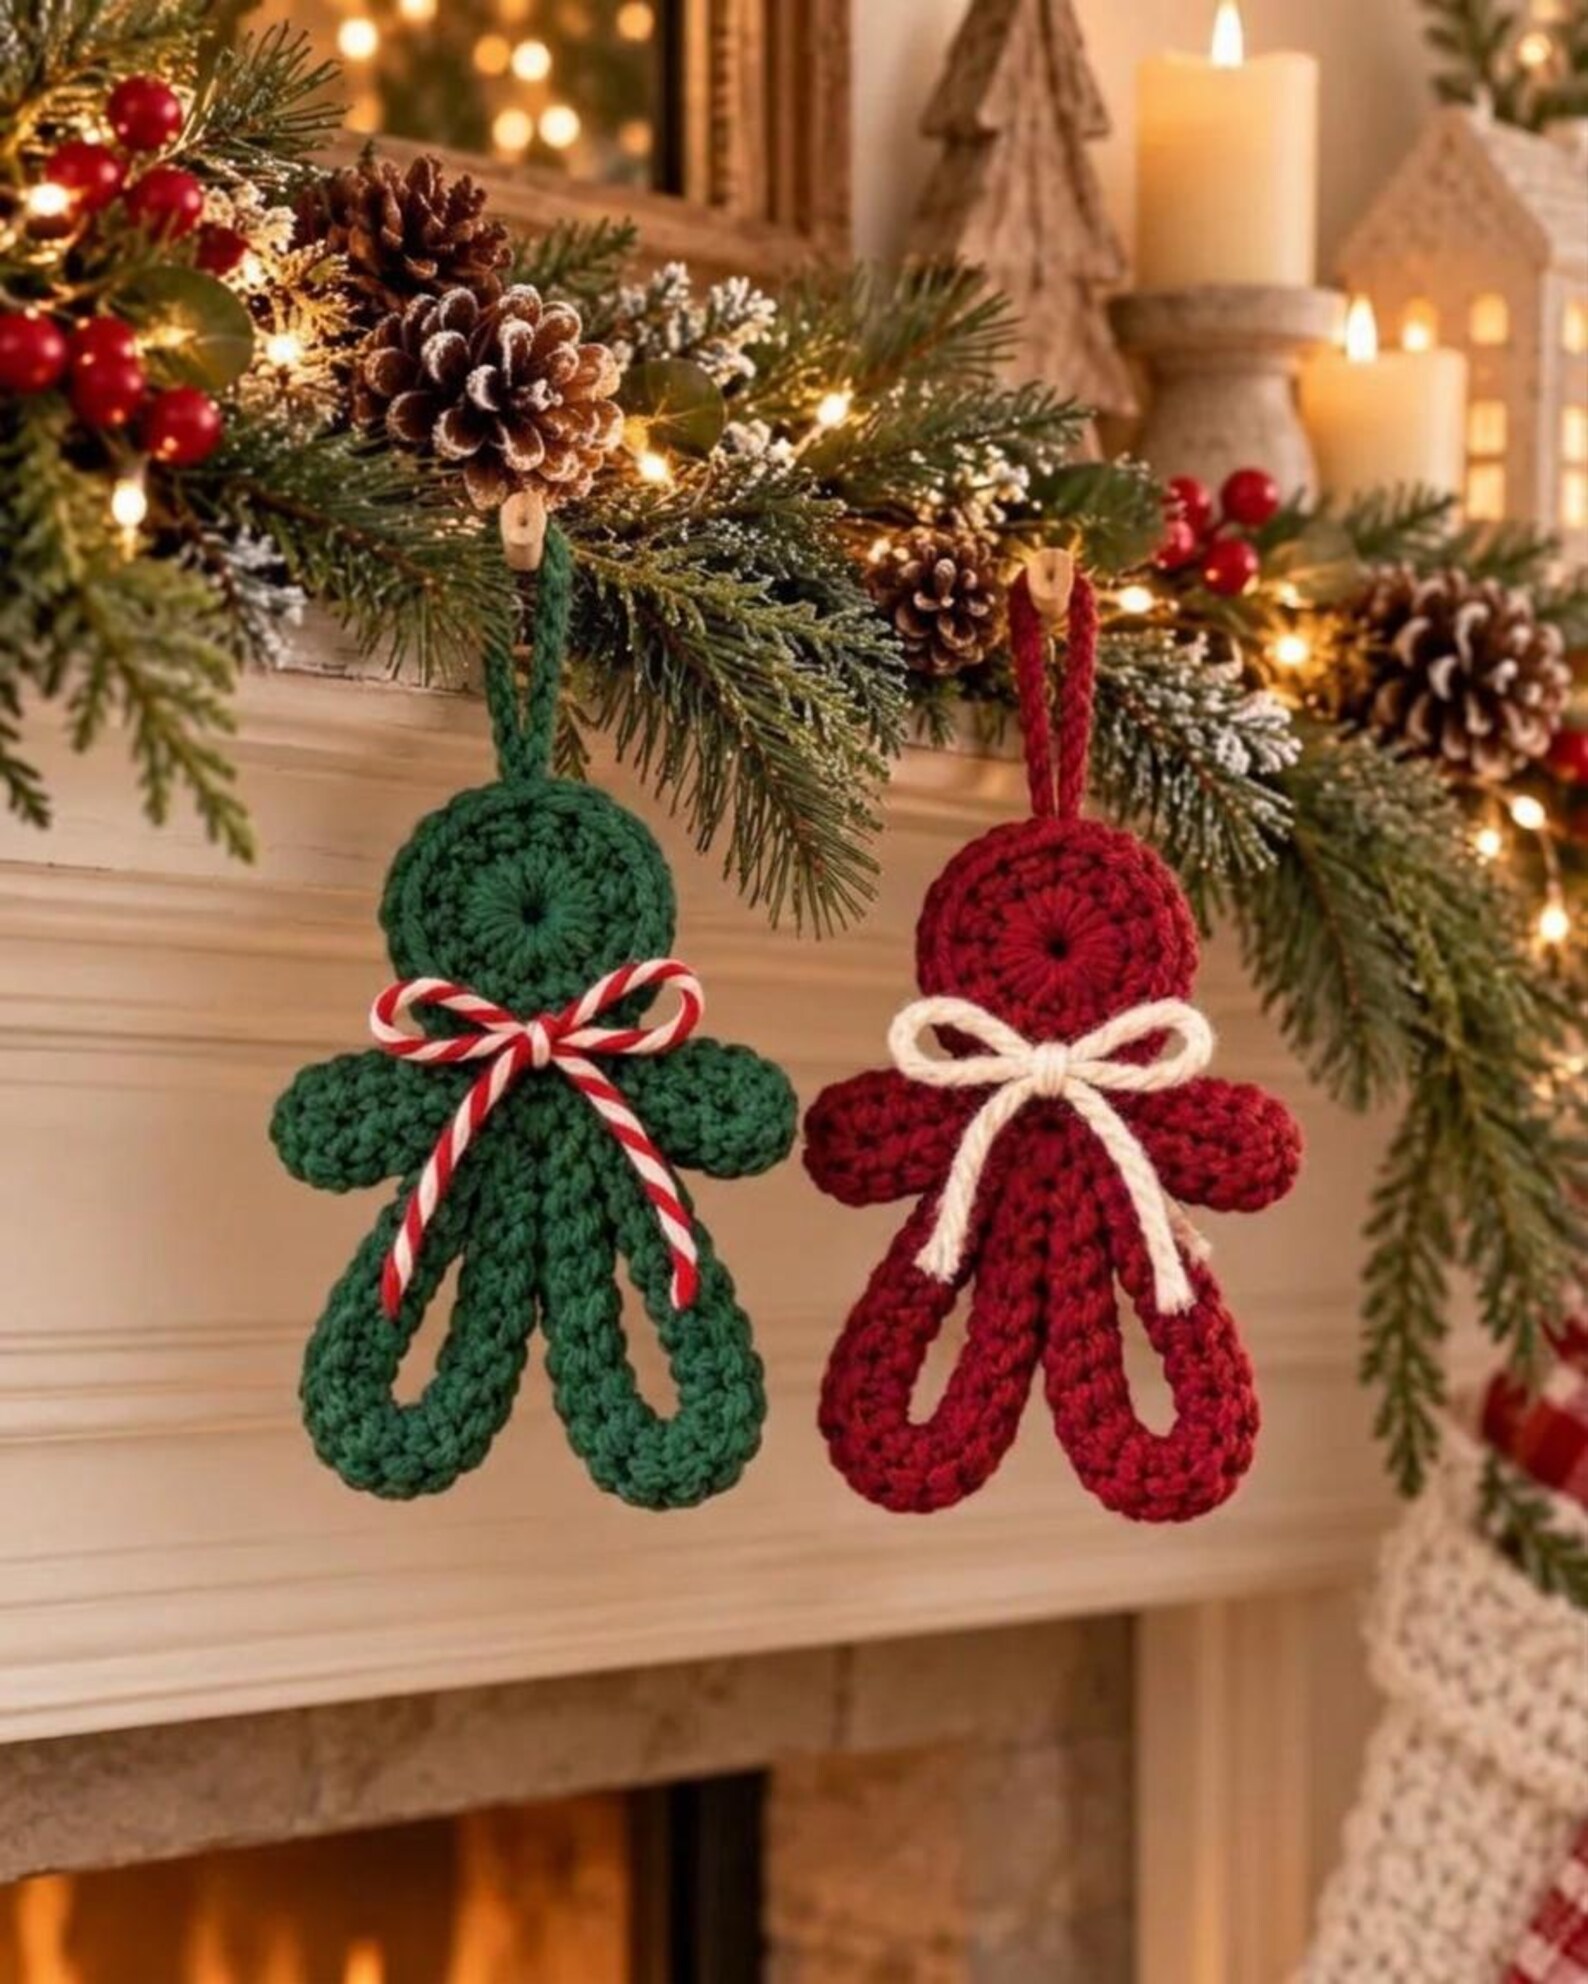
The combination of deep forest green and rich Christmas red makes these ornaments especially attractive against evergreen branches, snowy garlands, and warm golden lights. Their simple construction also makes them a wonderful project for crocheters who enjoy creating small seasonal decorations. Each ornament can be customized with different yarn colors, hanging loops, and ribbon details to complement almost any Christmas decorating theme.
One of the most appealing features of this handmade crochet ornament pattern is its versatility. These little figures can decorate Christmas trees, fireplace mantels, holiday wreaths, wrapped gifts, and festive table arrangements. They also make thoughtful homemade presents for friends, relatives, and neighbors. In this tutorial, you will learn how to create your own version using basic crochet techniques, practical measurements, and an easy-to-follow assembly method.
1. Materials and Preparation for Crochet Christmas Ornaments
Before starting this charming Christmas crochet project, gather your materials and decide which colors you want to use. The ornaments pictured feature traditional red and green yarn with contrasting bows, but the design works equally well in cream, burgundy, gold, and other holiday-inspired combinations.
For a soft and attractive finish, choose a medium-weight cotton or acrylic yarn. Cotton provides excellent stitch definition, while acrylic offers softness, flexibility, and affordability. Both are suitable for making decorative ornaments that will be used year after year.
Materials needed:
-
Worsted-weight yarn (Category 4) in forest green and Christmas red
-
Small amounts of white and contrasting yarn for bows
-
3.5 mm or 4.0 mm crochet hook
-
Yarn needle for sewing and weaving in ends
-
Stitch markers
-
Sharp scissors
-
Measuring tape
-
Optional polyester fiberfill for a slightly raised head
-
Optional decorative ribbon or cotton cord
The finished ornament will measure approximately 15–18 cm (6–7 inches) from the top of the head to the bottom of the legs, excluding the hanging loop. Exact measurements depend on yarn thickness, hook size, and individual crochet tension.
This project uses common US crochet terminology, including chain (ch), slip stitch (sl st), single crochet (sc), half double crochet (hdc), double crochet (dc), and single crochet increase (inc). An increase means working two single crochet stitches into the same stitch.
For the best results, maintain even tension throughout the project. The circular head should remain fairly firm, while the arms and legs can be slightly flexible. You can make a practice circle before beginning the complete ornament to become comfortable with the stitches.
The pattern below uses a flat circular head, short crocheted arms, a narrow central body, and two elongated loop-shaped legs. This creates an ornament inspired by the reference design while remaining approachable for confident beginners.
2. Step-by-Step Crochet Christmas Ornament Pattern
Begin by crocheting the head, which serves as the main structural feature of the ornament. Use forest green yarn for the first figure and Christmas red for the second. The instructions remain the same for both versions, allowing you to create a matching set.
Step 1: Crochet the circular head
Make a magic ring and work the following rounds. Join each round with a slip stitch when using the joined-round method.
-
Round 1: Work 12 dc into the magic ring. (12 stitches)
-
Round 2: Ch 2, work 2 dc in every stitch around. (24 stitches)
-
Round 3: Ch 2, repeat 1 dc, 2 dc in the next stitch around. (36 stitches)
-
Round 4: Ch 1, work 1 sc in every stitch around. (36 stitches)
The beginning chains do not count as stitches. Join each round to the first actual stitch. Fasten off, leaving a long tail for assembly. The head should form a compact circle approximately 5–6 cm in diameter.
Step 2: Make the small arms
The arms are short, rounded crochet tubes that extend horizontally from the upper body.
Ch 9, then join with a slip stitch to form a ring, taking care not to twist the chain. Work 1 sc in each chain around for approximately 6 rounds, making a small tube. Fasten off, leaving a tail for sewing.
Make two identical arms for each ornament. For a fuller appearance, gently flatten the tubes or place a very small amount of stuffing inside before attaching them. Keep both arms the same length to maintain the symmetrical shape.
Step 3: Crochet the central body
Create a narrow body section that will connect the head, arms, and legs.
Ch 7. Beginning in the second chain from the hook, work 6 sc. Ch 1 and turn. Continue working 6 sc across for 8–10 rows, or until the body measures approximately 5 cm in length.
Fasten off and weave in the starting tail. This compact rectangular body will sit behind the circular head and provide a stable foundation for attaching the decorative limbs.
Step 4: Create the loop-shaped legs
The legs give these crochet Christmas decorations their distinctive elongated silhouette. Each leg is formed from a narrow crocheted strip folded into a rounded loop.
Ch 31. Beginning in the second chain from the hook, work 30 sc. Ch 1, turn, and work another 30 sc across. Repeat for one additional row to create a sturdy strip.
Fold the strip so that both short ends meet, creating a long oval loop. Sew the ends together securely. Repeat to make the second leg, ensuring both loops are approximately the same size.
Step 5: Assemble the ornament
Place the central body vertically on a flat surface. Position the head over the upper end of the body, allowing the lower portion of the head to overlap the body slightly.
Sew the arms to the left and right sides of the upper body. Attach the two folded leg loops along the bottom, positioning them evenly so they hang naturally.
Secure all connections with multiple stitches, especially where the legs meet the body. The ornament should remain balanced when lifted from the top. Adjust the pieces before tightening your final stitches.
Step 6: Make the hanging loop
Ch 30 using the same yarn color as the ornament. Join the ends with a slip stitch and fasten off, leaving a sewing tail.
Fold the chain loop in half and attach its ends securely to the back of the head. The finished hanging loop should be approximately 6–8 cm long when flattened.
Before decorating, lift the ornament by its hanging loop to check its balance. If the figure tilts to one side, reposition the loop slightly toward the center.
3. Decorating and Personalizing Your Handmade Christmas Ornaments
Once the main crochet pieces are assembled, the decorative details transform a simple handmade figure into a beautiful Christmas tree ornament. In the reference design, the bows are the most noticeable embellishments, adding contrast and a traditional holiday appearance.
For the green ornament, use a twisted red-and-white cord or two strands of contrasting yarn held together. Wrap the cord around the neck area and tie it into a neat bow. Leave the ends hanging naturally over the body.
For the red ornament, use cream or white yarn to create a softer bow. A simple cotton cord works particularly well because its smooth texture contrasts nicely with the thicker crochet stitches. Keep the loops symmetrical for a polished appearance.
You can also experiment with classic Christmas color combinations. Forest green with gold creates an elegant traditional look, while burgundy with cream brings a vintage farmhouse feeling. White with silver is ideal for winter-inspired decorations, and red with green offers a timeless festive style.
If you enjoy additional details, consider adding small embroidered accents or tiny crochet buttons. However, the minimalist appearance of these ornaments is part of their charm, so avoid overcrowding them with embellishments that hide the original crochet texture.
For a more rustic presentation, decorate the ornaments with natural cotton twine, small wooden beads, or a narrow plaid ribbon. Keep all embellishments securely attached, particularly if the ornaments will be displayed in homes with children or pets.
An optional finishing technique is light steam blocking. Hold a garment steamer a safe distance above the crochet pieces and gently shape the arms and legs with your fingers after the yarn has cooled. Always check your yarn label first, since excessive heat can damage acrylic fibers.
These handmade ornaments look especially beautiful when displayed in pairs. Hang a red and green figure close together on the Christmas tree, or use matching sets throughout a festive garland. Repeating the same shape in different colors creates a coordinated holiday theme without making every decoration identical.
4. Creative Ways to Use and Care for Crochet Christmas Decorations
The beauty of these DIY crochet Christmas ornaments extends beyond the Christmas tree. Their lightweight construction makes them suitable for many holiday arrangements, and their handmade appearance adds warmth to both traditional and modern homes.
One lovely decorating idea is to hang them from a fireplace mantel garland. Combine evergreen branches, pinecones, red berries, and warm white lights, then position the ornaments at slightly different heights. This arrangement highlights their shape and creates a cozy seasonal atmosphere.
Another attractive option is to use the ornaments as reusable gift decorations. Attach one to a wrapped present with cotton twine or satin ribbon. After opening the gift, the recipient can keep the crocheted figure as a Christmas decoration for future holidays.
You can also create a beautiful handmade Christmas ornament collection by experimenting with different sizes. Use thinner yarn and a smaller hook for miniature ornaments, or choose bulky yarn and a larger hook for oversized versions. Maintain the same proportions so the finished pieces look like members of a coordinated set.
For holiday craft fairs or handmade gift baskets, arrange several ornaments in complementary colors. A set of four or six figures makes an appealing seasonal gift. You can include a small handmade tag explaining that each ornament was individually crocheted.
Proper storage will help preserve the ornaments for many years. After Christmas, remove them carefully from the tree and inspect the hanging loops and decorative bows. Repair loose stitches before storing them.
Place the ornaments inside a clean, dry storage box with tissue paper between the pieces. Avoid compressing them beneath heavy decorations, as this can flatten their crocheted details or distort the loop-shaped legs.
If an ornament becomes dusty, gently shake it or brush it with a soft, clean cloth. For washable yarn, carefully hand-wash using cool water and mild detergent, provided all embellishments are also washable. Reshape the ornament and allow it to air-dry completely before storing or displaying it again.
Handmade decorations are also a wonderful way to establish family traditions. Crocheting a new ornament each Christmas allows you to build a personal collection over time. Different colors can represent particular years, special occasions, or memorable family celebrations.
Frequently Asked Questions About Crochet Christmas Ornaments
Are these crochet Christmas ornaments suitable for beginners?
Yes. The project primarily uses basic crochet stitches, simple rectangles, circular rounds, and straightforward sewing techniques. Beginners who are comfortable with single crochet, double crochet, and slip stitches should be able to complete the design.
What is the best yarn for making Christmas tree ornaments?
Medium-weight cotton yarn is an excellent choice because it provides clear stitch definition and helps the ornaments maintain their shape. Acrylic yarn also works well, particularly for soft, lightweight holiday decorations.
How long does it take to crochet one ornament?
A crocheter familiar with the basic stitches may complete one ornament in approximately 1–2 hours. Beginners may need additional time for shaping, sewing, and attaching the decorative bow.
Can I make these ornaments without stuffing?
Absolutely. The pattern is designed primarily with flat and lightly dimensional crochet pieces, so stuffing is optional. Leaving the pieces unstuffed creates lightweight decorations that are easy to hang.
How can I make smaller Christmas ornaments?
Use a lighter yarn weight and a smaller crochet hook. You can also reduce the number of rounds in the head and shorten the chains used for the arms, legs, and hanging loop. Adjust all parts proportionally.
Can I use these crochet ornaments for Christmas gifts?
Yes. These ornaments are excellent handmade gifts, especially when presented as matching sets. They can also decorate gift packages, holiday stockings, and Christmas baskets.
How do I prevent the ornaments from stretching?
Use a hook that creates firm, even stitches, and avoid excessively loose tension. Reinforce the hanging loop securely and store the ornaments flat when they are not being displayed.
Can I customize the colors for different Christmas themes?
Definitely. Traditional red and green are popular choices, but cream, champagne, gold, silver, burgundy, and soft pink can create equally beautiful results. Select colors that coordinate with your holiday decorations.
Conclusion
Creating your own crochet Christmas gingerbread-inspired ornaments is a delightful way to add handmade charm to the holiday season. Their rounded heads, cheerful bows, loop-shaped legs, and rich traditional colors make them attractive decorations for Christmas trees, garlands, gift packages, and fireplace mantels.
This project combines approachable crochet techniques with endless opportunities for customization. By changing the yarn colors, decorative cords, or finished sizes, you can create an entire collection of unique ornaments while following the same basic construction method.
Whether you make them as gifts, seasonal craft projects, or treasured additions to your own Christmas decorations, these easy handmade crochet ornaments offer a beautiful reminder that some of the most meaningful holiday details are created by hand.