
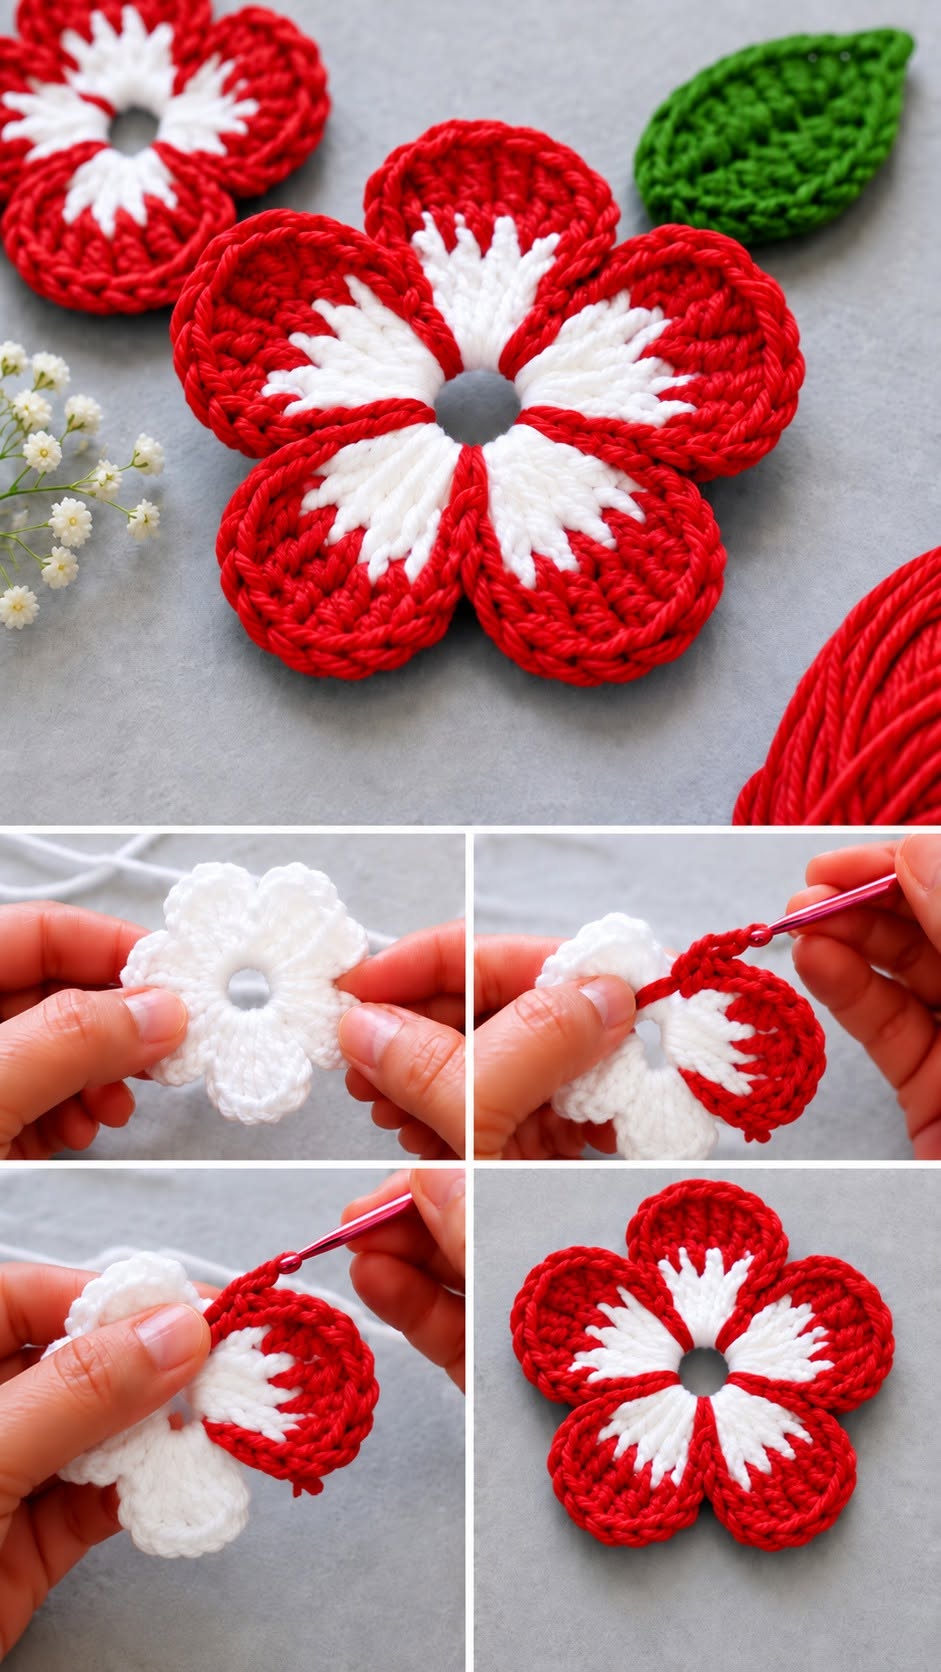
One of the most appealing features of this crochet flower tutorial is its dimensional appearance. Instead of looking like a completely flat flower, the petals have a softly raised texture, making the finished piece appear fuller and more realistic. The white center blends naturally into the red outer petals, creating a beautiful contrast that highlights each stitch. Even though the design looks detailed, it can be recreated using familiar crochet techniques, making it a satisfying project for crocheters who enjoy experimenting with decorative motifs.
Whether you are an experienced crocheter looking for a quick creative project or a beginner interested in learning how to make decorative flowers, this easy crochet flower pattern offers plenty of possibilities.
You can make individual flowers for embellishments, combine several into a decorative arrangement, attach them to bags and hats, or use them to create colorful seasonal decorations. In this tutorial, you will learn how to choose your materials, construct the flower center, create five matching petals, add the beautiful red edging, and finish your handmade flower neatly.
Materials and Supplies for the Red and White Crochet Flower
The first step toward creating a beautiful handmade crochet flower is choosing materials that provide good stitch definition. Because this pattern features textured petals and visible color transitions, a smooth yarn is particularly helpful. Cotton yarn is an excellent option for making flowers that retain their shape, while acrylic yarn produces a slightly softer and more flexible result.
For the flower shown in the inspiration image, bright red and pure white yarn create a dramatic combination. The red gives the petals their cheerful appearance, while the white highlights the inner portion of each petal. You can also add small green crocheted leaves to create a more natural floral arrangement, especially when using the flowers for home decoration.
Materials Needed
-
Medium-weight cotton or acrylic yarn in bright red
-
Medium-weight yarn in white
-
Small amount of green yarn for optional leaves
-
3.5 mm or 4.0 mm crochet hook
-
Yarn needle for weaving in ends
-
Sharp scissors
-
Stitch markers (optional)
-
Measuring tape
-
Fabric stiffener (optional, for decorative applications)
The amount of yarn needed is relatively small. Approximately 15–20 grams of red yarn and 8–12 grams of white yarn should be sufficient for one medium-sized flower, depending on the yarn thickness, hook size, and stitch tension. This makes the pattern particularly useful for using leftover yarn from larger crochet projects.
Finished Flower Measurements
With medium-weight yarn and a 3.5 mm crochet hook, the suggested flower should measure approximately:
| Part | Approximate size |
|---|---|
| Overall flower diameter | 10–12 cm |
| Individual petal length | 4–5 cm |
| Individual petal width | 3.5–4.5 cm |
| Center opening | 1–1.5 cm |
| Optional leaf length | 5–6 cm |
These measurements are estimates for the pattern developed below, not exact measurements taken from the photograph. The final size will depend on your tension and materials.
Crochet Abbreviations (US Terms)
Understanding the abbreviations will help you follow the instructions more easily.
| Abbreviation | Meaning |
|---|---|
| ch | Chain |
| sl st | Slip stitch |
| sc | Single crochet |
| hdc | Half double crochet |
| dc | Double crochet |
| tr | Treble crochet |
| st | Stitch |
| sts | Stitches |
| sp | Space |
| rep | Repeat |
| FO | Fasten off |
The pattern uses US crochet terminology throughout. Before beginning, practice keeping your tension consistent, especially when working taller stitches. Even tension helps all five petals maintain a similar size and shape.
How to Crochet the White Flower Center and Five Petals
The construction begins with a white central ring that forms the foundation of the flower. Five petal bases are then created around the ring, followed by a white textured interior. The red yarn is introduced afterward to build the larger outer sections of the petals.
This is an adapted, beginner-friendly pattern inspired by the pictured flower. The instructions are designed to produce a similar five-petal appearance rather than claim an exact stitch-for-stitch reconstruction of the photographed piece.
Step 1: Create the Central Ring
Using white yarn and a 3.5 mm crochet hook, make a slip knot and chain 12 stitches. Join the final chain to the first chain with a slip stitch, making sure the chain does not twist.
This forms the small open center visible in the finished flower. The opening is an important decorative feature because it allows the inner white stitches to spread outward naturally.
Round 1: Chain 1, work 20 single crochet stitches around the chain ring, and join with a slip stitch to the first single crochet.
You now have a stable white ring with 20 stitches. These stitches will be divided into five equal sections, with four stitches assigned to each petal.
Step 2: Make the Five Petal Foundations
Each petal begins with a small chain arch. These arches provide the structure needed to build the rounded white sections.
Round 2: Chain 1 and single crochet into the same stitch. Chain 8, skip the next 3 stitches, and single crochet into the following stitch.
Repeat the sequence of chain 8, skip 3 stitches, single crochet in the next stitch four more times, using the first single crochet as the fifth anchor when completing the round.
You should now have five evenly spaced chain-8 arches surrounding the center. These arches are the foundation of the five petals.
Check that each arch has approximately the same size. If one appears noticeably smaller or larger, adjust your tension before continuing.
Step 3: Crochet the White Inner Petals
The next round creates the rounded white petals that will remain visible beneath the red sections.
Round 3: Working into the first chain-8 arch, crochet the following sequence:
-
1 sc
-
2 hdc
-
3 dc
-
2 tr
-
3 dc
-
2 hdc
-
1 sc
This creates a softly rounded petal with the tallest stitches positioned near its outermost edge.
Repeat the same stitch sequence in each of the remaining four chain arches. Join with a slip stitch at the first petal base and fasten off the white yarn.
At this stage, the flower should resemble a small white blossom with five textured petals and a visible center opening.
Step 4: Shape the White Flower
Place the flower flat on your work surface and gently spread the petals into position.
The white petals should sit evenly around the central opening without excessive curling or overlapping. A slight natural curve is acceptable because it contributes to the finished flower’s dimensional appearance.
If necessary, lightly dampen the flower and arrange it on a towel. Allow it to dry before beginning the red outer petals.
This simple shaping step makes it easier to identify the edges and maintain symmetry during the next stage.
How to Add the Red Crochet Petals and Decorative Edging
The vibrant red sections are responsible for the flower’s most recognizable appearance. They create the larger rounded outlines while leaving the white inner petals visible.
To achieve this effect, the red yarn is attached near the base of each white petal and worked around its outer edge. Carefully controlling the placement of the stitches helps create the appearance of white floral rays surrounded by rich red borders.
Step 5: Attach the Red Yarn
Hold the flower with the front facing upward. Attach the red yarn with a slip stitch at the base of the first white petal, near the center ring.
Work along the outer side of the white petal rather than across its center. The goal is to add a red section that frames the white stitches without completely covering them.
Begin by making 1 single crochet in the first available edge stitch, followed by 2 half double crochet stitches in the next suitable edge spaces.
When working along an existing crocheted edge, insert the hook beneath secure stitch loops rather than splitting the yarn strands.
Step 6: Build the Rounded Red Petals
Continue working along the outer perimeter of the first white petal using the following suggested stitch progression:
First side: 1 sc, 2 hdc, 3 dc, 2 tr.
Rounded top: Work 3 tr in the central outer stitch or space.
Second side: 2 tr, 3 dc, 2 hdc, 1 sc.
Spread the stitches evenly along the edge. If the existing petal does not have enough suitable insertion points, use small spaces between stitches rather than forcing several stitches into a tightly packed loop.
The taller treble crochet stitches create the rounded upper section, while the shorter stitches bring the petal back toward its base.
Repeat this shaping process on the remaining four white petals.
Because yarn weights and edge-stitch placement vary, you may need to adjust the number of red stitches slightly to keep the petals from curling or ruffling excessively.
Step 7: Add More Red Texture
For a fuller flower, work an additional red round around the outside of each petal.
Begin at the lower side of a petal and work half double crochet stitches along its edge. When approaching the upper curve, work double crochet stitches to create additional width.
At the top of the petal, add two stitches into selected spaces where extra fullness is needed. Continue down the opposite side with half double crochet stitches.
Repeat the technique across all five petals, keeping the shape as balanced as possible.
This second layer creates a more substantial appearance and makes the red crochet petals stand out against the white inner sections.
Step 8: Create the Raised Red Border
One of the most attractive details in the flower is the slightly raised edging around each petal.
To recreate this effect, work a final round of single crochet stitches around each red petal. For a more defined edge, insert the hook through the back loop only where the stitches permit.
You can also use reverse single crochet, sometimes called the crab stitch, to create a twisted cord-like finish.
Reverse single crochet is worked from left to right for right-handed crocheters, producing a textured edging that resembles a narrow braided cord.
Use the same edging technique around every petal so the flower maintains a consistent, professional appearance.
Step 9: Define the Petal Separations
The red dividing lines between the petals give the flower its distinctive five-point shape.
Cut a separate length of red yarn measuring approximately 30–40 cm. Thread it through a yarn needle and bring it from the back of the flower toward the front near the center opening.
Gently lay the yarn along the division between two neighboring white petals, following the natural valley between them.
Secure the strand with small stitches along the back of the flower, taking care not to pull so tightly that the petals fold.
Repeat around the remaining petal divisions. This decorative surface detail enhances the contrast between the white and red sections.
Finishing Techniques, Creative Uses, and Crochet Flower Variations
Once all five red petals are completed, the flower is almost ready to use. A few finishing techniques will improve its appearance, strengthen the structure, and help it retain its shape over time.
The image also shows a small green crocheted leaf, which makes a beautiful optional addition. A leaf adds another natural color to the design and helps transform a simple flower into a more complete decorative motif.
Step 10: Weave in the Yarn Ends
Turn the flower over and locate any loose yarn tails remaining from the color changes and finishing rounds.
Thread each tail through a yarn needle and weave it beneath several stitches on the back of the project. Change direction at least once to help prevent the ends from loosening.
Trim the excess yarn carefully without cutting any working stitches.
Avoid tying large knots because they may create visible bumps, especially if the flower will be sewn onto clothing or another flat surface.
Step 11: Crochet an Optional Green Leaf
Using green yarn, chain 12.
Beginning in the second chain from the hook, work the following stitches along one side of the foundation chain:
1 sc, 1 hdc, 2 dc, 3 tr, 2 dc, 1 hdc, 1 sc.
Work 3 single crochet stitches into the final chain to turn around the tip of the leaf.
Continue along the opposite side of the foundation chain, mirroring the stitch progression in reverse order.
Join with a slip stitch and fasten off, leaving a long tail for attaching the leaf to the flower.
For a more defined leaf, work a row of slip stitches along the center using the green yarn to create a raised central vein.
Step 12: Block and Shape the Flower
Blocking helps create uniform petals and improves the overall appearance of decorative crochet pieces.
Lightly mist the finished flower with water and place it on a clean blocking mat or folded towel.
Gently arrange the petals into a symmetrical five-petal formation, making sure the red borders lie smoothly.
Allow the flower to dry completely before removing it from the blocking surface.
If you are using cotton yarn for a decorative item, a small amount of fabric stiffener can help the petals maintain their shape. Always test the stiffener on a yarn sample first.
Step 13: Attach the Flower to Your Project
The finished red and white crochet flower can be sewn onto a variety of handmade items.
For bags, hats, scarves, and garments, position the flower and attach it using matching yarn or strong sewing thread.
Stitch securely around the center and selected petal bases, leaving the outer petals slightly free for a dimensional effect.
If the flower is intended for a removable accessory, you can attach it to a brooch pin or hair clip using a sewn felt backing.
Step 14: Experiment With Different Color Combinations
Although red and white create a particularly beautiful contrast, this flower design can be adapted to many color combinations.
For a soft spring-inspired appearance, try pastel pink and cream. For a cheerful summer decoration, use sunshine yellow and white.
Burgundy with ivory produces an elegant vintage effect, while royal blue and white create a striking modern design.
You can also make several flowers in coordinating colors and arrange them together for a decorative wreath or handmade bouquet.
Step 15: Creative Ways to Use Your Crochet Flowers
These five-petal crochet flowers are suitable for a wide range of decorative projects. They can be attached to handmade tote bags, decorative pillows, crochet blankets, headbands, hats, or fabric baskets.
Red and white flowers also work beautifully as Christmas ornaments. Add a small hanging loop to the back of each flower and display them on a Christmas tree, decorative garland, or holiday wreath.
For a personalized handmade gift, attach one flower to a wrapped package or a reusable fabric gift bag.
You can also combine the flowers with green crocheted leaves to create a colorful floral wall hanging or table decoration.
Frequently Asked Questions About the Red and White Crochet Flower Pattern
1. Is this crochet flower suitable for beginners?
Yes. The pattern uses common crochet stitches, including chains, single crochet, half double crochet, double crochet, and treble crochet. Beginners who are comfortable with these stitches can follow the instructions with practice.
2. How long does it take to crochet one flower?
A crocheter familiar with the stitches may complete one flower in approximately 45–90 minutes. Beginners may need additional time, particularly when shaping the red petals.
3. What is the best yarn for this crochet flower?
Smooth cotton yarn is an excellent choice because it provides defined stitches and helps the petals retain their shape. Acrylic yarn is also suitable if you prefer a softer finish.
4. Can I make the flower larger or smaller?
Yes. Changing the yarn weight and crochet hook size will alter the overall dimensions. For a larger flower, you can also experiment with extending the petal foundations and adding carefully distributed stitches.
5. Why are my crochet petals curling?
Curling often happens when the stitches are too tight or when too few stitches are worked along the outer edges. Try loosening your tension or adding a few evenly distributed stitches around the rounded sections.
6. Can I wash the finished crochet flowers?
Most flowers made with washable cotton or acrylic yarn can be gently hand-washed in cool water. Always follow the yarn manufacturer’s care instructions and reshape the petals while drying.
7. Can these flowers be used for Christmas decorations?
Absolutely. Their bright red and white colors make them particularly suitable for Christmas wreaths, holiday gift decorations, festive garlands, and handmade tree ornaments.
8. How can I make the petals look more three-dimensional?
Use slightly tighter stitches for the white center and fuller, taller stitches for the red outer petals. A raised border and careful blocking will further enhance the dimensional appearance.
Conclusion
Creating a Red and White Crochet Flower is a wonderful way to turn simple yarn into a beautiful handmade decoration. The combination of a delicate white center, five rounded red petals, and textured edging produces an eye-catching floral design that can complement many different projects.
This easy crochet flower tutorial also provides an opportunity to practice shaping, changing colors, working decorative borders, and finishing small crochet motifs. By adjusting the yarn colors, hook size, and finishing details, you can create a collection of flowers with different appearances while maintaining the same basic construction.
Whether you use these flowers for Christmas decorations, accessories, home décor, or thoughtful handmade gifts, each finished piece brings a special handcrafted touch. With a little patience and creativity, you can transform this beautiful five-petal crochet flower pattern into countless colorful projects that showcase the timeless charm of crochet.