
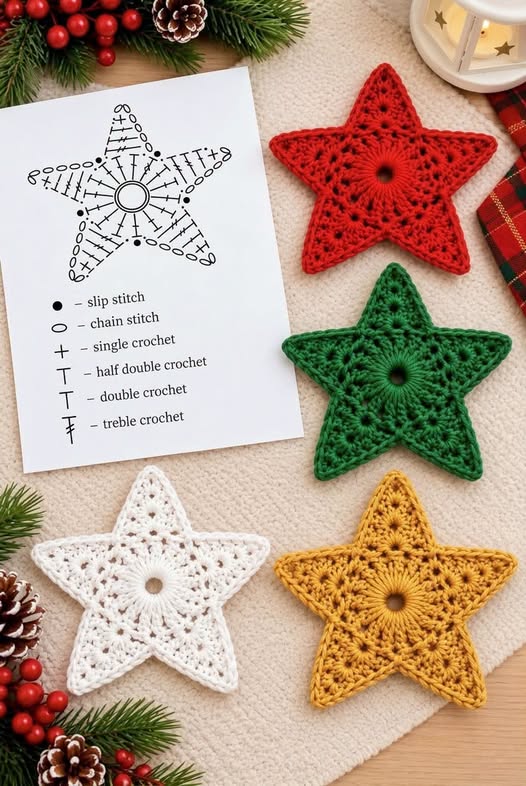
The crochet star pattern featured in this project uses a lovely combination of openwork stitches, textured rounds, and carefully shaped points. The stars can be made in classic Christmas colors such as bright red, evergreen, snowy white, and golden yellow.
Each color creates a different effect, allowing you to make an entire collection of coordinated ornaments. Whether you prefer rustic farmhouse decorations, elegant traditional Christmas themes, or cheerful modern holiday displays, these stars can easily complement your decorations.
Another wonderful advantage of this easy crochet Christmas ornament is its versatility. You can experiment with different yarn weights, hook sizes, and decorative finishes to create stars in several sizes. Smaller stars make lovely gift toppers, while larger versions can become beautiful wall decorations or hanging ornaments. This tutorial explains the materials, crochet stitches, construction process, finishing techniques, and creative ideas needed to make your own five-pointed Christmas stars using US crochet terminology.
Materials and Supplies for Crochet Christmas Stars
Before beginning your handmade crochet Christmas star, prepare all the materials you will need. Choosing the right yarn and crochet hook is important because it influences the finished ornament’s appearance, structure, and size. Cotton yarn is particularly suitable for this project because it offers excellent stitch definition and can help the star maintain its shape.
For a star similar to the example, choose a lightweight or DK cotton yarn in festive colors. Red creates a bold traditional Christmas appearance, green adds a natural holiday touch, white produces a delicate snowflake-inspired effect, and golden yellow gives the ornament a cheerful and elegant finish. You can make each star in a single color or alternate colors between rounds.
Recommended materials:
-
DK or lightweight cotton yarn in red, green, white, and golden yellow
-
3.0 mm or 3.5 mm crochet hook
-
Yarn needle for weaving in ends
-
Small sharp scissors
-
Stitch markers, if desired
-
Measuring tape
-
Rustproof pins and blocking mat
-
Fabric stiffener or diluted white craft glue, optional
-
Thin ribbon or matching yarn for hanging loops
The completed five-point crochet star will typically measure approximately 10–13 cm (4–5 inches) across when made with DK cotton yarn and a 3.5 mm hook. The exact measurement depends on your yarn, hook, tension, and blocking method. If you prefer smaller decorations, try thinner cotton thread with an appropriately smaller hook.
Understanding the crochet abbreviations will make the project much easier. This pattern uses standard US crochet terms: ch means chain, sl st means slip stitch, sc means single crochet, hdc means half double crochet, dc means double crochet, and tr means treble crochet. You will also use stitch spaces, joined rounds, and repeated stitch groups.
For best results, practice making chains and double crochet stitches before starting. The construction begins with a small center ring, develops into an openwork circular foundation, and gradually transforms into five triangular points. The finishing border brings the entire design together and creates the clean star silhouette.
The stitch diagram shown in the reference image illustrates the radial construction used in many crochet stars. The instructions below are an original, beginner-friendly interpretation of that style rather than a stitch-for-stitch transcription of the pictured chart. The main design principle is to maintain five evenly spaced sections around the center, then build each section into a pointed arm.
Step-by-Step Crochet Christmas Star Pattern
Begin your crochet Christmas star ornament with a magic ring. This technique produces a neat center opening that can be adjusted to your preference. For the small decorative hole visible in the middle of the star, avoid pulling the magic ring completely closed. Alternatively, chain six stitches and join them with a slip stitch to form a permanent central ring.
Round 1 – Create the center foundation: Chain 6 and join with a slip stitch into the first chain to form a ring. Chain 3, which counts as your first double crochet. Work 14 additional double crochet stitches into the center ring. Join with a slip stitch into the top of the beginning chain-3. You should now have 15 double crochet stitches arranged around the opening.
Round 2 – Form five decorative groups: Chain 3 and work 2 double crochet stitches into the same stitch as the join. Chain 2, skip the next 2 stitches, and work 3 double crochet stitches into the next stitch. Repeat the sequence of chaining 2, skipping 2 stitches, and working 3 double crochet stitches into the next stitch until you have five groups of three double crochet stitches. Join with a slip stitch to the top of the beginning chain-3.
Round 3 – Create the star’s five foundations: Slip stitch across to the first chain-2 space. Chain 3 and work 2 double crochet stitches, chain 2, and 3 more double crochet stitches into that same space. In each of the remaining four chain-2 spaces, work (3 dc, ch 2, 3 dc). Join with a slip stitch to the beginning chain-3. You now have five distinct corner sections that will become the star points.
Round 4 – Begin shaping the points: Slip stitch into the first corner chain-2 space. Work (3 dc, ch 2, 3 dc) into that space. Chain 1, then work a single crochet between the two neighboring corner sections to create a valley. Chain 1 and repeat the corner group in the next corner space. Continue around until all five corners have been worked. Join with a slip stitch and fasten off.
Round 5 – Extend the five star points: Join your yarn at the first corner chain-2 space. For each point, work 3 double crochet stitches, chain 2, and 3 double crochet stitches into the corner space. Then work the sides of the point separately in turned rows. For each side, decrease by working two double crochets together at the outside edge on successive rows until the tapered point is complete. Repeat this shaping for all five points, keeping the same number of rows on each side so the star remains symmetrical.
Final edging – Define the star silhouette: Attach your yarn to any outer edge and work a round of single crochet stitches around the entire ornament. At each pointed tip, work (sc, ch 2, sc) to create a sharp corner. At each inward valley, use a single crochet decrease if needed to draw the two neighboring edges together neatly. Join, fasten off, and weave in your ends. This finishing round helps strengthen the edges and gives the star a more polished appearance.
Because yarn and tension vary, check the shape after completing each point. The instructions above provide a construction guide, and the point shaping may need small adjustments to achieve an even five-point silhouette. For an identical reproduction of the pictured lace motif, a fully counted chart-specific pattern would be required.
Helpful Tips for Perfect Crochet Star Ornaments
One of the most important aspects of creating a beautiful crochet Christmas decoration is maintaining consistent tension. If your stitches are too tight, the star may curl inward and become difficult to flatten. If they are too loose, the points may appear floppy or uneven. Try to keep a relaxed and consistent tension throughout the project.
Another helpful technique is blocking. Once your star is finished, gently dampen it with water and remove the excess moisture using a clean towel. Lay the ornament on a blocking mat and carefully pin each of the five points outward. Make sure the points are evenly distributed and the center remains circular. Allow the star to dry completely before removing the pins.
For crochet Christmas tree ornaments, additional stiffness can be especially useful. You can apply a small amount of diluted fabric stiffener to the finished star before blocking. This helps the ornament maintain its crisp shape when hanging vertically. Always test the product on a small yarn sample first, especially when using brightly colored or delicate fibers.
Color selection is another wonderful opportunity for creativity. Traditional red and green stars create a warm holiday atmosphere, while white stars resemble winter snowflakes. Golden yellow ornaments add a cheerful glow when placed near Christmas lights. You can also try metallic yarns, soft cream, champagne, silver, or deep burgundy for a more sophisticated appearance.
If you want to create an especially decorative crochet star garland, make several stars in coordinating colors. Attach them to a long crocheted chain, leaving approximately 10–15 cm (4–6 inches) between ornaments. The garland can be displayed across a fireplace mantel, along a staircase railing, or above a window. Lightweight yarn works best for this arrangement.
You can also personalize each ornament with embroidery, tiny wooden beads, or decorative hanging loops. Add embellishments carefully so they do not overwhelm the openwork design. If the ornaments will be used around young children or pets, avoid small detachable decorations. The beauty of this star pattern comes from its simple geometry, delicate stitches, and handmade texture.
Creative Ways to Use Handmade Crochet Christmas Stars
The most traditional way to display handmade crochet stars is on a Christmas tree. Their lightweight structure makes them ideal for branches of various sizes, and the openwork design allows Christmas lights to shine through the stitches. A collection of red, green, white, and golden stars can create a coordinated holiday theme without requiring expensive decorations.
These ornaments also make beautiful additions to wrapped Christmas presents. Instead of using disposable gift bows, attach a small crocheted star to the ribbon around a gift box. The recipient can remove the ornament and keep it as a handmade Christmas decoration. This simple detail adds a personal and thoughtful touch to holiday gift wrapping.
Another creative option is to incorporate the stars into a Christmas table centerpiece. Arrange several ornaments around candles, pinecones, evergreen branches, and decorative berries. You can also place one star on each dinner plate as a handmade place setting decoration. Avoid direct contact with flames, hot candle containers, or other heat sources.
For a rustic farmhouse appearance, combine white and natural-colored crochet stars with wooden ornaments, linen ribbons, and greenery. For a more colorful Christmas display, use bright red, emerald green, and golden yellow. The same crochet pattern can produce dramatically different decorative effects simply by changing the yarn colors and surrounding materials.
Crochet stars can also become wonderful small handmade gifts. Make a coordinated set of four or six ornaments and package them inside a decorative box or reusable fabric pouch. Include a short care note explaining that the stars can be gently hand-washed and reshaped when necessary. Handmade ornament sets are thoughtful gifts for friends, neighbors, teachers, and family members.
Finally, consider making crochet Christmas stars as part of a larger seasonal craft collection. They pair beautifully with crocheted snowflakes, miniature stockings, Christmas bells, trees, and traditional granny-square ornaments. Creating matching decorations offers a wonderful opportunity to practice new stitches while building a collection of meaningful holiday pieces that can be enjoyed for years.
Frequently Asked Questions About Crochet Christmas Stars
1. Is this crochet Christmas star pattern suitable for beginners?
Yes. Crocheters who understand basic stitches such as chains, slip stitches, single crochet, and double crochet can learn to make these stars. Beginners may need additional practice when shaping the points and following the openwork sections.
2. What is the best yarn for crochet Christmas ornaments?
Cotton yarn is an excellent choice because it provides clear stitch definition and responds well to blocking. DK cotton yarn is suitable for medium-sized ornaments, while lightweight cotton thread works beautifully for smaller lace-style decorations.
3. How large will the finished crochet star be?
With DK cotton yarn and a 3.5 mm crochet hook, a finished star may measure approximately 10–13 cm (4–5 inches) across. The final dimensions depend on your stitch tension, yarn thickness, and the number of rows used to shape the points.
4. How can I make my crochet stars stiff enough to hang?
Lightly apply a suitable fabric stiffener, then pin the star into its finished shape on a blocking mat. Allow it to dry completely before removing the pins. Stiffening is optional but helpful when you want sharply defined points.
5. Can I use different colors for the same crochet star pattern?
Absolutely. Red, green, white, and golden yellow are traditional Christmas colors, but you can also experiment with silver, champagne, pastel blue, burgundy, and other shades. A coordinated color palette creates a beautiful collection of matching ornaments.
6. How do I add a hanging loop to a crochet star?
Cut a piece of yarn or thin ribbon approximately 15–20 cm (6–8 inches) long. Fold it in half and attach it securely through a stitch at the top point of the finished star. Tie the ends together to create a loop suitable for hanging on a Christmas tree.
7. Can these crochet stars be washed?
Most cotton crochet ornaments can be gently hand-washed in cool water using mild detergent. Avoid excessive rubbing or twisting. After washing, reshape the star and allow it to dry flat. Stiffened ornaments may require reblocking and another application of stiffener.
8. Are crochet Christmas stars good projects for handmade gifts?
Yes. Their attractive appearance, manageable size, and customizable colors make them wonderful handmade gifts. You can give them individually as decorative keepsakes or create matching sets for Christmas gift exchanges.
Conclusion
Creating a crochet Christmas star pattern is a wonderful way to celebrate the holiday season through handmade creativity. These delicate five-pointed ornaments bring together traditional crochet techniques, beautiful festive colors, and endless decorating possibilities. Whether you choose classic red, evergreen, snowy white, or golden yellow, every finished star adds warmth and personality to your Christmas decorations.
With a few basic crochet supplies, careful stitch work, and simple finishing techniques, you can create attractive ornaments that can be displayed year after year. The project also provides opportunities to develop your crochet skills, experiment with new color combinations, and explore decorative finishing methods.
The greatest beauty of handmade crochet Christmas ornaments is the personal meaning behind every stitch. A simple ball of yarn can become a cherished holiday decoration, a thoughtful gift, or part of a family Christmas tradition. Enjoy the creative process, experiment with your favorite colors, and fill your home with the timeless charm of handmade crochet stars.