
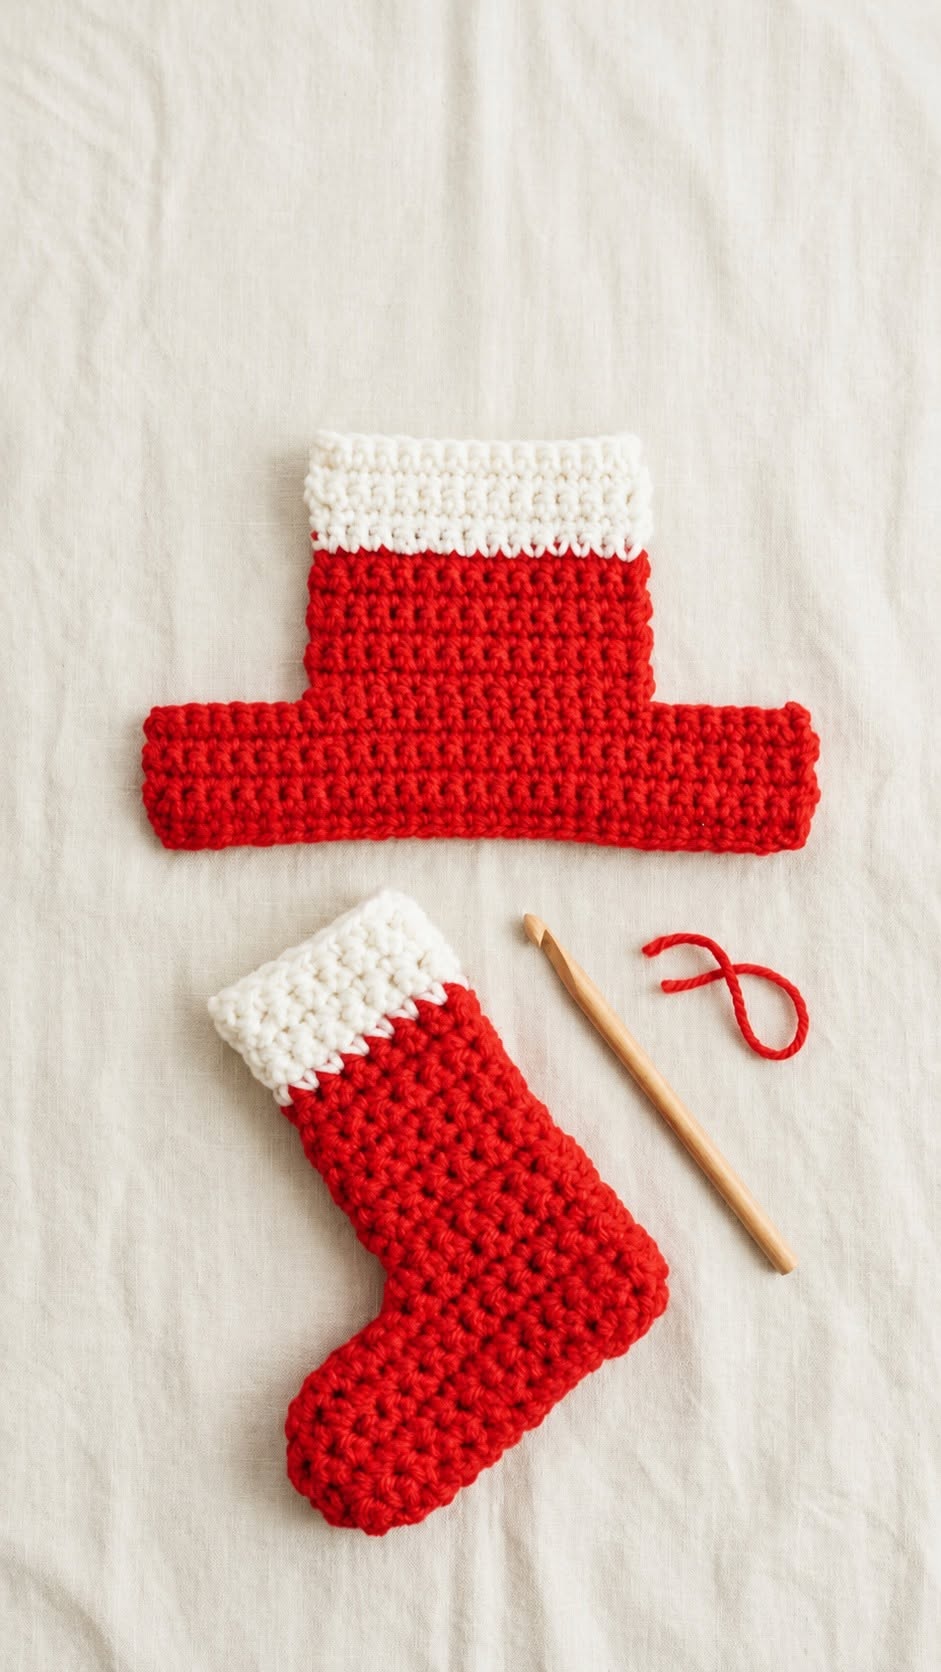
One of the most appealing features of this easy crochet Christmas stocking is its straightforward construction. The design begins with a flat crocheted piece that forms the main structure of the stocking.
Once the necessary sections have been completed, they are folded, joined, and shaped into a recognizable Christmas stocking. This approach makes the project particularly attractive to beginners who want to learn how simple crochet shapes can become beautiful three-dimensional decorations.
Creating your own handmade Christmas stocking is also a wonderful opportunity to experiment with traditional holiday colors, different yarn textures, and personalized embellishments. The classic combination of red and white creates a cheerful appearance, while the textured crochet stitches provide a cozy, rustic finish.This project is suitable for decorating your home, making thoughtful gifts, or creating matching stockings for everyone in the family.
Materials and Preparations for Your Crochet Christmas Stocking
Before beginning your crochet stocking pattern, gathering the appropriate materials will help ensure a comfortable and enjoyable crafting experience. This project uses basic crochet supplies and simple stitches, making it accessible to crocheters with different levels of experience.
For a stocking inspired by the photograph, choose medium-weight yarn in vibrant Christmas red and creamy white. Acrylic yarn is an excellent option because it is affordable, widely available, easy to wash, and capable of maintaining its shape. Cotton or wool-blend yarn can also provide attractive results.
Materials needed:
-
Approximately 100–150 yards of red worsted-weight yarn.
-
Approximately 20–35 yards of white worsted-weight yarn.
-
5.0 mm (H/8) crochet hook, or the size needed for your gauge.
-
Yarn needle for joining pieces and weaving in ends.
-
Sharp scissors.
-
Stitch markers.
-
Measuring tape.
-
Optional ribbon or additional yarn for a hanging loop.
The finished stocking in this tutorial is designed to measure approximately 25–28 cm (10–11 inches) from cuff to toe, depending on your gauge and shaping. The cuff measures approximately 10–12 cm (4–4.7 inches) across when the stocking is laid flat.
These measurements are suitable for a decorative Christmas stocking. If you want a larger stocking for gifts, increase the number of stitches and rows while maintaining the same basic proportions.
Basic Crochet Abbreviations (US Terms)
Understanding the abbreviations used throughout the tutorial makes the crocheting process much easier.
| Abbreviation | Meaning |
|---|---|
| ch | Chain |
| sc | Single crochet |
| hdc | Half double crochet |
| sl st | Slip stitch |
| st | Stitch |
| sts | Stitches |
| sc2tog | Single crochet two stitches together |
| RS | Right side |
| WS | Wrong side |
| FO | Fasten off |
The main stitch used in this version is single crochet, which creates a dense, sturdy fabric. This stitch is especially useful for decorative stockings because it prevents the finished piece from becoming too loose or stretched.
For the best results, practice maintaining an even tension before starting. Consistent stitches create smoother edges and make the joining process easier.
Step-by-Step Instructions for Making the Christmas Stocking
The stocking shown in the photograph features a flat construction section and a finished stocking shape. The following beginner-friendly pattern uses a similar construction concept with two matching shaped panels, making assembly straightforward.
The instructions are an original adaptation inspired by the photographed design rather than an exact stitch-by-stitch reconstruction.
Step 1: Crochet the First Red Stocking Panel
Begin with red yarn and make a foundation chain of 17 stitches.
Row 1: Work 1 sc in the second chain from the hook and in each remaining chain. You should have 16 sc.
Rows 2–24: Ch 1, turn, and work 1 sc in each stitch across. Maintain a consistent stitch count of 16.
This rectangular section forms the long, narrow leg of the stocking. Depending on your gauge, it should measure approximately 15 cm (6 inches) in length.
Make sure the edges remain straight and avoid adding accidental stitches at the beginning or end of each row.
Step 2: Extend the Foot of the Stocking
After completing Row 24, you will begin shaping the foot by adding a wider section to one side of the leg.
Row 25: Ch 1, turn, work 16 sc across, then ch 17.
Row 26: Turn and work 1 sc in the second chain from the hook, 1 sc in each remaining new chain, and 1 sc in each of the original 16 stitches. You should now have 32 sc.
Rows 27–35: Ch 1, turn, and work 1 sc in each stitch across.
This wider section establishes the foot and creates the characteristic L-shaped stocking silhouette.
The extended foot should be approximately twice as wide as the leg section. Adjust the number of rows if needed to achieve your preferred proportions.
Step 3: Shape the Rounded Toe
A slightly rounded toe gives the stocking a softer and more traditional Christmas appearance.
For a simple beginner version, keep the foot rectangular and gently curve the corners when joining the panels.
For a more defined rounded toe, decrease stitches at the outer toe end of the final rows.
Row 36: Ch 1, turn, sc2tog, sc across until 2 stitches remain, sc2tog.
Row 37: Ch 1, turn, sc across.
Row 38: Repeat Row 36.
Fasten off the yarn and leave a long tail for weaving in.
Because this project uses two identical panels, repeat the process to create the second stocking panel. Keep both panels facing the same direction while crocheting; flip one over before assembly so the shapes align.
Step 4: Create the White Christmas Cuff
The white cuff is one of the most recognizable details of this traditional crochet Christmas stocking.
Using white yarn, ch 17 and work 16 sc across, beginning in the second chain from the hook.
Continue crocheting for 5–7 rows, depending on the desired cuff height. This creates a rectangular white band that matches the width of the stocking leg.
Make two identical white cuff pieces.
For additional texture, alternate rows of single crochet and half double crochet. This variation produces a slightly thicker cuff without introducing complicated techniques.
Attach each white cuff piece to the upper edge of one red stocking panel using a yarn needle or slip stitches.
Check that both cuff pieces are aligned before proceeding to assembly.
How to Assemble and Finish Your Handmade Christmas Stocking
Once the two stocking panels and white cuff pieces are complete, the project begins to take its final shape. Careful assembly helps create the neat edges and sturdy structure associated with a well-made crochet Christmas decoration.
Place the two stocking panels together with their wrong sides facing each other. Align the top openings, heel corners, foot sections, and rounded toes.
Using red yarn and a yarn needle, join the panels along the outer edges. A whipstitch is a beginner-friendly choice, although slip stitches or single crochet seams can also be used.
Begin at one upper side edge, work around the heel, along the bottom of the foot, around the toe, and back toward the opposite upper side. Leave the top opening unstitched.
If you prefer a slightly raised decorative seam, work single crochet stitches through both layers around the outside. This creates a defined border that adds structure to the stocking.
When joining the white cuff, switch to white yarn to keep the seam less noticeable. Work carefully around the top corners to avoid creating bulky areas.
Adding a Hanging Loop
A hanging loop allows the finished stocking to be displayed easily on a mantel, wall hook, or Christmas tree.
Using red or white yarn, create a chain approximately 12–15 cm (5–6 inches) long.
Fold the chain in half and attach both ends securely to the inside corner of the upper cuff, on the heel side.
For extra strength, reinforce the attachment with several stitches using a yarn needle.
A crocheted hanging loop is suitable for lightweight decorations and small gifts. If the stocking will hold heavier items, use a reinforced fabric loop instead.
Finishing and Blocking
After assembly, weave all loose yarn ends securely into the interior stitches.
Gently shape the stocking with your hands, making sure the toe, heel, and cuff sit naturally.
If necessary, lightly dampen the finished stocking and allow it to dry flat in the desired shape. Always follow the care instructions for the yarn you selected.
Avoid stretching the stocking excessively because this can distort the stitches and change the proportions.
The completed stocking should have a neat red body, a bright white cuff, and a soft handmade appearance that complements traditional Christmas decorations.
Creative Decorating Ideas and Tips for a Perfect Christmas Stocking
One of the greatest advantages of this DIY crochet Christmas stocking is its versatility. The basic design can be personalized in countless ways, making every finished stocking unique.
For a classic Christmas style, keep the traditional red body and white cuff. This combination looks beautiful alongside evergreen garlands, golden ornaments, wooden decorations, and warm holiday lights.
For a more elegant appearance, consider burgundy yarn with a cream-colored cuff. Deep forest green paired with ivory is another sophisticated combination that works especially well with rustic or farmhouse Christmas decorations.
Personalized stockings are wonderful handmade gifts. Embroider a name or initial onto the white cuff using a contrasting yarn color.
You can also embellish the stocking with crocheted snowflakes, miniature bows, decorative stars, or small pom-poms. Attach embellishments securely, particularly if the stocking will be displayed around young children.
How to Adjust the Stocking Size
Changing the dimensions of the stocking is relatively simple once you understand its construction.
To create a larger stocking, increase the width and length of the leg section. Extend the foot proportionally so that the finished design maintains a balanced appearance.
For smaller stockings, reduce the foundation chain and the total number of rows. Miniature stockings are perfect for Christmas tree ornaments, gift packaging, and festive table settings.
Always measure your work as you crochet. Yarn thickness, hook size, and individual tension can significantly affect the final dimensions.
Common Mistakes to Avoid
Uneven stitch tension is one of the most common issues when making flat crochet pieces. Crocheting too tightly can make the stocking stiff, while loose stitches may cause the fabric to lose its shape.
Another common mistake is losing stitches along the edges. Count the stitches regularly and use stitch markers when necessary.
When making the second panel, double-check the stitch counts and row numbers. Even small differences can make the pieces difficult to align during assembly.
Finally, avoid pulling the joining stitches too tightly. A tight seam can cause puckering and prevent the finished stocking from lying smoothly.
Frequently Asked Questions About Crochet Christmas Stockings
Is this Christmas stocking suitable for beginners?
Yes. This version uses mostly single crochet stitches, simple increases in width, basic decreases, and straightforward joining techniques.
What yarn works best for a Christmas stocking?
Worsted-weight acrylic or cotton yarn works well. Acrylic is lightweight and economical, while cotton provides a firmer finish.
Can I make this stocking without sewing two panels together?
Yes. Some Christmas stockings are crocheted continuously in rounds. However, the two-panel technique is particularly beginner-friendly and is well suited to the flat construction shown in the photograph.
How long does it take to crochet a Christmas stocking?
A simple stocking can take approximately 3–6 hours, depending on experience, yarn thickness, stocking size, and the amount of decorative detail.
Can I wash my finished stocking?
That depends on the yarn. Many acrylic yarns are machine washable, but delicate embellishments or reinforced decorations may require gentle hand washing.
Can I use this pattern to make stockings for the entire family?
Absolutely. Change the colors, add names, and adjust the sizes to make a coordinated collection of handmade Christmas stockings.
Conclusion
The Easy Crochet Christmas Stocking Pattern is a delightful holiday project that combines simplicity, creativity, and traditional seasonal charm. Its cheerful red body, cozy white cuff, and recognizable stocking shape make it an attractive decoration for any Christmas setting.
By working through the basic crochet sections, joining the finished pieces, and adding a secure hanging loop, you can create a beautiful handmade stocking with ordinary crochet supplies. The construction also provides an excellent opportunity to practice consistent stitches, shaping techniques, and neat finishing.
Whether you are making one stocking for your home or an entire collection for friends and family, this handmade crochet Christmas stocking is a meaningful way to celebrate the season. With a little yarn, a crochet hook, and some creativity, you can turn a simple project into a treasured Christmas decoration that brings warmth and joy year after year.