
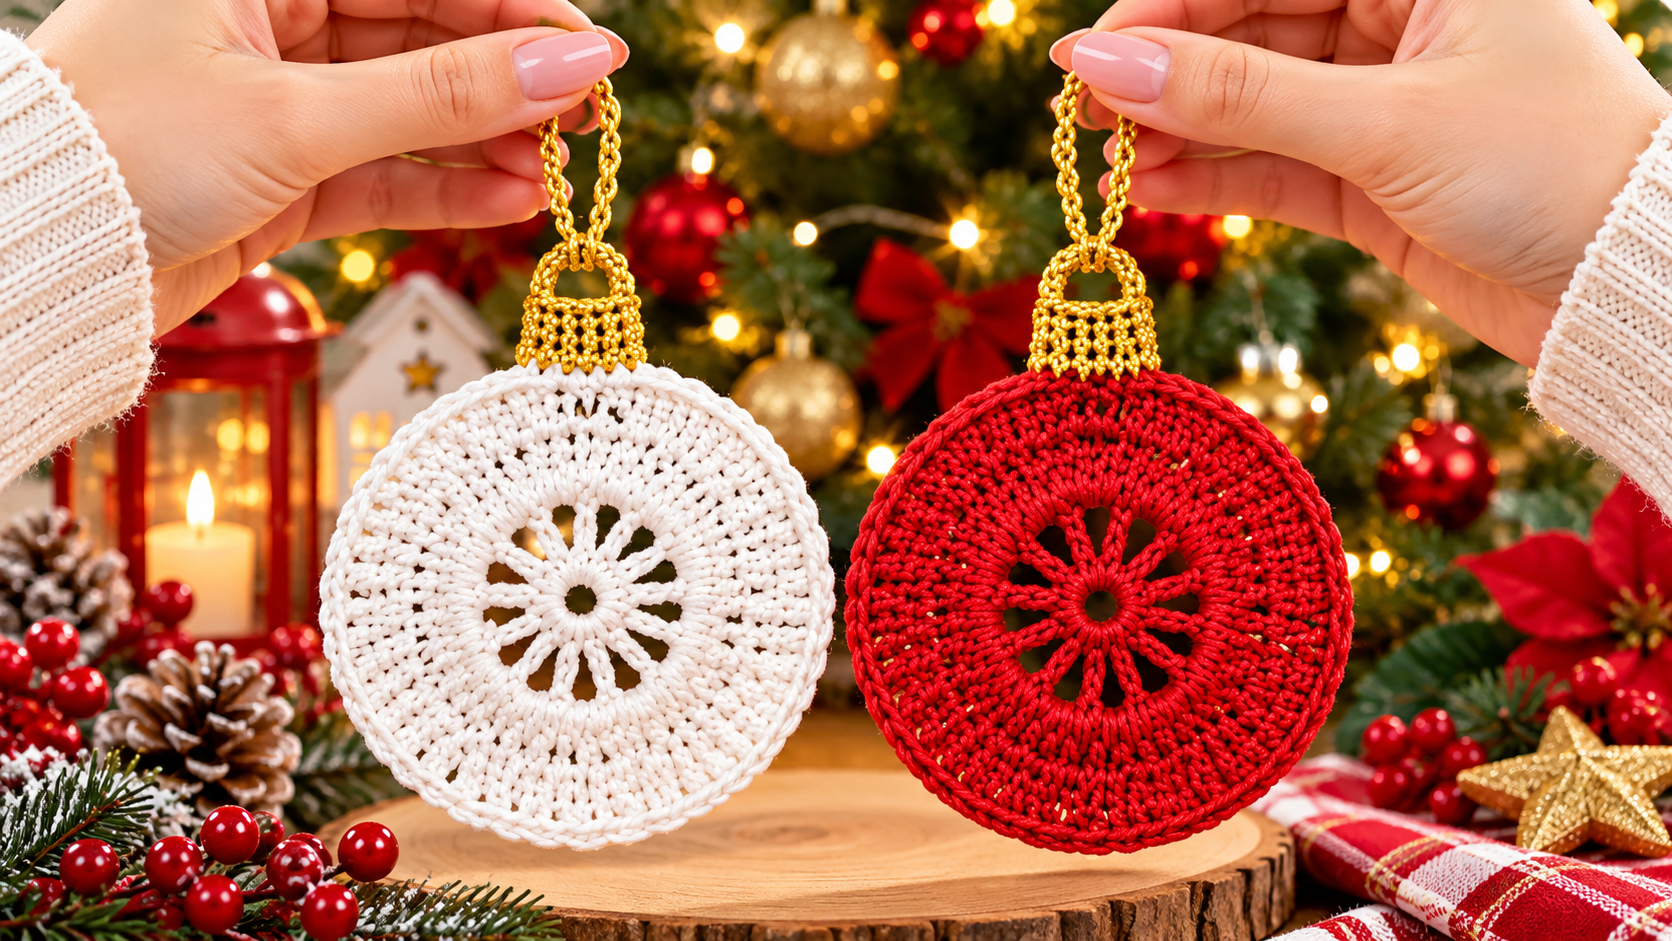
The design features a charming circular shape with a decorative openwork center that resembles a delicate snowflake or festive flower. The combination of bright Christmas red, soft snowy white, and shimmering gold creates a classic holiday look that feels both traditional and sophisticated. Each ornament has carefully arranged stitches that form a beautiful textured surface, making the decorations attractive from every angle.
One of the most enjoyable things about this easy crochet Christmas ornament pattern is its versatility. These ornaments can be used on Christmas trees, holiday wreaths, decorative garlands, wrapped gifts, or festive table settings.
Whether you are an experienced crocheter or someone looking to practice working in rounds, this handmade Christmas project offers an opportunity to create something beautiful for the holiday season.
Materials and Supplies for Crochet Christmas Ornaments
Before beginning this lovely Christmas craft, gather the necessary materials. Choosing the right yarn and crochet hook will help create ornaments with a neat circular shape and attractive stitch definition.
For ornaments similar to those pictured, a smooth cotton yarn is an excellent choice. Cotton provides structure, displays decorative stitches beautifully, and helps the finished ornaments maintain their shape.
Materials Needed:
- Red cotton yarn, size 3 or lightweight size 4.
- White cotton yarn in the same weight.
- Metallic gold crochet thread for decorative tops.
- Crochet hook, approximately 3.0 mm to 3.5 mm.
- Smaller crochet hook, approximately 2.0 mm, for the gold details.
- Yarn needle for weaving in ends.
- Small scissors.
- Stitch markers, if desired.
- Fabric stiffener or diluted craft glue, optional.
- Blocking pins and a foam blocking mat.
- Measuring tape.
Finished Measurements:
The suggested finished diameter is approximately 4.5 to 5 inches (11.5 to 12.7 cm), excluding the gold hanging loop.
The hanging loop can measure approximately 2 to 2.5 inches (5 to 6.5 cm) when flattened.
These measurements are approximate and may vary depending on your yarn, hook size, and personal crochet tension.
For smaller decorations, choose fine cotton thread and a smaller crochet hook. For larger ornaments, use thicker yarn while maintaining a comfortable stitch tension.
Crochet Abbreviations (US Terms):
- ch: Chain
- sl st: Slip stitch
- sc: Single crochet
- hdc: Half double crochet
- dc: Double crochet
- tr: Treble crochet
- st: Stitch
- sp: Space
- rep: Repeat
- MR: Magic ring
The ornament is worked from the center outward in joined rounds. The open center is made with chain spaces, while the outer rounds gradually create a fuller circular shape.
Step-by-Step Crochet Christmas Ornament Pattern
The following original pattern is designed to recreate the general appearance of the pictured ornaments, featuring a decorative openwork center and a textured circular border. It is an interpretation of the photographed design rather than an exact stitch-for-stitch reconstruction.
Step 1: Create the Center Ring
Begin with your chosen red or white yarn.
Make a magic ring, or chain 6 and join with a slip stitch to form a small circle.
Work 12 single crochet stitches into the ring.
Join with a slip stitch to the first single crochet.
Pull the magic ring closed, leaving a small central opening if you prefer the flower-like appearance shown in the ornaments.
This foundation provides the starting point for the decorative spokes.
Step 2: Form the Decorative Openwork Center
Chain 1 and work a single crochet into the first stitch.
Chain 5, skip the next stitch, and work a single crochet into the following stitch.
Repeat this sequence around the center.
At the end of the round, you should have six evenly spaced chain loops.
Join with a slip stitch.
These open loops will become the petals or spokes of the central snowflake-inspired design.
Step 3: Create the Inner Flower Shape
Slip stitch into the first chain-5 space.
Chain 3, which counts as the first double crochet.
Work 4 additional double crochet stitches into the same space.
Chain 2.
Continue working 5 double crochet stitches and chain 2 in each remaining chain-5 space.
Join to the top of the beginning chain-3.
You will now have six groups of five double crochet stitches, separated by small chain spaces.
The central motif should resemble a flower with six gently rounded sections.
Step 4: Expand the Circular Shape
Slip stitch into the next chain-2 space.
Chain 3 and work 2 double crochet stitches into the same space.
Work 1 double crochet into each of the next five double crochet stitches.
Work 3 double crochet stitches into the following chain-2 space.
Continue working double crochet stitches across each group, placing increases in the chain spaces.
For this round, treat the beginning chain-3 and its two accompanying double crochets as the first increase group. After working across the five stitches, place 3 double crochets in the next chain space and repeat around.
Join with a slip stitch when the round is complete.
The fabric will begin expanding into a round decorative disk.
Step 5: Build the Textured Outer Section
Continue working in joined rounds using double crochet stitches.
To maintain a flat circle, distribute increases evenly throughout each round.
For a regular double crochet circle, a useful guideline is to increase by approximately 12 stitches per round, although the exact number may need adjustment because of the decorative center.
If the fabric begins to curl upward, add a few more increases.
If the outer edge becomes wavy, reduce the number of increases.
Work until the ornament approaches your desired diameter, usually around 4 to 5 inches.
To produce a subtle textured appearance, alternate rounds of regular double crochet with rounds of half double crochet.
This creates an attractive surface while preserving the classic circular shape.
Step 6: Crochet the Decorative Border
Once the ornament reaches the desired diameter, begin the finishing border.
Chain 1.
Work one single crochet into each stitch around the outside edge.
Join with a slip stitch.
For a slightly more decorative finish, work a final round of reverse single crochet, also called the crab stitch.
This technique produces a gently twisted edge that gives the ornament a more polished and professional appearance.
Fasten off and weave in the loose yarn ends.
Repeat the entire process using the second yarn color.
You will have one beautiful white ornament and one festive red ornament.
How to Make the Golden Hanging Loop and Finish the Ornaments
The golden hanging detail is an important feature of this design. It adds brightness and creates the elegant appearance of a traditional Christmas bauble.
Using metallic gold crochet thread, create a small decorative attachment at the upper edge of the ornament.
Step 1: Make the Gold Ornament Cap
Identify the top center of your finished circular ornament.
Attach the gold thread to a stitch near the upper edge.
Chain 1 and work approximately 9 single crochet stitches along the top edge, centering them around the hanging point.
Turn your work.
Chain 1 and work one single crochet into each stitch across.
Repeat for another 2 to 3 rows.
This creates a small gold rectangular section resembling the metal cap on a traditional Christmas ornament.
For a decorative appearance, alternate single crochet rows with chain-1 mesh rows.
Step 2: Create the Hanging Loop
At the center of the gold cap, attach your thread and chain approximately 25 to 30 stitches.
Join the chain to the opposite attachment point using a slip stitch.
Make sure the loop is securely attached.
For a stronger hanging loop, work one slip stitch into each chain around the loop.
Alternatively, use a ready-made gold cord threaded through the crocheted cap.
The gold detail should feel proportional to the circular decoration, providing enough length to hang comfortably from a Christmas tree branch.
Step 3: Secure the Ornament
Use a yarn needle to weave all remaining thread ends through the back of the work.
Check the connection between the gold cap and the circular ornament.
If needed, reinforce the attachment with several small hand stitches.
This is particularly helpful when creating decorations intended for long-term use.
Step 4: Block the Crochet Ornament
Blocking helps the ornament maintain a smooth, symmetrical shape.
Lightly dampen the finished crochet piece with water.
Place it on a foam blocking mat and gently stretch it into a perfect circle.
Use rustproof pins to secure the outer edge.
Allow the ornament to dry completely.
If you want a firmer decoration, apply a light coat of fabric stiffener according to the manufacturer’s instructions.
Avoid excessive stiffener, which may make the yarn feel brittle or affect the softness of the stitches.
Step 5: Add the Finishing Touches
Once your ornament is completely dry, inspect the border and hanging loop.
Gently adjust any uneven stitches and trim visible yarn tails.
For an especially festive appearance, consider adding a small gold bead at the base of the hanging loop or a delicate metallic thread accent around the outer edge.
These finishing touches are optional, as the simple red and white designs already have a classic Christmas appearance.
Creative Decorating Ideas and Helpful Crochet Tips
Handmade Christmas ornaments are more than decorations. They can become meaningful keepsakes that families enjoy year after year.
The beautiful combination of red, white, and gold makes these crochet decorations suitable for many holiday decorating styles.
Decorate a Traditional Christmas Tree
Hang the white and red ornaments on a green Christmas tree decorated with warm white lights.
The contrasting colors create a festive look, while the gold hanging loops coordinate beautifully with traditional Christmas baubles.
Distribute the crocheted ornaments throughout the branches to create visual balance.
Create a Handmade Christmas Garland
Make several ornaments in alternating red and white colors.
Attach each ornament to a length of gold cord or decorative ribbon.
Hang the finished garland along a fireplace mantel, staircase, doorway, or festive window display.
This is a wonderful way to create coordinated decorations without purchasing expensive holiday accessories.
Use Them as Christmas Gift Decorations
A handmade ornament can make gift wrapping feel extra special.
Attach one to a wrapped present using a satin ribbon or natural twine.
After opening the gift, the recipient can reuse the ornament as a Christmas tree decoration.
This transforms a simple package embellishment into a thoughtful handmade keepsake.
Experiment With Different Color Combinations
Although red and white are traditional Christmas colors, this pattern can be adapted to many holiday palettes.
Try emerald green and champagne gold for an elegant look.
Soft blush pink and ivory can create a romantic vintage-inspired Christmas theme.
Navy blue and silver are beautiful choices for winter decorating.
For a rustic farmhouse style, combine natural cotton, warm cream, and muted burgundy.
Helpful Tips for Beautiful Results
Maintain consistent yarn tension throughout the project.
Count the stitches at the end of each round, especially when increasing the circular shape.
Use stitch markers to identify the beginning of each round.
Choose yarns of similar thickness when making matching ornaments.
Block each piece carefully before attaching decorative finishing details.
Finally, always test the strength of the hanging loop before displaying your ornament.
These simple habits will help create beautiful, durable decorations with neatly finished edges.
Frequently Asked Questions About Crochet Christmas Ornaments
Are these crochet Christmas ornaments suitable for beginners?
Yes. The project uses familiar stitches, including chains, single crochet, and double crochet. Beginners who understand working in rounds can practice these techniques while creating a decorative holiday ornament.
What yarn works best for crochet Christmas decorations?
Cotton yarn is particularly suitable because it provides definition and holds its shape well. Mercerized cotton can also create a smooth surface with a subtle sheen.
How can I make my crochet Christmas ornaments stiff?
Use a commercial fabric stiffener or diluted craft glue suitable for textiles. Shape the ornament while damp and allow it to dry completely before hanging.
Can I make these ornaments in different sizes?
Absolutely. Changing the yarn thickness, crochet hook size, or number of outer rounds allows you to create smaller or larger ornaments. Always check that the circle remains flat as you adjust the size.
Can these ornaments be washed?
Cotton ornaments without additional embellishments can often be cleaned gently according to the yarn manufacturer’s instructions. Decorations treated with stiffener or metallic elements may require careful spot cleaning instead.
How long does it take to make one ornament?
The time depends on the crocheter’s experience, the desired size, and the complexity of the finishing details. A crocheter familiar with basic stitches may complete one in approximately one to two hours, excluding blocking and drying time.
Can I sell handmade ornaments made using this pattern?
You can generally sell physical ornaments you personally make from this original tutorial. When selling handmade items, ensure that your materials, embellishments, and presentation meet any applicable marketplace or product safety requirements.
Conclusion
Creating your own crochet Christmas ornaments is a beautiful way to celebrate the holiday season with creativity and traditional craftsmanship. The combination of decorative circular stitching, festive red and white yarn, and elegant golden hanging loops makes these ornaments both charming and versatile.
Whether you hang them on your Christmas tree, incorporate them into a handmade garland, or give them as thoughtful holiday gifts, these decorations bring warmth and personality to Christmas celebrations.
The greatest beauty of handmade Christmas decorations lies in the time, attention, and care invested in every stitch. With just a little yarn, a crochet hook, and some imagination, you can create festive treasures that become part of your family’s holiday traditions for years to come.