
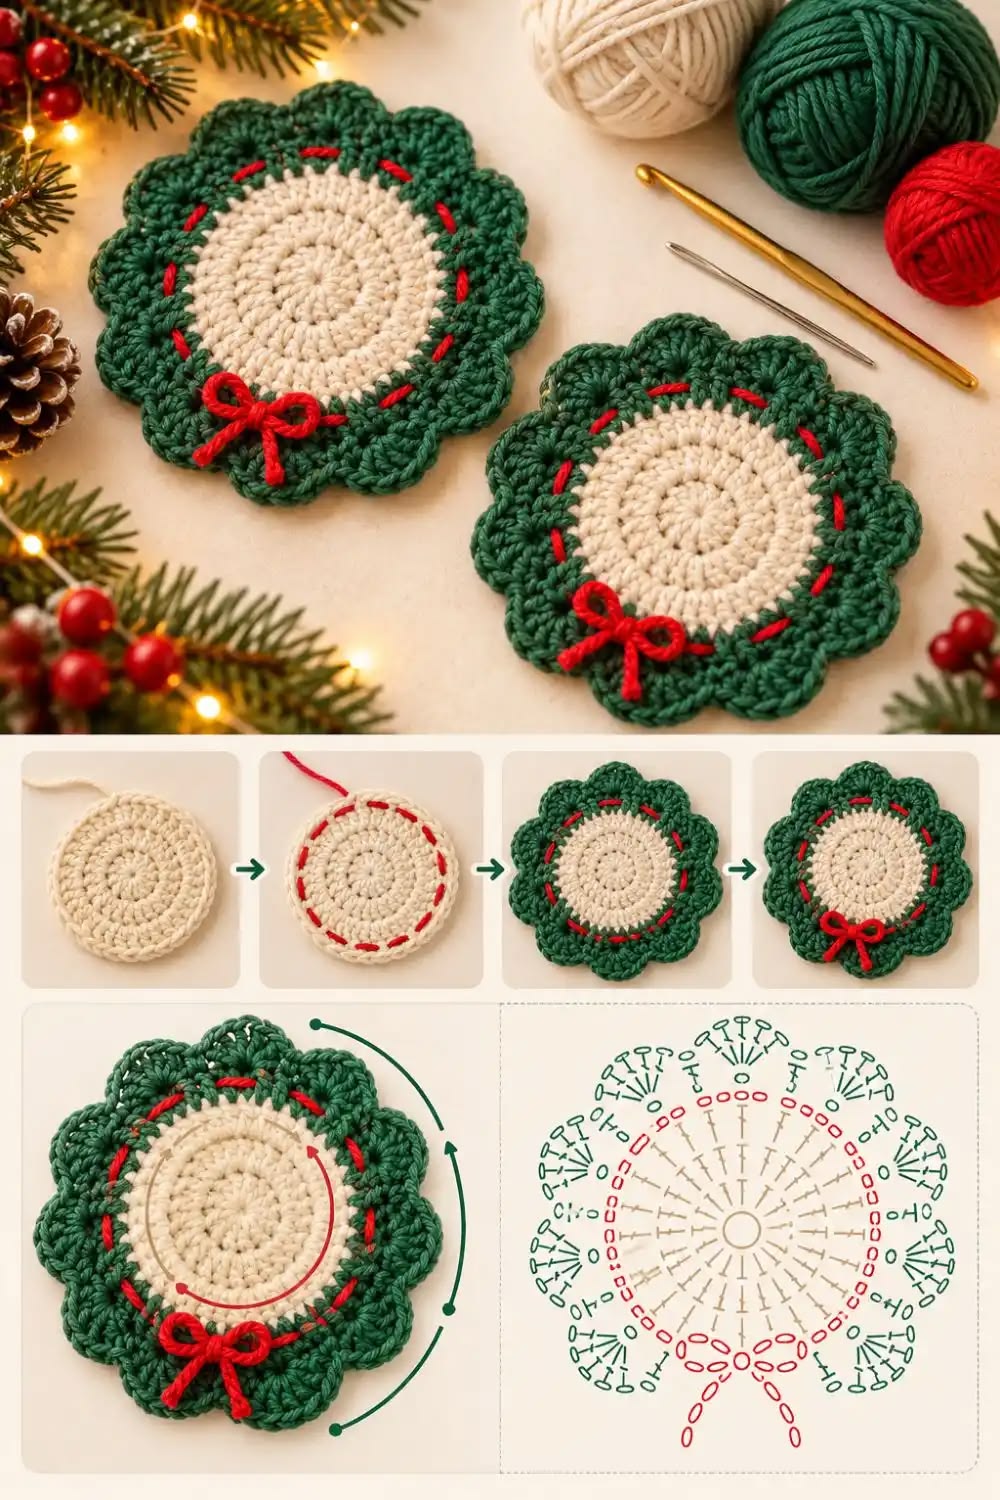
One of the most appealing features of these crochet Christmas wreath coasters is their timeless appearance. The circular center creates a clean and comfortable surface for cups and mugs, while the decorative green edging resembles the branches of a miniature Christmas wreath. The red ribbon woven around the coaster adds a cheerful finishing touch, making the entire design look festive without becoming overly complicated.
This easy Christmas crochet pattern is also a fantastic opportunity to practice crocheting in the round, making decorative scalloped edges, and adding embroidered embellishments.
With basic crochet stitches and a little patience, you can create beautiful accessories for your Christmas dining table, coffee station, or holiday gift baskets.The finished coasters can also be used as small decorative mats, Christmas ornaments, or accents for seasonal centerpieces.
Materials and Supplies for the Crochet Christmas Wreath Coaster
Before beginning your Crochet Christmas Wreath Coaster Pattern, gather your supplies and choose your favorite holiday yarn colors. The traditional combination of forest green, warm cream, and bright Christmas red produces a classic appearance that works beautifully with rustic, farmhouse, vintage, and modern Christmas decorations.
For this project, cotton yarn is an excellent choice because it provides good stitch definition, maintains its shape, and absorbs moisture. Cotton also creates a more stable surface for cups and mugs than many fluffy or stretchy yarns. If you prefer a softer decorative coaster, a smooth cotton-blend yarn can also work well.
Materials needed:
-
Worsted-weight cotton yarn in cream or ivory.
-
Worsted-weight cotton yarn in forest green.
-
Small amount of red cotton yarn for decoration.
-
4.0 mm (G/6) crochet hook, or a suitable hook for your yarn.
-
Yarn needle for weaving and embroidery.
-
Sharp scissors.
-
Stitch markers, if desired.
-
Measuring tape.
-
Blocking mat and rustproof pins, optional.
The finished coaster will measure approximately 5–6 inches (12.5–15 cm) in diameter, depending on your yarn, hook size, tension, and the number of rounds you complete. This size is suitable for most coffee mugs, teacups, and small drinking glasses.
You can easily customize the size by adjusting the number of rounds in the cream center. A smaller center creates a compact coaster, while additional evenly increased rounds can transform the project into a decorative mat for candles, small flower arrangements, or holiday table displays.
For beginners, it is helpful to crochet a small practice circle before starting the final project. This allows you to become comfortable with increases, maintaining an even stitch count, and keeping the circular base flat.
The design shown in the photograph features a compact cream center, a deep green wreath-inspired border, and simple red accents. The written instructions below are an adaptable pattern inspired by those visible details, rather than a stitch-by-stitch transcription of the decorative chart.
Step-by-Step Crochet Christmas Wreath Coaster Pattern
The construction begins with a flat circular base worked in cream yarn. After completing the center, you will add a forest-green border featuring decorative shell stitches. Finally, you will weave red yarn through the edge and create a small bow that resembles a Christmas ribbon.
This pattern uses U.S. crochet terminology, making it convenient for crocheters who follow American patterns. The main stitches include single crochet, double crochet, slip stitch, and chain stitch.
Crochet abbreviations:
| Abbreviation | Meaning |
|---|---|
| MR | Magic Ring |
| ch | Chain |
| sl st | Slip Stitch |
| sc | Single Crochet |
| dc | Double Crochet |
| st | Stitch |
| sts | Stitches |
| inc | Increase |
| rep | Repeat |
| BLO | Back Loop Only |
Step 1: Create the cream circular center
Begin with cream yarn and make a magic ring.
Round 1: Ch 1, work 8 sc into the magic ring. Join with a sl st to the first sc. (8 sts)
Round 2: Ch 1, work 2 sc in each stitch around. Join with a sl st. (16 sts)
Round 3: Ch 1, repeat 1 sc in the next stitch, 2 sc in the following stitch around. Join. (24 sts)
Round 4: Ch 1, repeat 1 sc in each of the next 2 stitches, 2 sc in the next stitch around. Join. (32 sts)
Round 5: Ch 1, repeat 1 sc in each of the next 3 stitches, 2 sc in the next stitch around. Join. (40 sts)
Round 6: Ch 1, repeat 1 sc in each of the next 4 stitches, 2 sc in the next stitch around. Join. (48 sts)
Round 7: Ch 1, repeat 1 sc in each of the next 5 stitches, 2 sc in the next stitch around. Join. (56 sts)
Round 8: Ch 1, repeat 1 sc in each of the next 6 stitches, 2 sc in the next stitch around. Join. (64 sts)
Work with consistent tension to keep the circle smooth and flat. If the center begins to curl or ripple, check your stitch counts and make sure the increases are evenly distributed.
Step 2: Prepare the decorative green border
Fasten off the cream yarn and attach the forest-green yarn in any stitch around the outer edge of the circle.
Round 9: Ch 1, work 1 sc in each stitch around. Join with a sl st. (64 sts)
This round establishes a clean green foundation between the cream center and the scalloped wreath border.
Round 10: Ch 1, work 1 sc in each of the 64 stitches, placing a stitch marker after every eighth stitch if desired. Join with a sl st. (64 sts)
The marked groups make it easier to space the decorative scallops evenly around the perimeter.
Step 3: Crochet the scalloped wreath edge
The scalloped border is the feature that gives this project its beautiful Christmas wreath appearance. Each decorative shell forms a rounded section that resembles the full, layered branches of an evergreen wreath.
Round 11: Ch 1, skip the next stitch, work 7 dc in the following stitch, skip the next stitch, work 1 sc in each of the next 5 stitches. Repeat from * to * eight times. Join with a sl st.
This round creates eight generous scallops around the circumference. The shell stitches naturally extend beyond the green foundation, adding dimension and creating a soft floral appearance.
To make the border fuller, work an additional decorative surface detail using green yarn. For example, you can add a small cluster of stitches at the center of each scallop, taking care not to pull the border too tightly.
When the edging is complete, fasten off the green yarn and weave in the ends carefully. Check that the coaster lies flat and that each scallop has a rounded, balanced shape.
Step 4: Add the red decorative ribbon
Thread a yarn needle with a length of bright red cotton yarn, approximately 20–24 inches (50–60 cm) long.
Starting near the bottom of the coaster, weave the red yarn in and out through the green stitches near the boundary between the cream center and the green border. Keep the stitches evenly spaced to create the appearance of a decorative holiday ribbon.
Continue around the entire circle, leaving enough yarn at the beginning and end to form a small bow. Avoid pulling the red yarn too tightly because this can distort the shape of the coaster.
Once the embroidery is complete, bring both ends of the red yarn together at the bottom of the wreath. Tie a small, neat bow with two rounded loops and short hanging tails.
Secure the bow with a few discreet stitches using a yarn needle. If the coaster will be washed frequently, make the bow firmly attached so it does not loosen with regular use.
Step 5: Finish and shape the Christmas coaster
After completing the red ribbon, inspect your project for loose yarn ends or uneven stitches. Use a yarn needle to weave all remaining ends securely into the back of the crocheted fabric.
Lightly dampen the coaster with water and place it on a clean blocking mat or towel. Gently arrange the green scallops into an even circular shape.
Allow the coaster to dry completely before using it or packing it as a gift. Blocking can improve the overall appearance, especially when the border has slightly uneven scallops.
Your handmade Crochet Christmas Wreath Coaster is now ready to decorate your holiday table.
Creative Christmas Decorating Ideas and Customization Tips
One of the greatest advantages of this Christmas wreath crochet tutorial is its versatility. Although the traditional red, green, and cream color combination is beautiful, you can experiment with other shades to match your seasonal decorations and personal style.
For an elegant vintage Christmas theme, consider using antique ivory, muted sage green, and burgundy red. These colors create a softer, nostalgic appearance that works beautifully with wooden furniture, lace tablecloths, and traditional Christmas ornaments.
For a modern holiday table, try bright white yarn with emerald green and metallic-inspired gold accents. You can replace the red embroidered ribbon with a thin gold-colored cotton thread or a decorative yarn that adds a subtle sparkle.
If you enjoy colorful Christmas decorations, create a matching set of coasters using different combinations of green, red, white, and cream. Each coaster can feature a slightly different ribbon color while maintaining the same basic wreath design.
These handmade pieces also make wonderful gifts. A set of four or six crochet Christmas coasters tied together with a festive ribbon makes an affordable, thoughtful present for friends, neighbors, teachers, or family members.
You can also transform the project into a hanging Christmas ornament by adding a small crocheted loop to the upper edge. For decorative hanging pieces, lightweight yarn may be preferable because it prevents the ornament from becoming too heavy.
Another creative idea is to use these coasters beneath small decorative candles or miniature Christmas arrangements. If using candles, place them in suitable heat-safe holders and keep the crocheted fabric away from flames and hot surfaces.
For a complete holiday collection, combine these wreath coasters with matching crochet napkin rings, table runners, mug cozies, or Christmas tree decorations. Using the same yarn colors across several projects creates a coordinated handmade holiday display.
Helpful Crochet Tips, Common Mistakes, and Care Instructions
When making a round crochet coaster, maintaining an even stitch count is essential. Incorrect increases can cause the center to become wavy or form a bowl shape. Counting stitches after every round helps prevent these problems and makes the project easier to complete.
Another important detail is choosing the correct crochet hook. If your stitches are too loose, the coaster may feel floppy and lose its shape. If the stitches are too tight, the circular center may curl upward. Adjust your hook size when necessary to achieve a smooth, flat fabric.
The scalloped border should also be worked with consistent tension. Uneven shell stitches can make some sections of the wreath appear larger than others. Taking your time with each scallop will help create a balanced decorative edge.
When adding the red embroidered ribbon, keep the stitches loose enough to preserve the natural movement of the fabric. Tight embroidery can pull the cream center inward or distort the green border, especially after washing.
Cotton coasters are generally easy to maintain, but always follow the care recommendations for the specific yarn you use. Gentle washing in cool water and drying flat can help preserve the stitches and maintain the rounded shape.
If you plan to make several coasters, complete each step in batches. For example, crochet all the cream centers first, then add the green borders, and finish with the red ribbon decorations. This method can save time and help your finished pieces look more consistent.
For the best results, use the same yarn brand, yarn weight, hook size, and tension throughout the set. Small differences in materials can change the finished dimensions, even when the same stitch pattern is followed.
Finally, remember that handmade crochet decorations do not need to be perfectly identical. Slight variations in the scallops, ribbon placement, and stitch texture are part of the charm of handcrafted holiday accessories.
Frequently Asked Questions About the Crochet Christmas Wreath Coaster
Is this crochet Christmas wreath coaster suitable for beginners?
Yes. This project is suitable for confident beginners who understand basic crochet stitches and know how to work in rounds. The circular center is straightforward, while the decorative scalloped border provides an opportunity to practice new techniques.
What is the best yarn for Christmas crochet coasters?
Medium-weight cotton yarn is one of the best options because it offers durability, absorbency, and good stitch definition. Smooth cotton yarn also helps the decorative border maintain its shape.
How long does it take to make one Christmas wreath coaster?
Most crocheters can complete one coaster in approximately 45–90 minutes. Beginners may need additional time to practice the increases, scalloped border, and embroidered ribbon.
Can I make the crochet wreath coaster larger?
Yes. You can add more evenly increased rounds to the cream center before beginning the decorative border. Remember to adjust the scallop repeat so that the border fits the new stitch count.
Can these crochet coasters be used as Christmas tree ornaments?
Absolutely. Simply attach a small hanging loop to the top of the wreath. You can also make miniature versions using thinner yarn and a smaller hook.
How can I keep the coasters flat?
Use even tension, count your stitches, and block the finished pieces if necessary. Cotton yarn is particularly useful for creating flat, stable crochet projects.
Can I sell handmade Christmas wreath coasters?
You can generally sell finished items you make using your own materials and this original written pattern. Check any applicable marketplace rules and avoid using other creators’ protected photos or branding without permission.
Conclusion
The Crochet Christmas Wreath Coaster Pattern is a delightful way to add handmade warmth and festive color to your home. With its creamy circular center, forest-green scalloped edging, and cheerful red ribbon, this beautiful project captures the traditional spirit of Christmas in a practical and decorative accessory.
Whether you make a single coaster for your favorite holiday mug or an entire matching set for your Christmas table, the project offers a satisfying combination of simple crochet techniques and elegant seasonal details. It is also a lovely choice for handmade gifts, holiday craft collections, and festive home decorating.
Most importantly, this easy crochet Christmas decoration demonstrates how a few basic stitches and thoughtfully chosen colors can become something special. Gather your yarn, prepare your crochet hook, and enjoy creating a charming Christmas wreath coaster that can be treasured throughout the holiday season.