
Creating your own crochet Christmas gift bag is a wonderful way to make Christmas presents even more meaningful. Instead of using disposable wrapping paper, you can make a reusable handmade bag that becomes part of the gift itself. This delightful design is perfect for presenting chocolates, small accessories, jewelry, gift cards, and other thoughtful Christmas surprises.
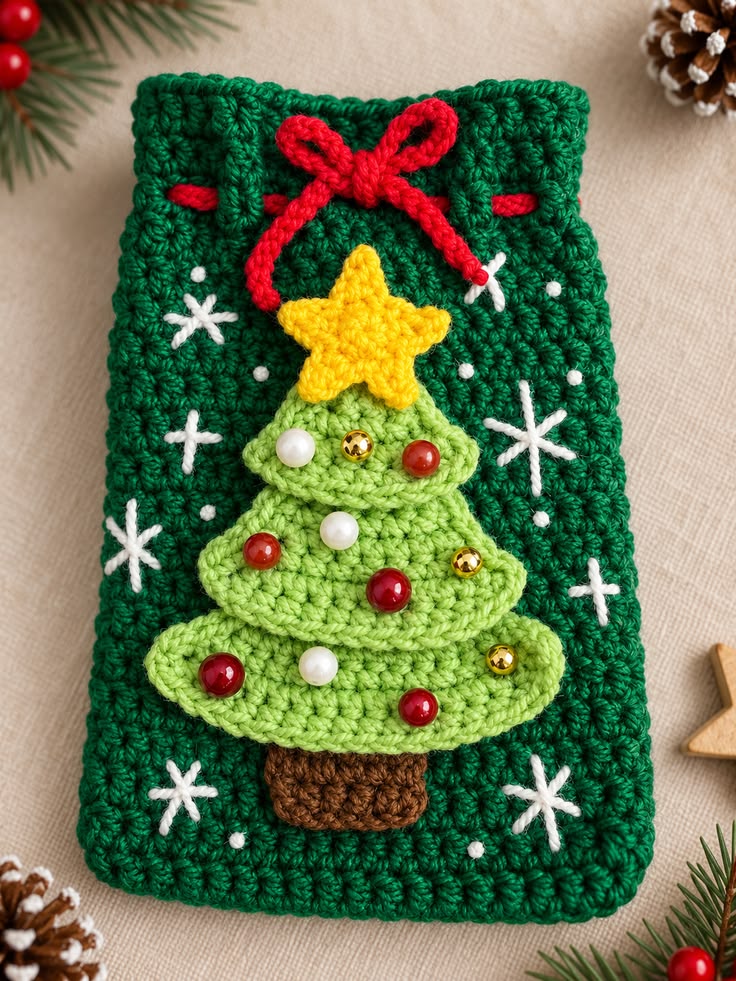
One of the most appealing features of this Christmas tree crochet bag is its three-dimensional decorative design. The layered Christmas tree stands out beautifully against the dark green crocheted background, while colorful beads resemble miniature Christmas ornaments.
Whether you are an experienced crocheter or an enthusiastic beginner looking for a festive challenge, this project offers an enjoyable opportunity to practice basic stitches, appliqué techniques, and decorative embroidery.
Materials and Supplies for the Crochet Christmas Tree Gift Bag
Choosing the right materials is essential for creating a beautiful, durable, and professional-looking handmade Christmas gift bag. The design works particularly well with medium-weight cotton yarn because cotton provides excellent stitch definition and helps the finished bag maintain its shape.
Acrylic yarn is another suitable option, especially if you prefer a softer texture or want to create several gift bags at an affordable cost. When selecting your yarn, consider using traditional Christmas colors to highlight the individual decorative elements.
For a bag measuring approximately 7 inches wide and 10 inches tall (18 × 25 cm), gather the following materials:
-
Worsted-weight yarn (Category 4) in dark Christmas green, approximately 110–140 yards.
-
Light green yarn, approximately 35–50 yards, for the Christmas tree.
-
Bright yellow yarn, approximately 10–15 yards, for the star.
-
Red yarn, approximately 15–20 yards, for the drawstring and bow.
-
Brown yarn, approximately 10 yards, for the tree trunk.
-
White yarn for embroidered snowflakes.
-
A 4.0 mm (G/6) crochet hook, or the size needed to obtain the desired gauge.
-
Yarn needle, stitch markers, and scissors.
-
Small decorative beads in red, gold, and pearl white.
-
Optional cotton fabric for an interior lining.
The finished measurements are approximate and will depend on your yarn, hook size, and personal crochet tension. The project described below is an original construction inspired by the pictured design rather than an exact reconstruction of its unseen stitches.
For the Christmas tree decorations, choose lightweight beads that can be sewn securely into place. If the gift bag will be given to a young child, embroidered ornaments are a safer alternative to small detachable decorations.
Before beginning, crochet a small gauge swatch. A useful starting point for the main bag is approximately 16 single crochet stitches and 18 rows per 4 inches (10 cm), although matching the desired finished dimensions is more important than achieving an exact gauge.
How to Crochet the Christmas Gift Bag Step by Step
The main structure of this crochet drawstring gift bag is surprisingly simple. It consists of a rectangular pouch with a closed bottom, two side edges, and an upper opening. The decorative Christmas tree and embroidered snowflakes are added after the basic bag is completed.
This version uses U.S. crochet terminology. The primary stitches include chain (ch), single crochet (sc), slip stitch (sl st), half double crochet (hdc), double crochet (dc), and single crochet two together (sc2tog).
Step 1: Crochet the Main Green Bag
Begin with dark green yarn and a 4.0 mm crochet hook.
Foundation: Chain 29.
Row 1: Work 1 sc into the second chain from the hook and each remaining chain. You should have 28 sc.
Rows 2–45: Chain 1, turn, and work 1 sc into each stitch across.
Repeat the same process to create a second rectangular panel of identical size.
Each panel should measure approximately 7 inches wide and 10 inches tall (18 × 25 cm), depending on gauge. The dense single crochet texture creates a sturdy surface for attaching the decorative appliqués.
Position the two panels with their right sides facing outward. Join the sides and bottom using a slip stitch seam or a neat single crochet border, leaving the top open.
For a thicker, more dimensional edge similar to the photographed bag, work an additional round of single crochet around the pouch opening.
Step 2: Create the Drawstring Opening
The red drawstring adds a beautiful contrast to the deep green background and gives the bag its recognizable Christmas appearance.
Near the upper edge of the bag, create a decorative eyelet round using the following sequence:
Eyelet round: Chain 3, skip 1 stitch, double crochet into the next stitch, then repeat chain 1, skip 1 stitch, double crochet in next stitch around the opening, adjusting at the end as needed.
Alternatively, the red cord can be woven through spaces between existing crochet stitches, as suggested by the photographed design.
For the drawstring, use red yarn and chain approximately 65–75 stitches, adjusting the length for your bag.
Slip stitch into the second chain from the hook and continue slip stitching across the chain to create a stronger cord. Make a second cord if you prefer a double-drawstring closure.
Weave the cord through the upper opening and tie it into a beautiful decorative bow at the front of the bag.
The red bow becomes an important visual detail, making the Christmas crochet pouch look festive even before additional decorations are attached.
Creating the Crochet Christmas Tree, Star, and Snowflake Decorations
The main attraction of this Crochet Christmas Tree Gift Bag Pattern is the three-dimensional Christmas tree appliqué. The pictured design features three overlapping light-green branches, a small brown trunk, and a bright yellow star at the top.
Making each decorative component separately allows you to arrange the pieces before permanently sewing them onto the bag. It also makes the project easier to customize with different colors, ornaments, and Christmas-inspired details.
Step 3: Crochet the Layered Christmas Tree
Begin with light green yarn and create three triangular tree sections. The following compact, tapered pieces can be overlapped to form the tiered silhouette.
For the smallest section:
Row 1: Chain 3. Work 2 sc starting in the second chain from the hook.
Row 2: Chain 1, turn, work 2 sc into the first stitch, then 1 sc into the next stitch. (3 sc)
Row 3: Chain 1, turn, work 2 sc into the first stitch, sc across to the last stitch, then 2 sc into the last stitch. (5 sc)
Continue increasing at both ends of each row until the section reaches approximately 2.5–3 inches (6.5–7.5 cm) wide.
Create the middle section in the same way, continuing until it reaches approximately 4 inches (10 cm) wide.
For the bottom section, continue increasing until the piece measures approximately 5–5.5 inches (13–14 cm) wide.
Work a final round of single crochet around each section to create a tidy edge. The three pieces will overlap, with the smallest at the top and the largest at the bottom.
If you prefer a fuller tree, work the final border using half double crochet stitches. This creates a softer, slightly raised edge.
Arrange the sections on the front of the bag, positioning the smallest at the top. Overlap the pieces enough to conceal their upper edges, then sew them securely with matching green yarn.
Step 4: Crochet the Brown Tree Trunk
Using brown yarn, chain 11.
Row 1: Work 1 sc in the second chain from the hook and each remaining chain. (10 sc)
Rows 2–6: Chain 1, turn, and work 1 sc into each stitch.
Fasten off, leaving a long tail for sewing.
Position the trunk underneath the bottom tree section and attach it to the front of the bag.
For a more realistic tree trunk, use two slightly different shades of brown yarn to create subtle texture and dimension.
Step 5: Make the Yellow Crochet Star
The bright yellow star gives the tree an instantly recognizable Christmas appearance.
Start with yellow yarn.
Round 1: Make a magic ring, chain 1, and crochet 10 sc into the ring. Join with a slip stitch.
Round 2: Repeat the following sequence five times: chain 4, slip stitch into the second chain from the hook, sc into the next chain, hdc into the next chain, skip 1 stitch of the center ring, and slip stitch into the following stitch.
This creates five pointed star arms. Fasten off and carefully shape the points.
Attach the star above the upper tree section, allowing the bottom of the star to overlap the tree slightly.
You can lightly block the star before sewing if you want particularly neat, symmetrical points.
Step 6: Embroider the White Snowflakes
The delicate white snowflakes scattered around the Christmas tree add contrast and create the charming appearance of gently falling snow.
Thread a yarn needle with white yarn and work small straight stitches onto the front green panel.
To make a basic six-point snowflake, stitch three straight lines crossing at the center. Each line should form two opposing arms.
Make snowflakes in different sizes for a more natural winter appearance.
Add smaller white stitches or French knots between the larger snowflakes to represent falling snow.
Be careful not to pull the embroidery stitches too tightly, because excessive tension can distort the surface of the crocheted bag.
Step 7: Add Decorative Christmas Ornaments
Use small red, gold, and white beads to decorate the Christmas tree, following the general arrangement shown in the reference image.
Place larger red and pearl-white beads across the lower sections of the tree, then add smaller gold ornaments to create sparkle and visual balance.
Sew each bead individually using strong thread and multiple secure passes. Keep the fastening knots on the inside of the appliqué whenever possible.
For an entirely crocheted version, replace the beads with small French knots, embroidered circles, or tiny crochet bobbles.
This alternative gives the crochet Christmas gift bag a softer appearance while keeping the decorations permanently attached.
Finishing Techniques and Creative Ways to Personalize Your Christmas Gift Bag
Once all the decorative components are completed, the final stage is assembling the project into a polished handmade crochet Christmas bag. Good finishing techniques make a noticeable difference in the appearance and durability of the finished gift pouch.
Before attaching the decorations permanently, place the bag on a flat surface and arrange the Christmas tree, star, and snowflakes until you are satisfied with their positions.
Use stitch markers or removable pins to hold the appliqués in place. Sew around the edges of each decoration with matching yarn, using small, evenly spaced stitches.
Weave all remaining yarn ends securely into the wrong side of the work. Avoid cutting yarn tails too short, especially near the bag opening, where repeated use may create extra tension.
For additional structure, consider inserting a simple fabric lining. Cut two pieces of cotton fabric slightly smaller than the bag panels, sew the sides and bottom, then attach the lining neatly below the drawstring opening.
A lined bag works especially well for presenting small jewelry boxes, Christmas candy packages, handmade soaps, and other gifts that might catch on the crochet stitches.
Creative Christmas Color Combinations
Although traditional green, red, and yellow create a classic Christmas look, this pattern offers many opportunities for personalization.
A cream-colored bag with a forest-green tree and gold star creates a sophisticated vintage-inspired design. A burgundy background with snowy white decorations gives the project a cozy farmhouse appearance.
For a playful Christmas gift bag, try a bright red background with an emerald-green tree, colorful ornaments, and a sparkling white star.
You can also create a matching collection using the same bag construction while changing the central appliqué to a snowman, reindeer, gingerbread house, or Christmas stocking.
Practical Tips for a Professional Finish
Maintaining consistent stitch tension will help the bag panels remain straight and the decorative appliqués lie neatly against the background.
Choose colors with good contrast so the Christmas tree, star, and snowflakes remain clearly visible, even when the bag is photographed or displayed among holiday decorations.
When attaching the tree, sew the lower edges of each tier securely while leaving the central portions slightly raised. This gives the appliqué a gentle three-dimensional appearance without making it bulky.
Finally, test the drawstring several times to ensure the bag closes smoothly. A properly finished pouch should open easily, remain securely closed, and maintain its shape when filled.
Frequently Asked Questions About the Crochet Christmas Tree Gift Bag Pattern
Is this Christmas gift bag suitable for beginners?
Yes. The main bag uses basic crochet stitches, making it approachable for confident beginners. The layered tree appliqué, star, and embroidery require a little additional patience, but each component can be completed separately.
What is the best yarn for a crochet Christmas gift bag?
Worsted-weight cotton yarn is an excellent choice because it is durable and provides clear stitch definition. Acrylic yarn also works well and can be more economical for making multiple bags.
How big should a crochet Christmas gift bag be?
A finished size of approximately 7 × 10 inches (18 × 25 cm) is practical for small presents. You can adjust the foundation chain and number of rows to create larger or smaller versions.
Can I make this Christmas tree bag without beads?
Absolutely. Small embroidered ornaments, crochet bobbles, or French knots can replace decorative beads. This is a good option when creating gift bags for households with young children.
Can this crochet bag be washed?
The bag may be gently hand-washed if you use washable yarn and suitable decorations. Check the yarn manufacturer’s instructions and avoid machine washing when delicate beads or ornaments are attached.
Can I sell finished bags made from this pattern?
You can generally sell handmade bags you create using these instructions. If selling your finished work, use your own product photographs and ensure any additional embellishments or designs you incorporate are permitted for commercial use.
How long does it take to crochet this Christmas gift bag?
Many crocheters can complete a bag in approximately 4–7 hours, depending on experience, yarn choice, and the amount of decorative detail added. Beginners may prefer to spread the project across several crafting sessions.
Conclusion
The Crochet Christmas Tree Gift Bag Pattern is a delightful way to combine practical gift packaging with the creativity and warmth of handmade crochet. Its textured green background, layered Christmas tree, bright yellow star, white embroidered snowflakes, and festive red bow create an appealing decoration that perfectly captures the spirit of the holiday season.
More than just a gift container, this reusable crochet Christmas bag can become a treasured part of someone’s Christmas traditions. It can be brought out year after year, filled with thoughtful surprises, and displayed as a beautiful handmade decoration.
Whether you create one special bag for a loved one or make an entire collection for your holiday celebrations, this project offers endless opportunities to experiment with colors, textures, and embellishments. With a little yarn, creativity, and attention to detail, you can turn a simple crochet pouch into a memorable Christmas gift that is both beautiful and meaningful.