
Whether you are an experienced crocheter looking for a quick weekend project or a beginner searching for something creative, this easy crochet keychain tutorial offers an enjoyable way to practice shaping, increasing, and assembling small crochet pieces.These colorful accessories also make thoughtful handmade gifts, charming craft fair products, and lovely additions to personalized gift packages.
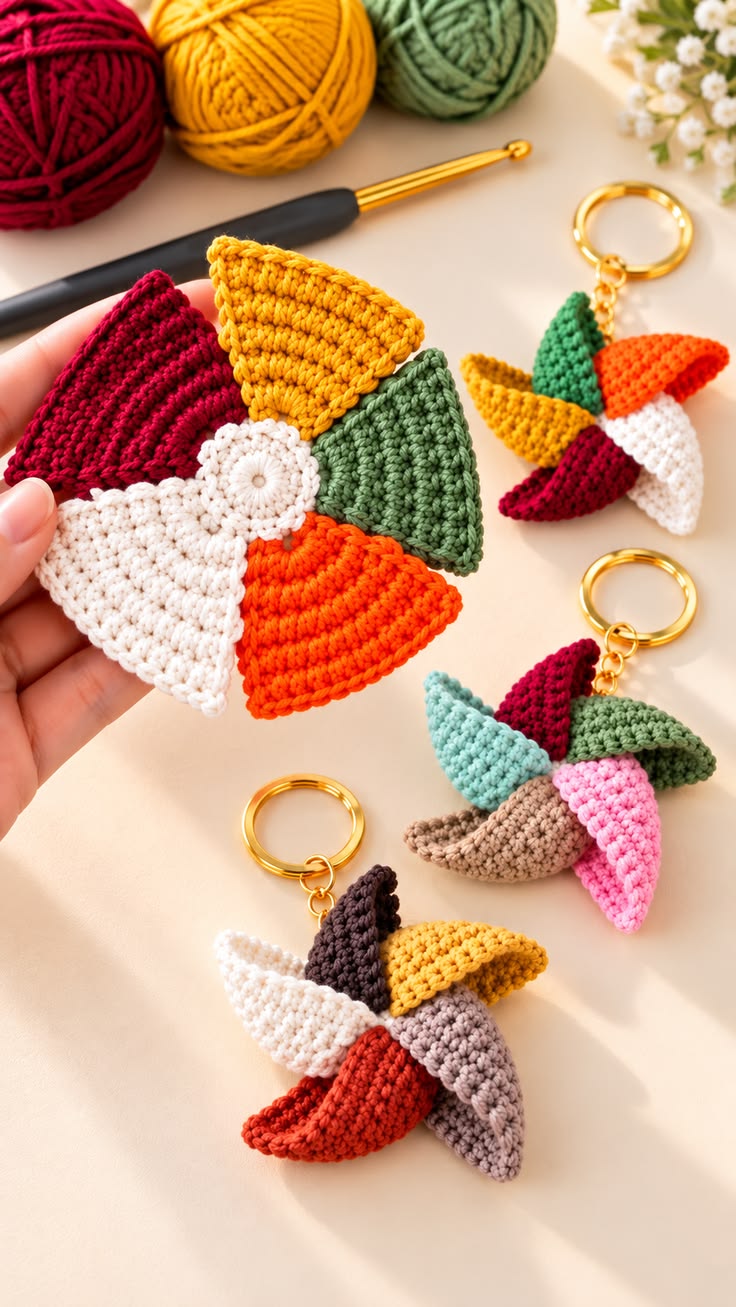
Materials and Supplies for the Colorful Crochet Pinwheel Keychain
Before starting your handmade crochet pinwheel, gather the materials needed to create a neat, durable, and beautifully finished accessory. Because the design consists of several individual crochet blades connected around a central circle, choosing a yarn with good stitch definition will make the assembly easier and help the finished shape maintain its appearance.
Cotton yarn is an excellent option for this project because it offers firmness, durability, and a smooth finish. Lightweight or medium-weight cotton can work well, depending on the desired finished size. Cotton-blend yarn is another suitable choice, particularly for crocheters who prefer a slightly softer texture.
For a small keychain measuring approximately 3.5–4.5 inches (9–11.5 cm) across, use a 2.5 mm to 3.5 mm crochet hook with compatible sport or DK-weight cotton yarn. These dimensions are approximate and will vary depending on the yarn, hook, tension, and final arrangement of the blades.
Materials You Will Need
-
Cotton yarn in five complementary colors
-
A small amount of white or cream yarn for the center
-
2.5 mm–3.5 mm crochet hook
-
Yarn needle for sewing and finishing
-
Sharp scissors
-
Stitch markers
-
Gold or silver metal keychain ring
-
Small jump ring or short metal chain
-
Optional small piece of felt for reinforcement
Selecting attractive colors is one of the most enjoyable stages of this crochet keychain pattern. A vintage-inspired combination of burgundy, golden yellow, sage green, cream, and burnt orange creates an elegant retro appearance, while brighter shades offer a more energetic and playful look.
For a softer variation, consider pale pink, mint green, lavender, warm beige, and light blue. These combinations are particularly attractive for decorative accessories, handmade birthday gifts, and personalized bag charms.
Although the project is relatively small, pay attention to yarn tension. The stitches should be firm enough to support the curved blades without becoming overly tight. Consistent tension will also make it easier to position the pieces evenly around the center.
Step-by-Step Crochet Pinwheel Keychain Pattern
The Colorful Crochet Pinwheel Keychain is constructed using five separate tapered crochet blades, a small circular center, and a metal ring attachment. Each blade is worked individually before the pieces are arranged and sewn together to create the familiar rotating pinwheel appearance.
The following instructions provide an approachable interpretation of the design shown in the photograph. Because the original stitch instructions are not available, this is a newly developed pattern inspired by its appearance rather than an exact reconstruction.
Crochet Abbreviations – U.S. Terms
| Abbreviation | Meaning |
|---|---|
| ch | Chain |
| sc | Single crochet |
| hdc | Half double crochet |
| dc | Double crochet |
| sl st | Slip stitch |
| st(s) | Stitch(es) |
| inc | Increase (2 sc in one stitch) |
| sc2tog | Single crochet 2 stitches together |
| MR | Magic ring |
| FO | Fasten off |
Step 1: Crochet the First Pinwheel Blade
Begin with the first color, such as deep burgundy. Create a foundation chain of 3 stitches, then work 2 single crochet stitches into the second chain from the hook and 1 single crochet into the final chain. You should have 3 stitches.
For Row 2, chain 1 and turn. Work 1 single crochet in the first stitch, 2 single crochet in the middle stitch, and 1 single crochet in the final stitch. You should now have 4 stitches.
Continue working in single crochet, increasing by one stitch approximately every second row until the blade reaches 14 stitches across. Work the remaining rows evenly until the piece measures approximately 2.5 inches (6.5 cm) from the starting tip.
To create a slightly curved appearance, work 2 or 3 additional short rows across one side of the blade, gradually decreasing the number of stitches worked. This will give the piece an asymmetrical shape that can be folded gently toward the center.
Finish with a round of single crochet around the outer edges, working 2 or 3 stitches into sharp corners where necessary. Fasten off, leaving a long yarn tail for assembly.
Step 2: Make the Remaining Four Blades
Repeat the same construction process four more times using different yarn colors. For a design similar to the photograph, consider golden yellow, forest green, burnt orange, and ivory white.
Try to keep all five blades approximately the same length and width. Slight variations in shaping can be attractive, but consistent dimensions will make the finished pinwheel appear balanced.
After completing each blade, gently curve one side toward the center to test the desired overlapping arrangement. The blades should resemble petals with a subtle spiral direction rather than completely flat triangular shapes.
Lay all five blades on a table before sewing. Rotate them until the widest edges create an attractive circular arrangement, with each tapered section contributing to the illusion of movement.
If the blades seem too soft, a smaller hook or slightly tighter stitch tension can help create a firmer structure. Avoid stuffing the pieces heavily, since the design depends on relatively thin and flexible crochet sections.
Step 3: Crochet the Circular Center
Using white or cream yarn, create a magic ring and work 6 single crochet stitches into the ring. Pull the yarn tail gently to close the center.
For Round 2, make 2 single crochet stitches in each stitch around, resulting in 12 stitches. For Round 3, repeat 1 single crochet followed by an increase six times, resulting in 18 stitches.
For Round 4, repeat 2 single crochet stitches followed by an increase six times, resulting in 24 stitches. This creates a small, flat circular piece that will hold the five blades together.
The center should measure approximately 1–1.25 inches (2.5–3 cm) in diameter, depending on the yarn and hook used. If necessary, add another increase round to make the circle large enough to cover the blade attachment points.
Fasten off, leaving a long yarn tail. This tail will be used to sew the circular center over the overlapping inner tips of the pinwheel blades.
Step 4: Assemble the Crochet Pinwheel
Arrange the five crochet blades in a clockwise pattern, overlapping their inner ends slightly. The wider portions should fan outward, while the tapered or curved edges create the characteristic pinwheel effect.
Secure the blades temporarily with stitch markers or sewing pins. Once satisfied with the arrangement, use a yarn needle and matching yarn to stitch the overlapping ends together.
Position the white circular center over the joining area, ensuring that all blade attachment points are concealed. Sew around the circumference of the center, catching the underlying blades securely.
For additional durability, create a second small circular center and attach it to the back. This optional reinforcement is useful when the finished piece will be carried regularly on keys or a handbag.
Gently adjust each blade after assembly. The sections should overlap neatly without pulling the center out of shape. The result is a decorative pinwheel with a lovely dimensional appearance.
Step 5: Attach the Metal Keychain Ring
Choose one of the upper blades as the attachment point. Using matching yarn, create a small reinforced loop by chaining approximately 8 stitches and securing the chain back into the same area.
Work several tight stitches around the loop to reinforce it, then weave the yarn ends securely into the crochet fabric. This additional reinforcement helps prevent the attachment from stretching during daily use.
Open a small jump ring using jewelry pliers and pass it through the crochet loop. Connect the jump ring to the metal keychain ring or short decorative chain.
Make sure the metal components are fully closed before using the accessory. If necessary, add a second reinforced attachment stitch near the base of the loop.
Your colorful crochet pinwheel keychain is now ready to decorate a handbag, brighten a set of keys, or become a thoughtful handmade gift.
Creative Color Combinations and Decorating Ideas
The beauty of this DIY crochet pinwheel pattern comes from its incredible versatility. By changing only the yarn colors, the same design can be transformed into an elegant vintage accessory, a cheerful summer decoration, or a festive seasonal gift.
A retro-inspired combination of burgundy, mustard yellow, burnt orange, olive green, and ivory creates a warm, nostalgic appearance. These colors work particularly well together because they offer contrast without overwhelming the finished design.
For spring and summer, pastel combinations can make the pinwheel look delicate and fresh. Try blending lavender, blush pink, pale turquoise, cream, and soft sage green for a charming accessory suitable for handbags and decorative gift packaging.
Holiday versions offer another creative possibility. Christmas pinwheels can combine deep red, evergreen, white, gold, and cream, while autumn-inspired keychains look beautiful in pumpkin orange, cinnamon brown, mustard, burgundy, and forest green.
You can also experiment with different yarn textures. Mercerized cotton produces a smooth and slightly lustrous finish, while matte cotton gives the project a softer, more traditional handmade appearance.
For a more decorative look, add tiny embroidered details to the blades or incorporate a metallic accent thread around the white center. Keep embellishments lightweight so the pinwheel maintains its original shape.
A larger version of this pattern can become a decorative hanging ornament, nursery decoration, or colorful addition to a craft room. When used as hanging décor, a short yarn cord can replace the metal keychain ring.
Smaller pinwheels can be attached to zipper pulls, tote bags, pencil cases, or handmade gift tags. These variations make excellent projects for using leftover yarn from larger crochet creations.
Helpful Tips for a Professional Crochet Finish
Creating a beautiful crochet pinwheel keychain involves more than simply completing the individual pieces. Careful shaping, consistent stitching, and thoughtful assembly all contribute to the finished accessory’s quality.
One important technique is maintaining consistent yarn tension. Uneven tension can cause one blade to appear larger than the others or create unwanted curling along the edges.
Using stitch markers is especially helpful when working increases and decreases. They allow you to identify shaping points and make it easier to repeat the same construction process across all five blades.
Before assembling the pinwheel, lightly block the individual pieces if necessary. Cotton crochet can be gently shaped with a little moisture and allowed to dry naturally on a flat surface.
Avoid stretching the blades excessively during blocking. The goal is to smooth irregular stitches and improve the overall shape without eliminating the gentle curves that give the pinwheel its dimensional appearance.
When sewing the center, use small, secure stitches and avoid pulling the yarn too tightly. Excessive tension can cause puckering and distort the arrangement of the blades.
For accessories intended for everyday use, reinforce the keychain attachment thoroughly. A securely sewn loop and properly closed metal jump ring will help the handmade charm withstand regular handling.
After assembly, weave all loose yarn ends through several stitches on the back of the work. Trim the ends carefully, leaving enough yarn inside the fabric to prevent unraveling.
Finally, inspect the finished pinwheel from both the front and back. Adjust any uneven blades, check the center stitching, and ensure the accessory hangs naturally from its metal ring.
Frequently Asked Questions About Crochet Pinwheel Keychains
Is this crochet pinwheel pattern suitable for beginners?
Yes. The pattern uses basic crochet techniques such as chain stitches, single crochet, increases, and simple sewing. Beginners may need a little practice shaping the curved blades, but the project is manageable with patience.
What is the best yarn for crochet keychains?
Cotton yarn is one of the best choices because it provides good stitch definition and a firm structure. Mercerized cotton is particularly useful when you want a polished finish.
How long does it take to crochet a pinwheel keychain?
Depending on experience and the number of details added, a single pinwheel keychain may take approximately 1.5 to 3 hours to complete. Preparing several blades in advance can make assembling multiple keychains more efficient.
Can I make the crochet pinwheel larger?
Absolutely. Use thicker yarn, a larger crochet hook, and additional rows to increase the size. Larger versions can become decorative wall hangings, nursery ornaments, or colorful handmade decorations.
How do I prevent the crochet blades from curling too much?
Keep the stitch tension consistent, avoid excessive increases along the edges, and gently block the pieces before assembly. A little natural curvature is desirable because it contributes to the pinwheel effect.
Can I sell finished pinwheel keychains at craft fairs?
You can sell finished items made from this original tutorial. Handmade pinwheel keychains can be attractive craft fair products, particularly when offered in coordinated color collections or personalized packaging.
Can the crochet pinwheel actually spin?
The version described here is a stationary decorative pinwheel. Its overlapping blades create the appearance of movement, but they do not rotate independently. A functioning spinning design would require a different center attachment mechanism.
Conclusion
The Colorful Crochet Pinwheel Keychain Pattern is a wonderful example of how a small crochet project can become a beautiful and eye-catching handmade accessory. With five curved blades, a neatly crocheted circular center, and a simple metal keychain attachment, this design combines creativity and practicality in a delightful way.
Its greatest appeal is the freedom to experiment with color. Whether you prefer elegant vintage tones, bright rainbow combinations, romantic pastels, or festive holiday shades, every handmade crochet pinwheel can be customized to reflect a unique style.
Perfect for gifts, craft fairs, handbag decorations, and creative leftover-yarn projects, this easy crochet pinwheel keychain tutorial offers an enjoyable way to transform a few simple materials into something special.