
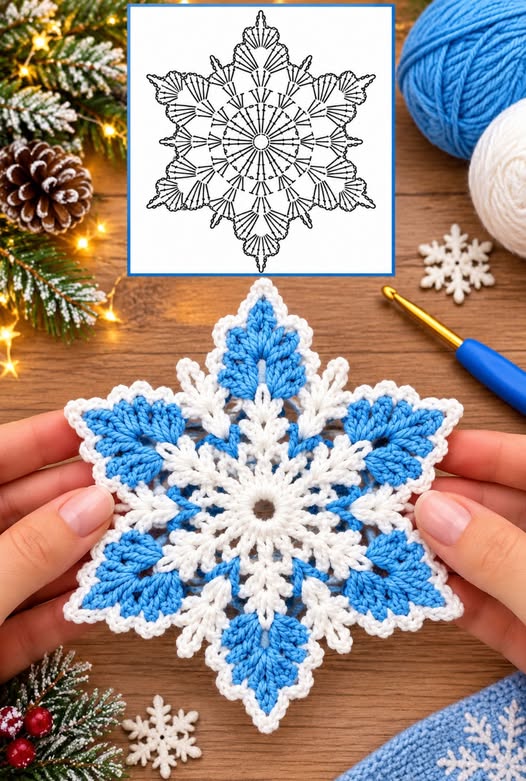
One of the most appealing qualities of a crochet snowflake ornament is its versatility. Unlike fragile glass decorations, handmade crochet snowflakes are lightweight, easy to store, and suitable for many seasonal decorating ideas. You can hang them on Christmas trees, attach them to wrapped presents, use them in winter garlands, or display them as decorative accents around your home. The blue and white crochet snowflake featured here takes inspiration from traditional six-point snowflake designs, combining textured stitches, airy spaces, and decorative edging. Although the design appears intricate, it becomes much easier to understand when divided into individual rounds and repeated stitch sequences.
Learning how to make a Crochet Snowflake Pattern is also an excellent opportunity to develop your crochet skills. This project introduces several important techniques, including working in the round, creating chain spaces, making tall stitches, forming decorative clusters, and maintaining symmetry throughout a circular pattern.
Beginners who already understand basic crochet stitches can approach the design gradually, while more experienced crocheters can enjoy experimenting with color combinations and decorative details. Throughout this tutorial, you will discover which materials work best, how to construct the central snowflake, how to build the six blue points, and how to finish your ornament so it maintains its beautiful shape for years to come.
1. Materials, Measurements, and Essential Crochet Techniques
Choosing the right materials is an important part of creating a beautiful Crochet Snowflake Pattern. Because snowflakes depend on small details and clearly defined stitches, smooth cotton yarn is particularly suitable for this project. Cotton offers excellent stitch definition, making the decorative branches and pointed edges easier to see. For the blue-and-white design, choose a bright winter blue for the six outer sections and a clean white for the central details and decorative border. These contrasting shades emphasize the symmetrical structure and give the finished ornament an attractive winter appearance.
For a medium-sized crochet Christmas snowflake, lightweight cotton yarn works especially well. Sport-weight cotton, commonly classified as Category 2 yarn, offers a good balance between structure and softness. A 2.5 mm crochet hook is a practical starting point, although the most appropriate hook size depends on your yarn, tension, and desired dimensions. You will also need a yarn needle, scissors, stitch markers, and a few pins for blocking. A foam blocking mat is helpful when shaping the six points, while a small amount of fabric starch can be used if you prefer a firmer ornament.
Materials needed for this Crochet Snowflake Pattern:
-
White cotton yarn: approximately 20–25 yards (18–23 meters).
-
Blue cotton yarn: approximately 15–20 yards (14–18 meters).
-
Crochet hook: 2.5 mm, or a size appropriate for your yarn.
-
Yarn needle for weaving in loose ends.
-
Small scissors.
-
Six removable stitch markers.
-
Blocking mat and rustproof pins.
-
Optional fabric starch for a firmer finish.
-
Optional thin ribbon or cotton thread for hanging.
The approximate finished diameter of this six-point crochet snowflake is 6–7 inches (15–18 cm), measured from the tip of one point to the opposite tip after blocking. The actual measurement may vary according to yarn thickness, hook size, and personal tension. Smaller hooks and fine crochet thread can create delicate miniature snowflakes, while slightly thicker yarn produces larger decorations. For a balanced result, aim for evenly sized stitches and check that all six points have similar dimensions before finishing.
Before starting the pattern, it is helpful to understand the basic US crochet abbreviations used throughout the instructions. These abbreviations make the written pattern easier to follow and are particularly useful when working with repeated stitch sequences. This tutorial uses US crochet terminology, which differs from UK crochet terminology for several common stitches.
Crochet stitch abbreviations (US terms):
| Abbreviation | Meaning |
|---|---|
| MR | Magic ring |
| ch | Chain |
| sl st | Slip stitch |
| sc | Single crochet |
| hdc | Half double crochet |
| dc | Double crochet |
| tr | Treble crochet |
| st(s) | Stitch(es) |
| sp | Space |
| rep | Repeat |
| BLO | Back loop only |
| FO | Fasten off |
The final technique to understand before beginning is working in repeated sections. A traditional crochet snowflake has six main points arranged around a central circle, which means many of the instructions repeat six times. In the pattern below, instructions between asterisks are repeated as directed, while instructions inside brackets form a smaller stitch group. For example, [2 dc, ch 2, 2 dc] in next sp, ch 2 means to place the four double crochet stitches and their central chain space into the indicated space, then make two additional chain stitches before continuing. Understanding this notation will help you follow the design with greater confidence.
2. Crochet Snowflake Pattern: Step-by-Step Instructions
The Crochet Snowflake Pattern begins with a circular white center and gradually expands into six evenly spaced sections. Each section becomes the foundation of one pointed snowflake arm. To create a design inspired by the reference ornament, we will use a white lacy center, blue textured outer points, and a delicate white decorative finish. The instructions below form a coordinated six-point snowflake rather than an exact stitch-for-stitch transcription of the photographed design. Take your time while working each round, and count the sections carefully to preserve the symmetry.
Round 1 – Creating the central ring: Using white yarn, make a magic ring. Ch 3, which counts as the first dc, then work 11 dc into the ring. Pull the yarn tail gently to close the center and join with a sl st to the top of the beginning ch-3. You should now have 12 dc stitches. This circular foundation creates a neat central opening and provides the structure needed for the following decorative rounds. If you prefer not to use a magic ring, ch 4 and join to form a ring before working the 12 dc stitches into the center.
Round 2 – Forming six decorative groups: Ch 3, counting as the first dc, then work 1 dc in the same stitch. Ch 3 and skip the next stitch. Work 2 dc in the next stitch, ch 3, skip the following stitch. Repeat the instructions between the asterisks five more times in total so that you have six groups of 2 dc separated by six ch-3 spaces. Join with a sl st to the top of the beginning ch-3. These six groups establish the repeated structure that will eventually produce the six-point crochet snowflake.
Round 3 – Expanding the white snowflake center: Sl st into the next dc and then into the first ch-3 space. Ch 3, counting as the first dc, and work 2 dc, ch 3, and 3 dc into the same space. Ch 2. Work [3 dc, ch 3, 3 dc] into the next ch-3 space, then ch 2. Repeat around until all six spaces contain matching groups. Join with a sl st to the top of the beginning ch-3. The design should now resemble a six-sided flower with small open spaces between its decorative sections. These openings contribute to the delicate appearance of the finished snowflake.
Round 4 – Preparing the blue outer points: Change to blue yarn by fastening off the white yarn and joining the blue yarn in any ch-3 corner space. Ch 3, then work 2 dc, ch 2, and 3 dc in the same corner. Ch 2, sc into the ch-2 space between the white groups, and ch 2. In the next ch-3 corner, work [3 dc, ch 2, 3 dc], ch 2, sc in the next intervening ch-2 space, ch 2. Repeat until all six corners are completed. Join with a sl st to the top of the beginning ch-3. The blue stitches now begin to highlight the six main arms of your blue and white crochet snowflake.
Round 5 – Building the blue snowflake tips: Sl st across the next two dc stitches and into the adjacent ch-2 corner space. Ch 3, work 4 dc into the same space, ch 3, then work 5 dc into that space. Ch 3, sc in the next sc positioned between the blue sections, and ch 3. Work [5 dc, ch 3, 5 dc] into the next blue corner space, ch 3, sc into the next separating sc, ch 3. Repeat around until all six points contain two groups of five double crochet stitches. Join with a sl st to the beginning ch-3. This round adds fullness and creates the characteristic triangular appearance of each snowflake point.
Round 6 – Adding the white decorative edging: Fasten off the blue yarn and join white yarn in any ch-3 space at the tip of a blue point. Work [sc, ch 3, sc] into that tip space. Continue with evenly spaced sc stitches along the edge of the blue section, working approximately one sc into each accessible stitch top and making ch-2 loops at the natural gaps between the major points. Repeat the same edging arrangement on all six sections, keeping the stitch placement symmetrical. At each blue tip, use [sc, ch 3, sc] to create a crisp point. Join with a sl st, fasten off, and weave in the yarn ends. After blocking, the white edging will frame the blue sections and emphasize the shape of the Crochet Snowflake Pattern.
3. How to Shape, Finish, and Decorate Your Crochet Snowflake
After completing the final round, your Crochet Snowflake Pattern may look slightly uneven or curled. This is completely normal, particularly when using cotton yarn and multiple textured stitch groups. Crochet snowflakes develop much of their final appearance during blocking, which gently stretches the stitches into a consistent geometric arrangement. Blocking is especially important for a six-point design because the outer tips should appear evenly spaced. Before beginning, check that every point contains the same number of stitches and that no sections were accidentally skipped.
To block your crochet snowflake ornament, lightly dampen the finished piece with clean water and gently press out the excess moisture using a towel. Avoid wringing or twisting the crochet fabric. Lay the snowflake on a blocking mat and locate the six main points. Insert a rustproof pin through each tip, spacing the points evenly around the center. Adjust the smaller decorative sections between the tips until the design looks symmetrical. Allow the piece to dry completely before removing the pins. This process improves stitch definition and creates a flatter, more professional-looking finish.
If you want a firmer Christmas crochet snowflake, a small amount of fabric starch can help the ornament maintain its shape. Always follow the product’s instructions and test it on a yarn sample first. Apply the starch evenly, taking care not to oversaturate the fibers, then pin the snowflake into shape while it dries. A lightly stiffened snowflake is ideal for hanging on Christmas trees or displaying in windows because the points are less likely to fold inward. However, excessive starch can make the texture overly rigid, so a moderate application generally produces a better result.
Adding a hanging loop is another useful finishing detail. Cut approximately 8–10 inches (20–25 cm) of matching cotton thread or narrow ribbon. Fold it in half and pass the folded end through one of the upper snowflake points. Bring the loose ends through the loop and gently tighten to secure it without distorting the crochet stitches. Tie the ends together at the desired hanging length. For a more discreet finish, use thin white crochet thread. This simple addition transforms the handmade crochet snowflake into a practical Christmas tree ornament.
You can also customize this Crochet Snowflake Pattern with different decorative elements. Small pearl-like beads, metallic embroidery thread, or subtle glitter yarn can add visual interest, although embellishments should be attached securely. For a classic Christmas look, try white and silver. For an elegant winter arrangement, combine icy blue, soft gray, and white. Red and white create a traditional holiday color palette, while cream and champagne gold give the snowflake a warm vintage appearance. The most attractive combinations usually maintain a clear contrast between the central details and the outer points.
Proper storage will help preserve your finished crochet Christmas decorations between holiday seasons. When the decorations are completely dry, place them flat between layers of acid-free tissue paper or clean cotton fabric. Avoid stacking heavy objects on top of the snowflakes, especially if the points have been starched. Store them in a dry, protected container away from excessive humidity and direct sunlight. If a snowflake loses its shape after storage, a second gentle blocking session can often restore its original appearance. With careful handling, these handmade decorations can be enjoyed for many Christmas celebrations.
4. Creative Decorating Ideas and Helpful Tips for Perfect Snowflakes
One of the most enjoyable aspects of the Crochet Snowflake Pattern is discovering different ways to display the finished ornaments. A single blue-and-white snowflake creates a beautiful accent on a Christmas tree, but a coordinated collection can produce an even more impressive result. Make several snowflakes using the same instructions and arrange them among warm white lights, silver ornaments, and natural greenery. The openwork stitches allow light to pass through, highlighting the decorative spaces and adding depth to the holiday arrangement.
Crochet snowflakes also make charming handmade gift decorations. Instead of using disposable gift toppers, attach a small crochet snowflake to a wrapped package with cotton ribbon or decorative twine. The recipient can remove the ornament and reuse it each Christmas. This approach adds a personal detail to homemade gifts while making good use of your crochet skills. For a balanced presentation, choose yarn colors that complement the wrapping paper. White snowflakes look especially elegant on kraft paper, while blue-and-white designs pair beautifully with silver or navy gift packaging.
Another creative idea is to make a crochet snowflake garland for a fireplace mantel, staircase, or window display. Crochet several matching snowflakes and connect them with a length of cotton cord or a simple chain-stitch strand. Leave approximately 4–6 inches (10–15 cm) between ornaments so each snowflake has enough room to display its shape. For a varied arrangement, combine snowflakes made with different yarn weights and hook sizes, while keeping the same general design. The resulting garland creates a handmade seasonal atmosphere without requiring complicated assembly techniques.
For crocheters interested in making their snowflakes look more professional, consistent tension is extremely important. Uneven tension can cause one snowflake point to appear wider or longer than the others. Try to maintain the same comfortable yarn tension throughout the project, especially during rounds containing chain spaces and double crochet groups. Count the stitches after every round, and use stitch markers to identify the six repeated sections. If you notice a mistake, correcting it immediately is usually easier than trying to disguise it with additional stitches later.
When experimenting with yarn, remember that different fibers can change the final appearance of the Crochet Snowflake Pattern. Cotton produces defined stitches and responds well to blocking, making it a reliable choice for decorative ornaments. Acrylic yarn can also be used, but it may behave differently during shaping and generally requires fiber-appropriate care. Metallic yarn offers attractive sparkle, although it can be more difficult to work with because the strand may be less flexible. Beginners may find that a smooth, light-colored cotton yarn makes stitch counting and pattern recognition much easier.
Finally, consider creating a small collection of easy crochet snowflake patterns in different colors and sizes. Once you understand the central construction and repeated six-point structure, you can experiment with shorter chain spaces, taller stitches, or additional decorative edging. Make one version with bright blue points, another entirely in white, and a third with metallic accents. Keep notes about your yarn, hook size, finished diameter, and any modifications you make. These notes will help you reproduce successful results and develop your own variations of the Crochet Snowflake Pattern over time.
Frequently Asked Questions About the Crochet Snowflake Pattern
1. Is this Crochet Snowflake Pattern suitable for beginners?
This Crochet Snowflake Pattern is most suitable for confident beginners and intermediate crocheters. The basic stitches are relatively simple, but the repeated sections, chain spaces, and decorative points require attention. If you already know how to make chains, single crochet, double crochet, and slip stitches, you should be able to follow the instructions with patience. Beginners may benefit from practicing the individual stitch groups before starting the complete ornament.
2. What is the best yarn for making crochet snowflakes?
Smooth cotton yarn is one of the best choices for crochet snowflake ornaments because it provides excellent stitch definition and can be blocked into a well-defined shape. Fine cotton thread produces delicate decorations, while sport-weight cotton creates slightly larger, more textured snowflakes. The ideal yarn depends on whether you want miniature ornaments, medium-sized tree decorations, or larger snowflakes for window displays.
3. How long does it take to crochet one snowflake?
The time required depends on your experience, yarn choice, and the complexity of the decorative edging. An experienced crocheter may finish a relatively simple snowflake in approximately 30–60 minutes, while beginners may need one to two hours or longer. Blocking and drying time should be considered separately. Working slowly and maintaining an accurate stitch count usually produces better results than rushing through the rounds.
4. Why does my crochet snowflake curl instead of lying flat?
Curling can result from tight stitches, insufficient chain spaces, or inconsistencies in the stitch count. Some curling is normal before blocking, particularly in designs with textured points. First, verify that each round contains the correct repeated groups. If the pattern is accurate, gently block the snowflake while damp. If the fabric remains excessively tight, consider using a slightly larger crochet hook for your next project.
5. Can I make a larger Crochet Snowflake Pattern?
Yes. You can increase the finished size by choosing thicker yarn and a larger crochet hook. For example, using medium-weight cotton yarn with a suitable hook can produce a larger ornament than fine sport-weight cotton. However, thicker yarn may reduce the delicate appearance of the openwork stitches. Always make a sample first, particularly if you need a specific finished measurement.
6. How can I make my crochet snowflake stiff enough to hang?
Blocking combined with a suitable fabric stiffener can help your crochet Christmas ornament maintain its shape. Start by dampening and pinning the snowflake into position. If additional firmness is needed, apply fabric starch according to the manufacturer’s directions. Allow the ornament to dry completely before hanging. Make sure any stiffening product is compatible with the yarn fibers you have selected.
7. Can I use only one color for this snowflake?
Absolutely. Although the featured blue and white crochet snowflake uses two contrasting colors, the instructions can be completed in a single shade. All-white snowflakes offer a classic winter appearance, while silver-gray or cream creates an understated decorative look. To work the entire design in one color, simply continue with the same yarn instead of changing colors at the indicated rounds.
8. What crochet stitches are most commonly used in snowflake patterns?
Most crochet snowflake patterns combine chain stitches, slip stitches, single crochet, double crochet, and sometimes treble crochet. Chain spaces create the characteristic openwork appearance, while taller stitches form decorative branches and pointed sections. More elaborate patterns may also include picots, puff stitches, clusters, or popcorn stitches for additional texture.
9. Can crochet snowflakes be washed?
Many crochet snowflakes made from washable cotton yarn can be gently hand-washed using cool water and a mild detergent. However, ornaments containing beads, metallic threads, starch, or other embellishments may require special care. Always consider the yarn label and the materials used. After washing, reshape the snowflake on a blocking mat and allow it to dry completely before storing or displaying it.
10. How can I make the six points look identical?
Consistent stitch counts are essential for creating a symmetrical six-point crochet snowflake. Each repeated section should contain the same number of stitches and chain spaces. Using stitch markers can help you identify the beginning and end of each point. During blocking, pin the six main tips at approximately equal distances from the center, then adjust the smaller branches for a balanced appearance.
11. Can I sell finished snowflakes made from this tutorial?
Finished handmade ornaments can generally be offered for sale, subject to any applicable laws and rights associated with the pattern or design. If you plan to sell crochet decorations, focus on careful workmanship, secure finishing, and accurate descriptions of the materials and dimensions. A coordinated set of handmade snowflakes can be an attractive seasonal craft product or thoughtful holiday gift.
12. What should I do if my snowflake has too many or too few stitches?
Check the stitch count at the end of every round before moving forward. If you discover an extra stitch or a missing chain space, carefully undo the affected section and work it again. Adding random stitches to compensate can disrupt the symmetry of the snowflake. Because the design is based on six repeated sections, correcting errors early helps maintain the intended shape and prevents uneven points.
Conclusion
The Crochet Snowflake Pattern is a beautiful handmade project that combines traditional crochet techniques with charming winter-inspired decoration. Throughout this tutorial, we explored the materials needed to create a blue and white crochet snowflake, reviewed essential US crochet abbreviations, and followed a detailed six-round pattern for constructing the center, developing six decorative points, and adding a delicate finishing edge.
We also discussed important finishing techniques, including blocking, gentle stiffening, attaching hanging loops, and storing your ornaments properly. These details can make a noticeable difference in the appearance and durability of your finished crochet snowflake decorations. With consistent tension, careful stitch counting, and a little patience, you can create an elegant ornament that brings handmade character to your Christmas tree, seasonal garlands, wrapped gifts, or winter home decorations.
Whether you choose traditional white, vibrant blue, sophisticated silver, or your own favorite color combination, this Crochet Snowflake Pattern provides a creative starting point for exploring beautiful crochet snowflake designs. Every snowflake you make offers an opportunity to improve your skills, experiment with new details, and celebrate the unique character of handmade decorations.