
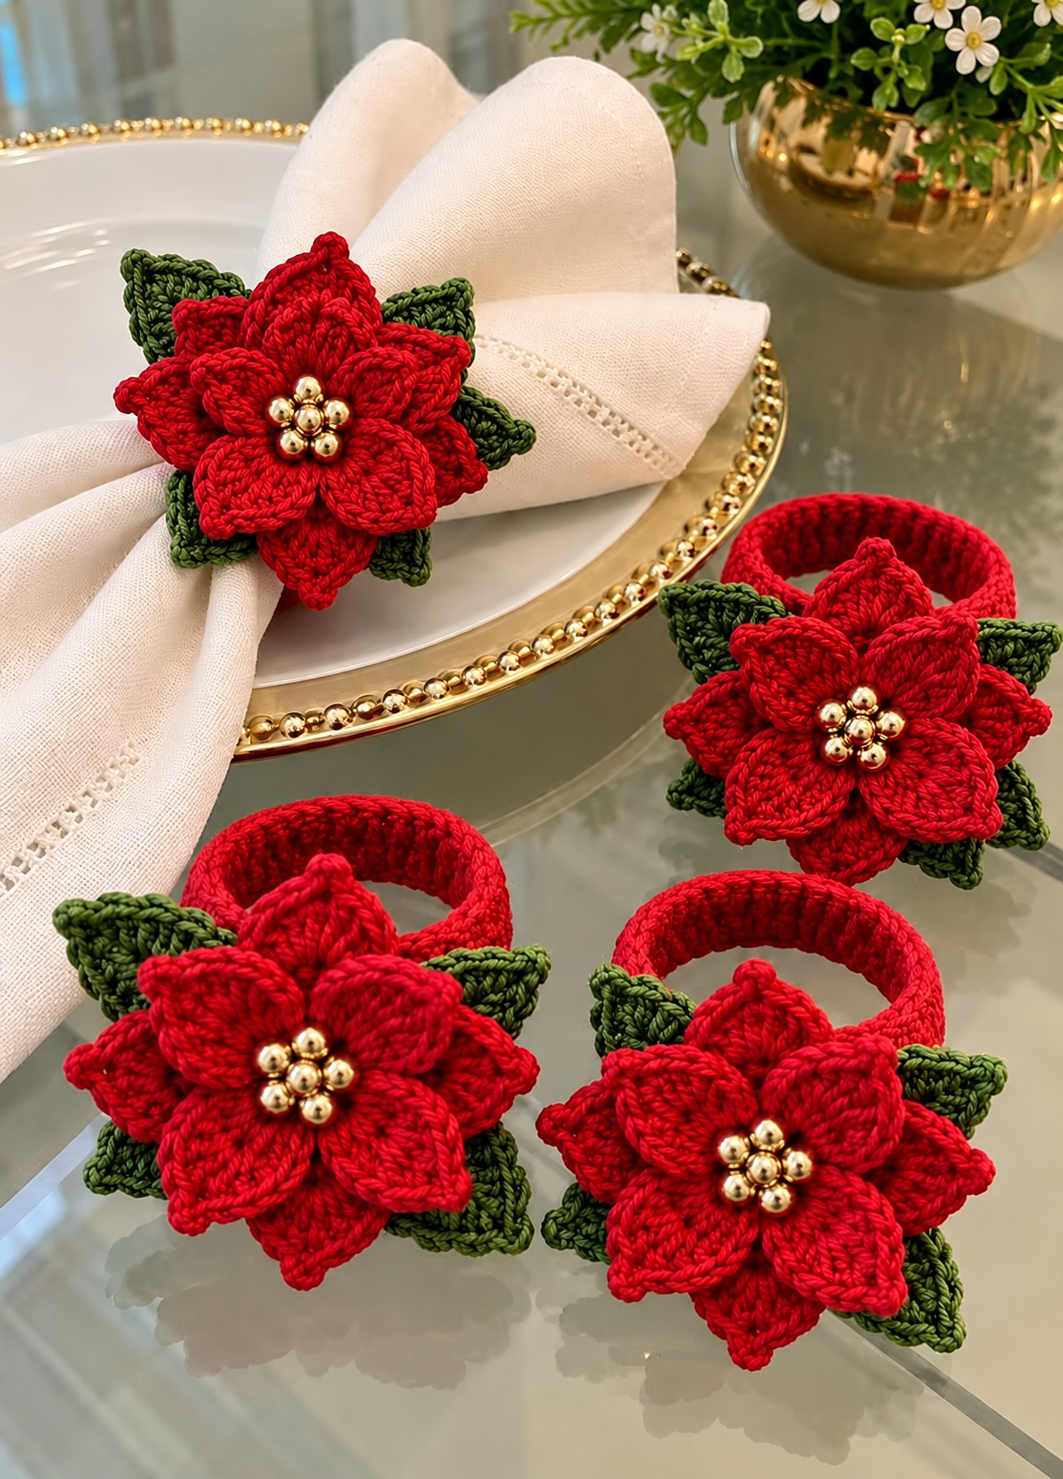
The Crochet Poinsettia Napkin Ring Pattern is a beautiful Christmas crochet project designed to turn a simple holiday table into something warm, handmade, and memorable. Inspired by the traditional poinsettia flower, this design combines deep red crochet petals, rich green leaves, a decorative golden center, and a comfortable crocheted ring that wraps neatly around a folded napkin. The finished accessory looks detailed and elegant, but the individual crochet techniques are manageable for anyone who is comfortable with basic stitches. Because each napkin ring uses only a small amount of yarn, this project is also an excellent way to use leftover cotton yarn from previous holiday crafts.
One of the most attractive features of this crochet Christmas napkin ring is its dimensional flower. Rather than creating a completely flat poinsettia, the petals can be arranged in overlapping layers so that the flower appears full and realistic. The green leaves placed behind the flower provide contrast, while small beads or crocheted bobbles in the center imitate the natural center of a poinsettia. When several finished rings are placed around white, cream, or neutral-colored napkins, the red and green crochet becomes the focal point of the table. This makes the Crochet Poinsettia Napkin Ring Pattern especially suitable for Christmas dinners, holiday parties, handmade gift sets, and seasonal home decorating.
The term Crochet Poinsettia Napkin Ring Pattern refers to a crochet design that combines three main elements: a poinsettia-inspired flower, decorative leaves, and a ring-shaped napkin holder. In this tutorial, the project is worked mainly with U.S. crochet terminology, including chain stitches, slip stitches, single crochet, half double crochet, double crochet, and treble crochet. The suggested construction creates each part separately before assembling everything into one finished decoration. This method allows you to shape the petals carefully, position the leaves exactly where you want them, and make the ring large enough for different styles of napkin folding.
Materials, Crochet Stitches, and Sizing for the Poinsettia Napkin Ring
For one Crochet Poinsettia Napkin Ring, choose a smooth cotton or cotton-blend yarn in red and green. A sport, DK, or light worsted yarn works especially well because it creates petals that are firm enough to hold their shape without becoming too bulky. You will need only a small quantity of each color. A crochet hook around 3.0 mm to 3.5 mm is a practical starting point, although the best hook size will depend on the yarn you select and your personal tension.
You will also need a yarn needle, scissors, and optional decorative beads for the center of the poinsettia. Gold beads create a festive look similar to the design shown, while pearl, cream, red, or wooden beads can create different styles. If you prefer an entirely crocheted project, replace the beads with several small French knots, tiny bobbles, or embroidered yarn knots. Always secure decorative pieces carefully, especially when making table accessories that will be handled frequently.
The U.S. crochet abbreviations used throughout this poinsettia crochet pattern are ch for chain, sl st for slip stitch, sc for single crochet, hdc for half double crochet, dc for double crochet, tr for treble crochet, and st for stitch. A magic ring can be used to begin the flower, although a short chain joined into a ring works equally well. Knowing these basic stitches will make the project much easier because the pointed petal shape is created primarily by gradually increasing the height of the stitches and then decreasing them again.
A finished flower made with DK-weight yarn will generally measure approximately 3.5 to 4.5 inches, or about 9 to 11.5 cm, across depending on tension and the number of petal layers. The napkin ring itself can measure approximately 1.5 inches or 4 cm in diameter when relaxed. These measurements are flexible. A thick folded linen napkin may require a slightly larger ring, while a thin cotton napkin can use a smaller one.
Gauge is not critical for this Christmas crochet pattern, but consistent tension is important. If the petals are worked too loosely, they may curl or droop. If they are worked too tightly, the flower can become stiff and difficult to shape. Crochet one sample petal or leaf before completing the entire project. The finished fabric should feel firm while remaining flexible enough to curve naturally.
Color choice can dramatically change the appearance of the finished napkin rings. Traditional Christmas red and forest green produce a classic poinsettia, but burgundy with olive green creates a more sophisticated style. Cream petals with gold details can work beautifully on an elegant table, while bright scarlet combined with emerald green gives the Crochet Poinsettia Napkin Ring Pattern a bold festive appearance. Maintaining strong contrast between the petals and leaves helps the flower remain visually defined.
How to Crochet the Poinsettia Flower Step by Step
Begin the center of the flower with red yarn. Make a magic ring, or ch 4 and join the first chain with a sl st to form a small ring. Work approximately 12 sc into the center and join with a sl st. This central round becomes the foundation for the first group of petals. Keep the center compact because the decorative beads or knots will later cover much of this area.
For the first petal, ch 2 and work into the next available stitch. A useful petal sequence is sc, hdc, dc, tr, dc, hdc, sc, with the taller stitches positioned near the center of the petal. You may place several stitches into the same foundation stitch to create fullness. The important idea is to gradually increase the stitch height toward the petal tip and then gradually decrease again. Finish the petal with a sl st near the foundation round.
Repeat the same method around the center until you have five or six inner petals. Six petals produce a full, symmetrical look, while five petals create a slightly more botanical appearance. Try to keep each petal approximately the same size. If necessary, gently stretch and shape the petals with your fingers after completing the round. Do not worry if they overlap slightly because that overlapping effect helps create the dimensional appearance of the poinsettia.
The second layer of red petals should be slightly larger than the first. Attach the yarn behind the first petal layer, preferably around the posts or spaces between the foundation stitches. Ch 3 to reach the back of the flower, then begin the next petal. Use taller stitches or one additional stitch on each side of the petal to increase its size. For example, you can work sc, hdc, dc, tr, tr, dc, hdc, sc before anchoring the petal with a sl st.
Continue around the flower until the second petal layer is complete. Position each larger petal between two smaller petals whenever possible. This staggered placement is one of the most important details in a successful crochet poinsettia flower because it prevents the flower from looking like two flat circles stacked together. Instead, the petals appear to emerge naturally from the center. Six larger petals usually create a balanced flower, but an additional petal can be added if a fuller shape is desired.
Once all red petals are complete, fasten off the yarn and weave the tail securely through the back stitches. Shape each petal gently with your fingers, allowing the inner petals to curve slightly upward and the outer petals to spread outward. If you use cotton yarn, the stitches will normally hold their shape well. Avoid pulling the petals completely flat because the dimensional structure is what gives this Crochet Poinsettia Napkin Ring Pattern its decorative character.
Crocheting the Green Leaves and the Napkin Ring
The green leaves can be crocheted individually and sewn behind the poinsettia. Begin each leaf by ch 7 to 9, depending on the size you want. Starting in the second chain from the hook, work sc, hdc, dc, tr, dc, hdc, and sc toward the end of the chain. Work additional stitches into the final chain so that you can continue crocheting along the opposite side of the foundation chain.
Crochet back along the other side using a mirrored stitch sequence. Work sc, hdc, dc, tr, dc, hdc, and sc, adjusting the sequence according to the length of your chain. Join with a sl st near the beginning. This creates an elongated leaf with a pointed tip. For a sharper poinsettia-style leaf, make a small picot at the tip by chaining 2 or 3 and slip stitching back into the previous stitch.
Make approximately five or six green leaves for each flower. Some leaves can be slightly smaller than others to give the arrangement a more natural appearance. Before attaching them permanently, place the leaves beneath the red flower and experiment with the spacing. A balanced design generally looks best when the leaves extend between the outer red petals rather than sitting directly behind them.
To crochet the napkin ring, ch enough stitches to create a strip approximately 4 to 5 inches, or 10 to 13 cm, long. The exact length depends on your yarn, hook, and desired ring diameter. Join carefully without twisting the chain. Work sc continuously around the ring for several rounds until the band measures approximately 0.75 to 1 inch, or about 2 to 2.5 cm, wide. A wider ring provides more stability for the flower.
Another method is to crochet the ring as a flat rectangle and sew the short ends together. This is useful if you want precise control over the finished size. Make a foundation chain approximately 1 inch or 2.5 cm wide, then work rows of sc until the strip is long enough to wrap around your folded napkin. Sew the first and last rows together securely using the yarn needle.
After completing the ring, weave in all loose ends carefully. The band should feel firm but not rigid. Test it around a folded napkin before attaching the flower. If it seems too small, blocking may provide a little additional room, but it is usually better to adjust the stitch count. If it is too large, overlap the ends slightly when sewing the ring closed. Proper sizing keeps the crochet napkin holder centered and prevents the decoration from sliding around the napkin.
Assembling, Finishing, and Styling the Crochet Napkin Rings
Begin assembly by placing the green leaves behind the finished red poinsettia. Arrange them so that several green points are visible around the edge of the flower. Using a yarn needle and matching green yarn, sew each leaf securely to the back of the flower. Keep your stitches near the center so they remain hidden when viewed from the front. Check the flower frequently to make sure the leaves have not shifted.
Next, create the decorative center. If using gold beads, sew approximately five or six beads close together in the middle of the flower. Use strong sewing thread or a durable yarn that can pass through the beads several times. Stitch through each bead more than once so the embellishment remains secure. The gold center provides a beautiful contrast against the red petals and gives the handmade flower a polished holiday appearance.
For a bead-free version, use yellow or gold yarn to create several small knots in the center. Tiny popcorn stitches, bobbles, or embroidered French knots can all imitate the center of the poinsettia. This is a useful alternative for households where loose beads would be undesirable. It also allows the entire Crochet Poinsettia Napkin Ring Pattern to remain soft and washable.
Position the completed flower over the seam of the crocheted ring. This hides the join and gives the accessory a clean finish. Sew the flower to the band through the back layer of the petals and the green leaves. Avoid stitching through the front of the petals because visible sewing stitches can distract from the flower. Make several passes through the band so that the relatively large flower remains stable.
After assembly, inspect the finished napkin ring from every angle. Trim any visible yarn tails and reshape the petals as necessary. The smaller petals can point slightly upward while the larger petals spread outward. Adjust the leaves so they can be seen between the red petals. If the yarn permits washing, light blocking can help the petals and leaves settle into their intended shape.
For a coordinated holiday table, crochet four, six, eight, or twelve matching napkin rings depending on your table setting. White or cream napkins create strong contrast with a traditional red poinsettia, while beige linen gives the project a warmer rustic appearance. Gold-edged dinnerware, simple greenery, candles, or understated Christmas decorations complement the design without competing with it. Because the Crochet Poinsettia Napkin Ring Pattern is reusable, the finished pieces can become part of your holiday decorating collection for many seasons.
FAQ About the Crochet Poinsettia Napkin Ring Pattern
Is the Crochet Poinsettia Napkin Ring Pattern suitable for beginners?
An adventurous beginner can make this project after learning the basic U.S. crochet stitches. The most important techniques are chain, slip stitch, single crochet, half double crochet, double crochet, and treble crochet. The flower looks detailed because several simple pieces are layered together rather than because it requires extremely complicated stitches.
What yarn is best for crochet poinsettia flowers?
Cotton yarn is an excellent choice because it provides good stitch definition and helps the petals maintain their shape. A cotton blend also works well. DK or light worsted yarn creates a flower that is decorative without becoming excessively heavy. Very fluffy yarn may hide the individual stitches and reduce the definition of the petals.
How large should a crochet napkin ring be?
A practical finished diameter is around 1.5 inches or 4 cm, although the correct size depends on the napkins you plan to use. Before permanently closing the band, wrap it around a folded napkin. The ring should slide on easily while still holding the napkin neatly together.
Can I make the poinsettia without beads?
Yes. Gold beads are decorative rather than essential. Replace them with embroidered knots, tiny crochet bobbles, popcorn stitches, or small circles crocheted with yellow or gold yarn. A fully crocheted center can also make washing and storage easier.
Can I use different colors instead of traditional Christmas red and green?
Absolutely. Burgundy, cream, white, gold, dusty rose, deep plum, or even icy blue can create interesting variations. However, red and green remain strongly associated with traditional poinsettia decorations and Christmas table settings. Choosing a palette that coordinates with your dinnerware can make the final arrangement look especially polished.
Why are my crochet petals curling too much?
Excessive curling can be caused by tight tension, too few stitches, or a hook that is too small for the yarn. Try using a slightly larger crochet hook or adding another stitch near the widest part of each petal. Gentle blocking can also relax cotton fibers and improve the final shape.
How many petals should a crochet poinsettia have?
There is no single required number for a decorative crochet poinsettia. Five or six petals per layer usually create a pleasing result. This pattern works especially well with two overlapping petal layers, giving approximately ten to twelve visible red petals in total.
How many leaves should I crochet for each flower?
Five or six green leaves usually provide enough contrast without hiding behind the flower completely. Position each leaf between the larger red petals so that the pointed green tips remain visible around the outside.
Can these napkin rings be washed?
That depends on the yarn and embellishments. Cotton crochet can often be gently hand washed, but decorative beads may require additional care. If you expect frequent washing, consider making the center entirely from yarn and follow the care instructions recommended for the yarn you selected.
Can this poinsettia pattern be used for projects other than napkin rings?
Yes. The finished flower can also be adapted as a decorative applique for holiday table runners, gift bags, wreaths, ornaments, crochet baskets, placemats, or other seasonal handmade projects. Simply make the flower and leaves without attaching the napkin ring band.
Conclusion
The Crochet Poinsettia Napkin Ring Pattern combines simple crochet techniques with layered construction to create an elegant Christmas table decoration. Throughout this tutorial, you learned how to choose appropriate yarn and hook sizes, crochet two layers of pointed red petals, create green leaves, make a sturdy napkin ring, add a decorative flower center, and assemble all the pieces into a finished holiday accessory.
The key to making this project look polished is careful shaping and placement. Stagger the two layers of petals, position the green leaves between the larger red petals, keep the ring firm enough to support the flower, and secure every piece thoroughly. These small finishing details transform basic crochet stitches into a dimensional poinsettia that can become the centerpiece of a festive place setting.
Once you understand the construction, the pattern is easy to customize. You can change the flower colors, adjust the size, use beads or crocheted centers, and make coordinated sets for different table settings. Whether you crochet a few pieces for your own Christmas dinner or create an entire matching set, this handmade project adds a warm and personal detail to holiday decorating.