
Crochet Tree Pattern is a beautiful holiday project for anyone who enjoys making handmade Christmas decorations with texture, dimension, and plenty of personality. This design creates a small three-dimensional Christmas tree using layered crochet sections that form soft, scalloped branches from the bottom to the top. The finished tree can be decorated with tiny crocheted balls, pom-poms, beads, or other lightweight ornaments, while a crocheted star adds the perfect finishing touch. One of the best things about this crochet Christmas tree is that you can easily customize the colors and size to match your holiday décor. Traditional green, bright Christmas red, snowy white, cream, gold, or even pastel yarn can completely change the appearance of the finished project. Because most of the construction uses basic U.S. crochet stitches, the pattern is also an enjoyable way for confident beginners to practice increases, shaping, layered crochet, and simple assembly.
The main feature of this Crochet Tree Pattern is its overlapping branch structure. Instead of making one flat triangle, the tree is built with several textured crochet layers that gradually become smaller toward the top. These layers create the full, ruffled appearance associated with a traditional Christmas tree while also giving the project enough dimension to stand as a tabletop decoration. The technique works especially well with medium-weight yarn because the stitches remain visible while still producing a sturdy shape. A smaller hook can be used if you want a firmer fabric, while a slightly larger hook will create softer and more flexible branches. Finished measurements will depend on yarn, hook size, tension, and the number of layers, but an average decorative tree can measure approximately 10 to 14 inches (25 to 36 cm) tall including the star. That size makes it suitable for tables, shelves, mantels, craft displays, holiday centerpieces, and handmade gift arrangements.
Another reason this Crochet Tree Pattern is so enjoyable is the amount of creative freedom it offers. You do not need every tree to look exactly the same, and small differences often make handmade decorations even more charming. One tree can be made in classic evergreen yarn with red, white, and gold ornaments, while another can be created completely in red for a dramatic holiday display. You can also use leftover yarn for the decorative balls, which makes this a practical scrap yarn crochet project during the Christmas season. The instructions below use U.S. crochet terminology and explain the project step by step, including the basic stitches, branch layers, shaping, decorations, star, and final assembly. Before beginning, read through the complete pattern so you understand how each section connects to the next. Taking time to prepare the materials and check your tension will make the assembly much easier later.
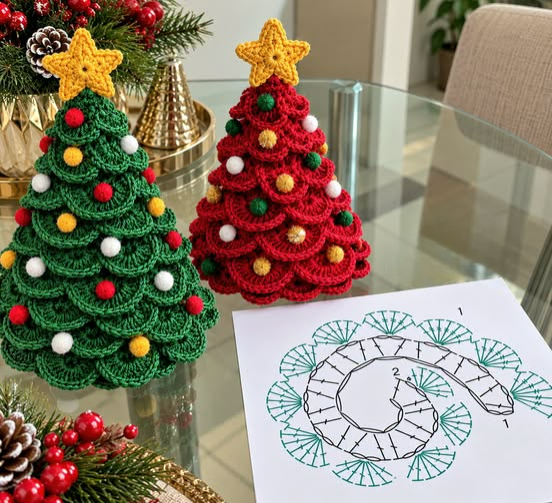
Materials, Crochet Stitches, and Sizing for the Crochet Tree Pattern
For this Crochet Tree Pattern, choose a medium-weight yarn such as worsted weight or another yarn that holds its shape reasonably well. You will need approximately 100 to 180 yards of the main tree color depending on the finished size. Green is perfect for a traditional tree, while red produces a bold Christmas version similar to the decorative style shown in the project. You will also need small amounts of yellow or gold yarn for the star and several scrap colors for the miniature ornaments.
A 3.5 mm to 4.5 mm crochet hook is a practical starting range for medium-weight yarn. If your stitches are naturally loose, use the smaller hook because the finished layers need enough structure to maintain their shape. Other helpful supplies include scissors, a yarn needle, removable stitch markers, polyester fiberfill if you want a stuffed center, and optional small pom-poms or crocheted balls. Avoid heavy decorations because excessive weight can pull the crochet branches downward.
The main U.S. crochet abbreviations used in this project are ch = chain, sl st = slip stitch, sc = single crochet, hdc = half double crochet, and dc = double crochet. You may also use tr = treble crochet if you want deeper scallops along the branches. An increase means working two or more stitches into the same stitch or space. These increases are what create the flare needed for each branch layer.
Gauge is not extremely strict for a decorative crochet tree, but consistent tension is important. A practical reference gauge with worsted-weight yarn is approximately 16 to 18 single crochet stitches across 4 inches (10 cm). Your exact gauge can vary because this project is not a fitted garment. However, very loose stitches can make the tree collapse, while extremely tight stitches may make the layers difficult to shape.
A medium tree can be approximately 11 inches (28 cm) tall without the star, with a bottom diameter of about 7 to 8 inches (18 to 20 cm). Adding the star can increase the total height to approximately 13 inches (33 cm). You can create a smaller tree simply by reducing the number of branch layers or by using lighter yarn and a smaller hook. A larger tree can be produced by adding more rounds and increasing the diameter of the lowest layers.
Before starting the full Crochet Tree Pattern, make a small test circle. Crochet a magic ring, work six single crochet stitches into the ring, and complete two or three increase rounds. The circle should remain reasonably flat without excessive waves. If it cups too strongly, your tension may be too tight; if it develops dramatic ripples immediately, there may be too many increases. This quick test will help you choose the most comfortable hook before making all of the tree sections.
How to Crochet the Tree Base and Layered Branches
Begin the lowest layer with a magic ring. Round 1: Work 6 sc into the ring and close it gently. Round 2: Work 2 sc in every stitch around for a total of 12 stitches. Round 3: Sc in the next stitch, 2 sc in the next stitch; repeat around. Continue increasing evenly until your circle measures approximately 6 to 7 inches (15 to 18 cm) across, depending on how wide you want the bottom of the tree.
Once the base circle reaches the desired diameter, begin creating the decorative branch edge. Chain 3, then work several double crochet stitches into the same stitch or nearby space to form a small fan. A useful scallop is 5 dc in one stitch, skip 1 stitch, sl st in the next stitch. Repeat this arrangement around the entire circle. The fans naturally curve downward and form the soft branch effect that gives this crochet Christmas tree pattern its characteristic appearance.
For a fuller ruffle, increase the number of stitches in each shell. For example, work 7 dc into one stitch, skip one or two stitches, then secure the shell with a slip stitch. You can also make a more dramatic branch by using a combination such as 2 dc, 3 tr, 2 dc in the same space. The important idea is maintaining approximately equal spacing between the scallops so that the tree looks balanced when viewed from every direction.
Make the second branch layer slightly smaller. Follow the same circular construction, but stop increasing when the circle is approximately 5½ to 6 inches (14 to 15 cm) in diameter. Add the same shell edging around the outside. Continue making progressively smaller layers, reducing each new section by approximately ½ to 1 inch (1.3 to 2.5 cm). A medium tree usually looks attractive with five to seven branch sections.
When arranging the layers, place the largest section at the bottom and gradually stack the smaller sections above it. Each new layer should partially cover the center of the layer beneath it while allowing the ruffled edge to remain visible. This overlapping construction is what produces the dense appearance of pine branches. Before sewing anything permanently, stack all of the sections loosely to check the proportions and make adjustments if necessary.
If you want an especially dimensional Crochet Tree Pattern, you can create a narrow central cone or stuffed core. Crochet a small cone using single crochet stitches and gradual decreases, then lightly fill it with polyester fiberfill. The branch layers can then be stitched around this center. The internal structure is optional, but it helps larger trees remain upright and makes the project more suitable as a freestanding tabletop decoration.
Assembling and Decorating the Crochet Christmas Tree
Once all branch sections are completed, weave in the loose yarn ends before assembly. Trying to hide every end after the layers are stacked can be difficult. Position the largest section first, followed by the next-largest layer. Use a yarn needle and matching yarn to make several small stitches through the center of both layers. Do not sew around the outer edges because the scallops need to remain loose and dimensional.
Continue adding the remaining layers one at a time. Rotate each new section slightly so the scallops do not line up perfectly with those underneath. This simple adjustment creates a fuller layered crochet tree because the branches appear to alternate naturally. After attaching each section, place the tree upright and check that it remains centered. Adjust the layer before tightening your stitches if it begins leaning to one side.
To crochet small ornaments, begin with a magic ring and work 6 sc into the ring. For slightly larger balls, increase to 12 stitches on the following round. Crochet one or two even rounds, then decrease until the opening becomes small. Add a tiny amount of fiberfill if desired, close the opening, and leave a yarn tail for sewing. Small pom-poms can be substituted when you want a faster decoration method.
Distribute the ornaments around the tree rather than placing them in perfectly straight lines. Red, white, yellow, green, and gold create a cheerful traditional combination. A red tree can look beautiful with green, white, and gold decorations, while a green tree pairs naturally with red, white, and yellow accents. Sew each ornament firmly through a few crochet stitches so it does not fall off when the tree is moved.
Another decorative option is creating small crochet bobbles directly on selected branch sections. A bobble is formed by beginning several partially completed double crochet stitches in the same stitch and closing them together at the top. This creates a raised ball of yarn without requiring a separate ornament. Bobbles are especially convenient if the decoration will be handled frequently because there are fewer individual pieces to sew onto the finished tree.
After decorating, gently shape every branch layer with your fingers. Pull the crochet shells outward and slightly downward to emphasize the overlapping design. If you used natural-fiber yarn, very light blocking may help define the shapes, but always follow the care instructions appropriate for your yarn. The completed tree should have a wide, stable bottom, progressively smaller upper branches, and an open top area ready for the star.
Crocheting the Star and Finishing the Crochet Tree Pattern
The star is the final focal point of this Crochet Tree Pattern. Begin with yellow, mustard, or gold yarn. Make a magic ring and work 10 sc into the ring, joining with a slip stitch. For each star point, chain 5. Starting in the second chain from the hook, work sl st, sc, hdc, dc back toward the center. Skip one stitch of the center circle and attach the point with a slip stitch in the next stitch.
Repeat the star-point sequence until you have five points. Depending on your tension, you may need to slightly adjust the number of skipped stitches so the points are evenly positioned. After finishing the fifth point, join the final stitch securely and leave a long tail. Gently pull the points outward with your fingers so the star has a clear, symmetrical shape.
For a thicker crochet star, make two identical stars. Place them with the wrong sides facing each other and single crochet or slip stitch around the edges. Before completely closing the star, insert a very small amount of fiberfill. Do not overstuff it because the points should remain defined. This double-layer method produces a sturdy topper that stays upright much better than a single flat piece.
Attach the star to the uppermost section of the tree with several secure stitches. Sew through the lower portion of the star rather than directly through the tips. If your tree has an internal cone, attach the star to the top of that center structure for additional stability. Check the front and side views before finishing the seam so the star does not lean noticeably backward or forward.
Inspect the entire Crochet Tree Pattern after assembly. Trim loose fibers, secure remaining yarn tails, and gently reposition the ornaments if necessary. The lowest branches should spread evenly around the base so that the tree can stand securely. If the bottom is slightly uneven, a small circular crochet base can be sewn underneath. A cardboard circle can also be inserted inside a stuffed base, but it should remain completely enclosed by the crochet fabric.
Your completed crochet Christmas tree can now be used as a holiday centerpiece, mantel decoration, shelf ornament, handmade gift, or seasonal craft display. Try making several trees in different sizes and colors for a coordinated arrangement. A group containing green, red, cream, and gold trees can create an especially festive display. Because the same basic construction can be customized so easily, this project can become a reusable pattern that you return to every Christmas season.
Frequently Asked Questions (FAQ)
What skill level is recommended for this Crochet Tree Pattern?
The project is suitable for advanced beginners and intermediate crocheters. Most of the construction uses single crochet, double crochet, chains, slip stitches, increases, and basic shaping. Beginners who already understand working in rounds should also be able to complete it by making one section at a time.
What yarn is best for a crochet Christmas tree?
Medium-weight or worsted-weight yarn is an excellent option because it offers a good balance between stitch definition and structure. Cotton blends can create very defined branches, while acrylic yarn is affordable, widely available, and easy to work with. The best choice is a yarn that does not become excessively floppy after crocheting.
How much yarn will I need?
For a medium tree measuring approximately 10 to 14 inches tall, plan on roughly 100 to 180 yards of the main color. You will need only small amounts of yarn for the star and ornaments. Larger trees or heavily ruffled versions naturally require more yarn.
Can I make the Crochet Tree Pattern smaller?
Yes. Use thinner yarn, a smaller crochet hook, and fewer increase rounds. You can also reduce the number of branch sections. A miniature version might use only four layered sections, while a large tabletop tree could have seven or eight.
How can I make the tree stand upright?
Use firm crochet tension and avoid making the branch fabric too loose. An internal stuffed crochet cone can provide excellent support. You can also make a flat circular base underneath the tree to distribute the weight more evenly.
Can I use pom-poms instead of crocheted ornaments?
Yes. Small pom-poms are an easy way to decorate the tree and can significantly reduce the finishing time. Sew them on securely with yarn or strong thread, especially if the decoration will be moved frequently.
Can I make the entire tree in one color?
Absolutely. A single-color crochet tree can look elegant and modern. White can create a snowy appearance, gold can look festive, and deep red can make a dramatic Christmas centerpiece. The layered texture provides enough visual interest even without multiple colors.
Why are my branch layers curling too much?
Excessive curling can happen if your crochet tension is too tight or if the shells are too large for the available base stitches. Try using a slightly larger hook or reducing the number of double crochet stitches in each shell. Some gentle curling is desirable because it helps create the dimensional branch effect.
How many branch layers should the tree have?
There is no strict number. Five to seven layers usually produce an attractive medium-size tree. Smaller trees may need only four layers, while taller trees can have eight or more. The most important detail is making every new layer progressively smaller.
Can this Crochet Tree Pattern be used with leftover yarn?
Yes, especially for the ornaments, star, and smaller branch sections. This makes the project an excellent scrap yarn Christmas crochet idea. Just try to use yarns of similar thickness so the finished layers remain proportional.
Can I wash the completed crochet tree?
That depends on the yarn and internal materials. If the project contains only washable yarn and fiberfill, gentle hand washing may be possible. However, trees containing cardboard, glued embellishments, beads, or delicate decorations should usually be spot cleaned instead.
How can I make the branches look fuller?
Increase the depth of the shell stitches, add additional branch layers, or alternate the position of the scallops during assembly. Rotating each layer slightly before sewing it down helps fill visual gaps and creates a more realistic, abundant appearance.
Conclusion
The Crochet Tree Pattern combines simple crochet techniques with dimensional construction to create a festive handmade Christmas decoration. Throughout this tutorial, you learned how to select suitable yarn and hook sizes, work circular increases, create ruffled branch edges, make progressively smaller layers, assemble the tree, add colorful crochet ornaments, and finish the project with a handmade star. The layered design is the key to achieving the full tree shape, while careful assembly helps each scalloped branch remain visible.
This project also offers plenty of opportunities for personalization. You can create a classic green crochet Christmas tree, a bold red version, an elegant cream-and-gold tree, or an entire collection in different colors and sizes. Changing the yarn, number of branch layers, ornaments, or star design allows you to use the same basic Crochet Tree Pattern many times while producing a different finished result each time.