
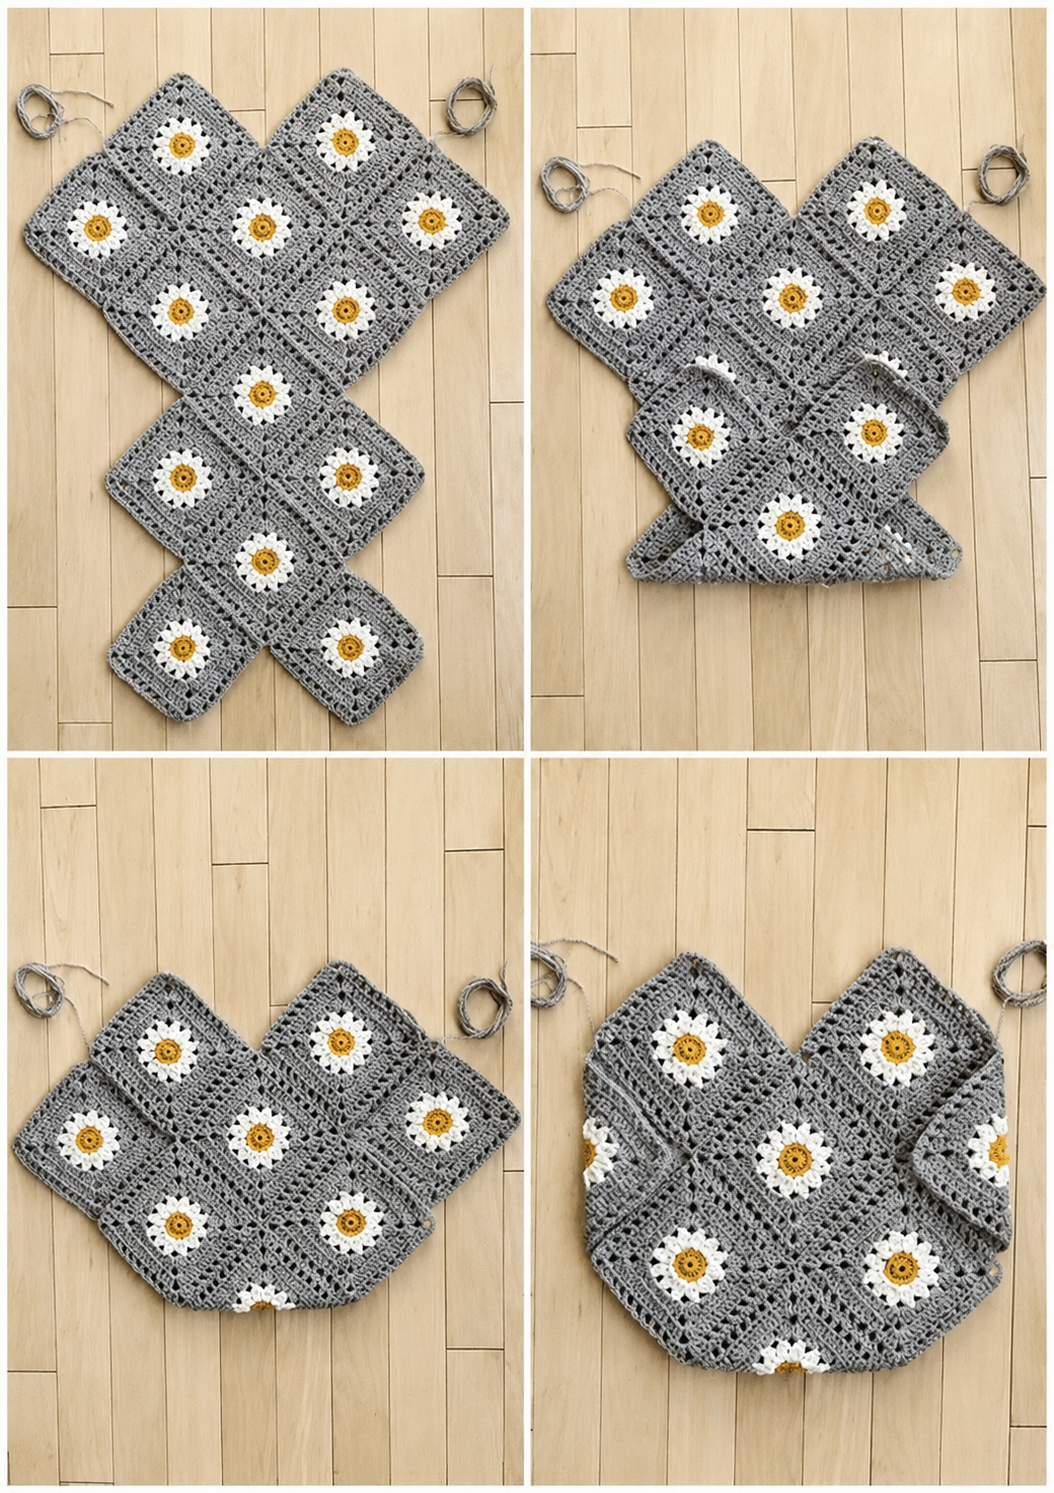
Overview & Design Inspiration
There is a magical sort of nostalgia that wraps around a classic granny square project, reminding us of cozy afternoons and the pure joy of handmade fashion. Crocheting a tote bag from these timeless motifs captures the absolute best of both worlds: stunning, tactile beauty and everyday functionality.
Whether you are raiding your stash for a vibrant bohemian masterpiece or curating a sleek, modern neutral palette, this project invites boundless creativity. Every individual square tells a story, transforming simple yarn into a gorgeous, sustainable accessory that you will be fiercely proud to carry everywhere you go.
Materials & Recommended Supplies
- Yarn: Durable cotton yarn (DK or Worsted weight) is the gold standard for structural integrity, though modern acrylic works wonderfully for a softer, budget-friendly option.
- Crochet Hook: Size 4.0 mm (US G/6) or 5.0 mm (US H/8) depending on your yarn weight and personal tension.
- Notions: Yarn needle for weaving in ends, locking stitch markers, and a sharp pair of embroidery scissors.
- Optional Lining: Coordinating cotton fabric and matching thread if you choose to line your finished tote for extra strength.
Essential Techniques & Stitch Highlights
Granny squares rely on foundational techniques like the magic ring and classic double crochet clusters, making them wonderfully approachable for adventurous beginners. Working in groups of stitches creates that iconic open-yet-sturdy geometric fabric that breathes so well.
As you advance, you can experiment with seamless color changes, textured puff stitches, or delicate floral centers. These artistic variations elevate a simple tote into a breathtaking showcase of your growing crochet skills.
Construction & Assembly Highlights
The beauty of a granny square tote lies in its portable, modular construction. Instead of wrestling with a massive piece from the start, you crochet individual squares piece by piece during your spare moments.
Once your target number of squares is complete, you will arrange them into your preferred layout and seam them together securely. Finally, sturdy straps and an optional fabric lining are added to give your handmade bag the ultimate professional finish and durability.
Customization & Styling Ideas
Make your tote truly one-of-a-kind by playing with high-contrast color-blocking, cheerful pastel rainbows, or sophisticated earth tones. You can easily adjust the bag’s dimensions simply by adding or subtracting a few squares from your layout.
This versatile accessory transitions effortlessly from a farmers’ market carrier to a beach bag or a stylish everyday purse. Toss in a few playful tassels or wooden handles to elevate the final look even further!
Pro Tips for Flawless Results
- Maintain Consistent Tension: Keep your stitches uniform so that all your finished granny squares match neatly in size for easier assembly.
- Block Your Squares: Take the time to wet or steam block every square before joining them to ensure crisp edges and a professional shape.
- Reinforce Your Seams and Handles: Use sturdy joining methods and double-layer your handles to prevent stretching when carrying heavier daily essentials.
Frequently Asked Questions
Is a granny square tote bag suitable for beginners?
Yes, absolutely! Because the project is broken down into small, manageable squares using basic stitches, it is a fantastic milestone project for confident beginners.
What is the best yarn to use for a crochet tote bag?
Cotton yarn is widely considered the best choice because it is strong, durable, and resists stretching under weight much better than animal fibers.
Should I add a fabric lining to my finished bag?
While optional, adding a fabric lining provides incredible structural support, prevents heavy items from slipping through the stitches, and greatly extends the life of your bag.
Watch the Full Step-by-Step Video Tutorial
Prefer visual guidance? Follow along with the complete video tutorial below at your own pace: