
The Christmas Stocking Pattern is a cheerful crochet project that brings together traditional holiday colors, textured stitches, and a charming handmade finish. Inspired by the small decorative stockings shown in the reference image, this pattern is designed as a compact Christmas ornament that can be hung on a tree, attached to a gift, displayed on a garland, or used as part of a festive table arrangement. The construction is approachable because the stocking begins with simple crochet shaping and uses familiar stitches such as chain stitches, single crochet, double crochet, slip stitches, and cluster-style groups. Red, green, and white yarn create the recognizable Christmas palette, but the design can easily be personalized with other seasonal colors. The finished piece has a cozy handmade appearance, and a small hanging loop and decorative bow complete the ornament without making the project overly complicated.
One of the most enjoyable features of this Christmas stocking Pattern is that it works well as a small project for practicing crochet techniques while still creating something useful and decorative. Instead of requiring complicated garment shaping, the design is built from a compact crocheted body that is folded and joined to form the familiar stocking silhouette. Strategic increases help create width, while clusters and textured stitches provide the raised appearance visible in handmade holiday crochet. Because the project uses only a modest amount of yarn, it is also excellent for using leftover red, green, white, burgundy, or metallic-accent yarn from other Christmas projects. Once you understand the basic construction, several stockings can be completed in coordinating colors, allowing you to create an entire collection of handmade ornaments for your home or for gifting.
For this tutorial, the finished mini stocking is approximately 5 to 6 inches (13 to 15 cm) tall and about 4 to 4½ inches (10 to 11.5 cm) wide at its broadest point, although the final measurement will depend on yarn weight, hook size, and individual tension. A medium worsted-weight yarn works especially well with a 4.0 mm to 4.5 mm crochet hook, while a smaller hook and lighter yarn can create miniature tree ornaments. You will need small amounts of red, green, and white yarn, a crochet hook suitable for your yarn, scissors, a yarn needle, and optional ribbon or a small decorative bow. The instructions use U.S. crochet terminology, and the most important goal is to maintain even tension so that the stocking keeps its shape when folded and joined.
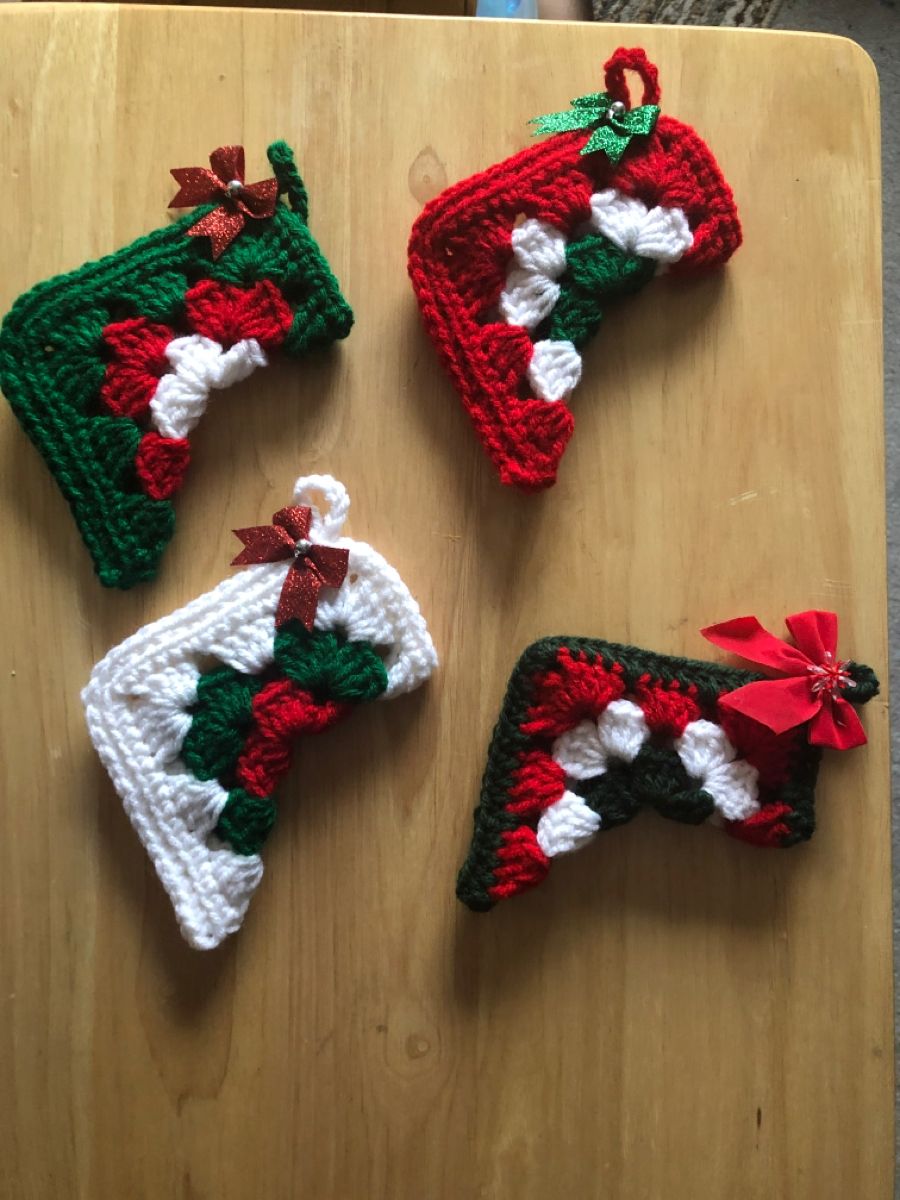
Materials, Crochet Stitch Key, and Preparing the Christmas Stocking
Before beginning the Christmas Stocking Pattern, choose three coordinating yarn colors. Red and green create the strongest traditional Christmas look, while white works beautifully for contrast. You can make the main stocking green with red and white details, red with green and white accents, or white with red and green decorative sections. For a softer appearance, cream can replace bright white, while burgundy or forest green can give the stocking a more rustic style. Approximately 20 to 30 yards (18 to 27 m) of yarn should be more than enough for one small ornament, depending on the exact size and stitch density.
The crochet stitch key for this project uses standard U.S. abbreviations. CH means chain, which creates the foundation and small spaces between stitch groups. SL ST means slip stitch, used for joining rounds and moving the working yarn without adding significant height. SC means single crochet, a compact stitch useful for edging and joining. HDC means half double crochet, which produces a slightly taller but still dense fabric. DC means double crochet, the main stitch used to create the textured body and decorative clusters. When the instructions mention a cluster, work several double crochet stitches into the same stitch or space so that the fabric develops the raised, fan-like texture associated with this decorative stocking.
The pattern begins with a small center section. Make a magic ring, or alternatively chain 4 and join the first chain with a slip stitch to create a small ring. Chain 3, which counts as the first double crochet. Work 2 more double crochet stitches into the center ring, chain 2, then work another group of 3 double crochet stitches into the same ring. Repeat this sequence until you have created a compact triangular or partially square motif with defined corners. Pull the magic ring closed firmly if you used one. This small center provides the foundation from which the stocking shape will expand.
For the next round, slip stitch into the first available chain space. Chain 3 and work 2 double crochet stitches into that space. Chain 2, then place another group of 3 double crochet stitches into the same space. This creates a corner. Continue around the piece, working 3 DC clusters into the spaces between previous clusters and using 3 DC, CH 2, 3 DC wherever a stronger corner is needed. The increases are important because they allow the fabric to open naturally rather than curling inward. Keep the stitches relaxed and check that the motif lies relatively flat after each round.
To reproduce the multicolored effect, change yarn colors between rounds or between selected clusters. When changing colors, begin the final double crochet of the previous color normally, but complete the last yarn-over and pull-through with the new yarn. This produces a cleaner transition. Carrying yarn behind the work can be convenient for short sections, but cutting and weaving the yarn ends usually produces a neater result in a small decorative piece. For the classic holiday style, alternate sections of red crochet, green crochet, and white crochet while keeping one color dominant around the outer edge.
Continue adding rounds until the crocheted piece measures approximately 7 to 8 inches (18 to 20 cm) before folding. The exact dimensions are flexible because the folding stage will determine the final stocking proportions. At this point, place the motif flat on the table and identify the section that will become the leg, heel, and toe. Before joining anything permanently, fold the piece gently into the stocking shape. This simple test is useful because it allows you to adjust the final round if one section needs slightly more width or length.
Step-by-Step Crochet Construction and Stocking Shaping
The distinctive appearance of this Christmas Stocking Pattern comes from folding and shaping the crocheted fabric rather than crocheting a complicated three-dimensional sock from the beginning. Position the finished motif with one corner facing downward. Fold one side inward toward the center, then bring the opposite side across so that the lower portion begins forming a tapered foot. The remaining upper section becomes the stocking cuff and hanging area. Adjust the folds until the proportions resemble a small Christmas stocking, with a clearly recognizable leg and toe.
Once you are satisfied with the shape, use removable stitch markers or small scraps of contrasting yarn to hold the folded sections temporarily. This is an important step because joining the wrong edges can distort the stocking. The toe should remain slightly rounded rather than sharply pointed. If your motif naturally creates a pointed corner, fold the tip slightly inward before joining. This tiny adjustment creates a softer toe similar to the handmade ornaments in the reference image.
Thread a yarn needle with matching yarn, or keep your crochet hook attached if you prefer a crocheted seam. To crochet the seam, insert the hook through both layers along the edge and work SL ST or SC stitches through corresponding loops. Slip stitches make a flatter seam, while single crochet produces a slightly more decorative ridge. Work slowly and avoid pulling the seam too tightly. Excessive tension can cause the stocking to curl or shorten, especially around the heel.
Shape the heel by leaving a small angled section between the vertical leg and horizontal foot. Rather than forcing the fabric into a perfect ninety-degree corner, allow the crocheted clusters to create a gentle curve. Add one or two small securing stitches on the inside if necessary. The heel does not need complex short-row construction because this mini crochet Christmas stocking is intended as a decorative ornament rather than wearable footwear. The goal is simply to achieve a balanced and recognizable silhouette.
For a more defined toe, work a short edging around the foot after the primary seam is complete. Attach matching yarn near the heel, chain 1, and work single crochet evenly toward the toe. At the tip, place 2 single crochet stitches into one or two strategic spaces to maintain the curve. Continue around the visible edge and join with a slip stitch. If the toe looks too wide, decrease by working two single crochet stitches together. Small corrections like these make handmade ornaments look much more polished.
Finish the top edge with one round of single crochet or reverse single crochet for extra texture. A contrasting white cuff can also be added by joining white yarn at the upper edge and working one or two rounds of half double crochet. If you prefer the simpler look shown in the photographed ornaments, keep the upper section in the main color and concentrate the white yarn inside the decorative body. Either approach works well, and the choice depends on whether you want a classic stocking cuff or a more motif-based design.
Adding Christmas Colors, Decorative Details, and the Hanging Loop
Color placement gives the Christmas Stocking Pattern much of its personality. Traditional red, green, and white instantly communicate a holiday theme and can be distributed differently across each ornament. One stocking can have a green outer edge with red and white inner clusters, while another can use red around the outside with green and white in the center. A white stocking with green and red accents creates a bright snowy appearance. Making several variations keeps a coordinated set from looking identical.
To create the puffed flower-like sections visible in the inspiration, use small cluster groups. Join contrasting yarn into a chosen gap, chain 2, then work several partially completed double crochets into the same space before pulling the final loop through all stitches on the hook. This creates a crochet puff or cluster stitch. Repeat the technique in neighboring spaces using red, white, or green yarn. These raised areas provide dimension while remaining soft enough for a lightweight ornament.
A small hanging loop can be added at the upper corner. Join yarn at the top of the stocking and chain approximately 12 to 18 stitches, depending on how large you want the loop. Slip stitch back into the same attachment point, fasten off, and weave the yarn end securely into the fabric. For a small Christmas tree ornament, a loop measuring approximately 2 inches (5 cm) when folded is usually practical. Make sure the loop is attached through several sturdy stitches rather than a single loose strand.
The bow is optional, but it gives the stocking a decorative finished appearance. A narrow satin or grosgrain ribbon approximately ¼ to ⅜ inch (6 to 10 mm) wide is suitable for this size of ornament. Tie a small bow and sew it securely near the top corner using matching sewing thread or yarn. If you prefer an entirely crocheted project, make a tiny bow by chaining 6 to 8 stitches, working a short row of single crochet, and wrapping yarn around the center before sewing it to the stocking.
You can also add a small bead, button-style accent, or crocheted berry in the center of the bow, provided the ornament will be used decoratively and kept away from very young children who might pull off small pieces. For a fully yarn-based version, crochet a tiny bobble with red yarn instead. Handmade details are most effective when they remain proportional to the stocking. Large embellishments can overpower a small ornament, so choose compact accents that complement the crochet texture.
After all decorative elements have been attached, weave every yarn end securely into the back of several stitches. Move the yarn needle in more than one direction before trimming the excess yarn. This prevents the ends from working loose when the ornament is handled or stored. Gently reshape the stocking with your fingers. If needed, lightly block the piece by dampening it and placing it flat until dry. Avoid aggressive stretching because the folded structure should remain slightly dimensional.
Finishing, Sizing, Troubleshooting, and Creative Variations
The finished Christmas Stocking Pattern should feel firm enough to hold its shape while remaining flexible. If your stocking is too soft or floppy, the hook may be too large for the yarn. Consider reducing the hook size by 0.5 mm for the next stocking. If the fabric is extremely stiff or difficult to fold, try a slightly larger hook. Crochet tension varies significantly between makers, so hook recommendations should be treated as a useful starting point rather than an absolute rule.
If the edges curl before folding, check your stitch counts and corners. Curling often happens when there are not enough increases around the outer round. Add an extra chain stitch or additional double crochet cluster in the corner areas if necessary. If the piece becomes wavy instead, you may have too many increases. Removing one cluster from the problem area usually helps. The goal is a motif that rests comfortably on a flat surface before shaping.
For a larger stocking, continue crocheting additional rounds before folding. Each additional round can increase the final ornament size by approximately 1 to 2 inches (2.5 to 5 cm) depending on your yarn and stitch height. A larger version can be used as a small gift holder for wrapped candy, notes, or lightweight decorations. If you want the stocking to function as an actual pocket, avoid sewing every overlapping section closed. Instead, leave the upper opening accessible.
A miniature version can be made with sport-weight or fingering-weight yarn and a 2.5 mm to 3.5 mm hook. This is especially attractive for tree ornaments, gift tags, or holiday garlands. You can crochet several small stockings and string them along a chain to create a handmade Christmas banner. Alternate the primary colors from stocking to stocking so the garland appears balanced. Small projects such as these also provide a practical way to use yarn scraps that might otherwise remain unused.
The same pattern can be adapted to different decorating styles. Burgundy, cream, and forest green produce a vintage Christmas look. Red and gold create a more formal holiday combination, while icy blue, white, and silver-colored yarn can create a winter theme. For farmhouse-style décor, try cream with muted red and sage green. The crochet construction remains exactly the same; only the color arrangement changes. This makes the Christmas stocking Pattern versatile enough for many types of seasonal decorating.
Before displaying or gifting the finished stocking, inspect every seam, hanging loop, and decorative element. Trim any visible yarn fibers and make sure the shape is balanced. A handmade ornament does not need to be perfectly symmetrical, and slight differences between pieces can add character. What matters most is that the seams are secure, the stocking shape is easy to recognize, and the colors feel harmonious. Once finished, your small crocheted stocking is ready for a Christmas tree, wreath, garland, gift package, or festive display.
FAQ About the Christmas Stocking Pattern
Is this Christmas stocking Pattern suitable for beginners? Yes. A beginner who is comfortable with basic stitches such as chain, slip stitch, single crochet, and double crochet should be able to complete the project. The folding stage may require a little experimentation, but the small size makes it easy to undo and reposition the fabric.
What type of yarn is best for a crochet Christmas stocking ornament? Medium worsted-weight acrylic or cotton yarn is a practical choice because it creates clear stitches and good structure. Acrylic yarn tends to be lightweight and easy to work with, while cotton can produce a firmer ornament with excellent stitch definition.
What crochet hook should I use? A 4.0 mm or 4.5 mm hook is a good starting point for worsted-weight yarn. If your stitches are loose, try the smaller hook. If your crochet is naturally tight, the larger hook may be more comfortable.
How large should the finished stocking be? The tutorial is designed for a decorative stocking approximately 5 to 6 inches (13 to 15 cm) tall. You can easily make it larger by adding more rounds or smaller by using thinner yarn and a smaller crochet hook.
Can I use only two colors instead of three? Absolutely. Red and white, green and white, or red and green can all create attractive results. Three colors provide more contrast, but the construction does not depend on a specific color arrangement.
Can I make the stocking without the ribbon bow? Yes. The bow is purely decorative. You can leave the upper edge plain, add a crocheted bow, attach a small yarn tassel, or simply use the hanging loop as the only embellishment.
Why is my crochet stocking curling? Curling usually indicates that the piece needs more increases, that the hook is too small, or that the tension is too tight. Check your corner spaces and make sure the stitch groups have enough room to spread naturally.
How can I make the stocking more dimensional? Use puff stitches, cluster stitches, or slightly raised double crochet groups in contrasting colors. You can also lightly stuff the toe with a tiny amount of polyester filling if the piece will be used only as an ornament, although this is optional.
Can this Christmas stocking be used as a gift holder? A larger version can hold lightweight items if you leave the top open and make the seams secure. For heavier gifts, use stronger yarn, tighter stitches, and reinforce the hanging loop carefully.
How many stockings can I make from one skein of yarn? Because these ornaments use small amounts of yarn, a standard skein can produce several stockings. The exact number will depend on skein size, stocking dimensions, stitch tension, and the number of colors used.
Do I need to block the finished stocking? Blocking is optional but can improve the shape. Lightly dampen the stocking, arrange it in the desired position, and allow it to dry completely. Avoid stretching it excessively because the slightly raised crochet texture is part of the design.
Can I personalize the stocking? Yes. You can add an embroidered initial, a tiny crocheted flower, a small bow, a decorative border, or different color combinations. Personalization is one of the advantages of working with a handmade crochet Christmas stocking.
Conclusion
This Christmas Stocking Pattern combines basic crochet stitches, simple shaping, traditional holiday colors, and decorative details to create a charming handmade ornament. Throughout the tutorial, you learned how to choose suitable yarn and hook sizes, understand the main crochet stitch abbreviations, build the foundation motif, increase correctly, change colors, fold the crochet fabric into a stocking shape, join the seams, form the heel and toe, finish the edges, and add a secure hanging loop.
You also learned how double crochet clusters, single crochet edging, color changes, puff-style details, and careful finishing can transform a simple piece of crochet into a festive Christmas decoration. Because the pattern is easy to resize and customize, you can create miniature tree ornaments, larger decorative stockings, colorful garlands, gift accents, or coordinated sets for holiday decorating.
The most enjoyable part of this project is the freedom to experiment. Try classic red, green, and white, or create your own combination that matches your Christmas décor. Small variations in stitch texture, edging, bows, and color placement can make every stocking unique while still following the same basic construction.