
The Crochet Christmas Tree Pattern is a beautiful seasonal project for anyone who enjoys making handmade Christmas decorations with yarn. This flat crochet tree is inspired by the layered evergreen shape shown in the reference image, with wide lower branches, gradually smaller upper sections, and a small hanging loop at the bottom or top depending on how you choose to display it. The design works wonderfully as a crochet Christmas ornament, table decoration, gift embellishment, wall hanging, coaster, or festive accent for a handmade holiday collection. Because the project is worked mainly with basic crochet stitches, it is approachable for confident beginners while still being enjoyable for experienced crocheters. The repeating rows also make this a relaxing project that can be completed in traditional green, Christmas red, cream, gold, or practically any color combination. In this tutorial, all instructions use U.S. crochet terminology, and the stitch abbreviations are explained before the construction begins.
Another advantage of this Crochet Christmas Tree Pattern is that it can be adapted easily to different yarn weights and finished sizes. A small cotton version can become an ornament for the Christmas tree, while a larger version made with thicker yarn can become a decorative hot pad, wall decoration, or centerpiece accent. The characteristic stepped silhouette is created by combining several widening crochet sections, giving the project the appearance of layered evergreen branches. You do not need complicated shaping techniques, and there is very little finishing compared with three-dimensional amigurumi. The pattern also uses only modest amounts of yarn, which makes it an excellent project for using leftover holiday colors from your yarn collection. Once you understand the basic construction, you can produce several trees quickly and create coordinated handmade Christmas decorations.
The instructions below focus on creating a tree approximately 10 inches (25 cm) tall and 7 inches (18 cm) wide, although your measurements will naturally vary depending on yarn, crochet hook, and tension. The finished piece is designed to remain relatively flat, so consistent tension is important for maintaining a neat shape. You will learn how to form the central triangular structure, create progressively wider branch tiers, work clean turning edges, make a hanging loop, and finish the tree professionally. A simple decorative bow may also be added near the bottom, similar to the charming handmade appearance of the reference project. Read through the complete Crochet Christmas Tree Pattern before beginning so that you understand where each increase and branch extension is placed.
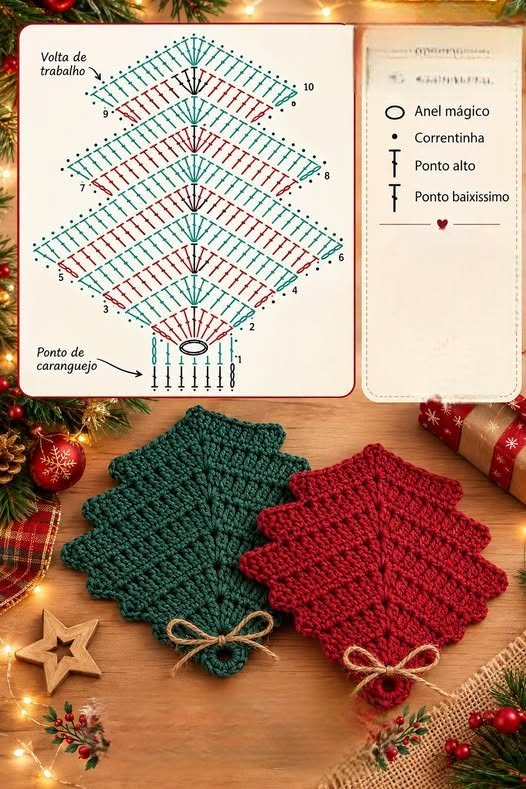
Materials, Crochet Stitch Key, Gauge, and Preparation
For this Crochet Christmas Tree Pattern, you will need approximately 70–100 yards (64–91 m) of medium-weight cotton or acrylic yarn. Worsted weight yarn, commonly labeled as weight #4, produces a substantial decorative tree, while DK yarn creates a slightly more delicate result. Traditional forest green is an obvious choice, but deep red, emerald, cream, burgundy, white, gold, or variegated Christmas yarn can also produce beautiful results.
Use a 4.0 mm to 4.5 mm crochet hook for worsted-weight yarn. If your stitches tend to be loose, choose the smaller hook so the finished fabric stays firm and defined. You will also need scissors, a yarn needle, stitch markers if desired, and a small length of jute, ribbon, or contrasting yarn for the decorative bow. Blocking pins are optional but useful for producing crisp branch points.
The crochet stitch key used throughout this tutorial is: MR = magic ring, ch = chain, sl st = slip stitch, sc = single crochet, hdc = half double crochet, dc = double crochet, inc = increase, st = stitch, sts = stitches, sp = space, RS = right side, and FO = fasten off. Unless specifically stated otherwise, turning chains do not count as stitches.
A double crochet (dc) is made by yarn over, insert the hook into the indicated stitch, yarn over and pull up a loop, yarn over and pull through two loops, then yarn over and pull through the remaining two loops. Double crochet creates the elongated vertical texture that makes this tree grow quickly while keeping the fabric flexible enough for blocking.
An increase in this pattern generally means working 2 dc into the same stitch. These increases are placed near the beginning and end of selected rows so that the triangular tree gradually becomes wider. Branch extensions are produced with short chains and additional stitches along the outside edges, creating the stepped Christmas-tree silhouette rather than a completely smooth triangle.
Exact gauge is not essential for a decorative project, but an approximate gauge of 14 dc × 8 rows = 4 inches (10 cm) works well. If your tree begins curling severely, your tension may be too tight. If it looks floppy and the stitches have large gaps, move down one hook size. The most important goal is consistency from the first row to the final branch.
Crocheting the Main Tree and Creating the Layered Branches
Begin at the top of the tree. Row 1: Ch 4. Work 2 dc into the fourth chain from the hook. Turn. (2 dc). This small starting point forms the tip of the Christmas tree. Keep the first stitches reasonably firm because they will support the uppermost point after blocking.
Row 2: Ch 3, 2 dc in the first st, dc across until 1 st remains, 2 dc in the last st. Turn. (4 dc). Row 3: Ch 3, 2 dc in first st, dc across, 2 dc in last st. Turn. (6 dc). These increases create the first small triangular section. Smooth the fabric gently after each row so that the increases remain balanced on both sides.
To create the first visible branch tier, work Row 4: Ch 4, dc in the fourth chain from the hook, dc in the first st of the previous row, dc across, work 2 dc in the last st, ch 3, then sl st back into the last dc. Turn. The small chain extensions on both sides create pointed branch ends. Do not pull these chains too tightly.
Continue widening the tree. Row 5: Ch 3, 2 dc in first st, dc evenly across the main body, 2 dc in last main st. Turn. Row 6: Ch 3, 2 dc in first st, dc across, 2 dc in last st. Turn. The center of the project should now look like a widening triangle underneath the first branch level.
Create a second, wider branch tier by beginning the next row with an extension. Row 7: Ch 5, starting in the fourth chain from the hook work dc in next 2 chains, then dc across the tree body. At the opposite edge ch 3, work dc back into the first chain, and sl st to the edge. Turn. This makes the new tier visibly wider than the section above it.
Repeat the basic rhythm of two widening rows followed by one branch-extension row until the tree reaches the desired size. For a tree around 10 inches (25 cm) tall, aim for approximately five branch tiers. Each new tier should extend about 0.5–0.75 inch (1.3–2 cm) farther than the tier above it. Continue increasing gradually so the lower portion becomes broad and balanced rather than suddenly flaring outward.
Shaping the Lower Tree, Loop, Edging, and Assembly
After forming approximately five tiers, crochet two final widening rows across the bottom section. Work ch 3, 2 dc in first st, dc across, 2 dc in last st, then repeat once more. These final rows give the lowest branches enough width to create a recognizable evergreen shape and provide a stable base for the decorative loop.
For the last branch row, work ch 5, crochet back along the chain with 2 dc, continue in dc across the entire lower edge, then repeat the extension at the opposite side. If you prefer deeper branch points, increase the extension to ch 6. If you want a subtler tree silhouette, use ch 4 instead. Maintaining symmetry is more important than following an exact chain count.
Next, create a small hanging loop or decorative loop. At the center of the bottom edge, attach yarn with a sl st, ch 8–12, depending on the desired loop size, and join with another sl st into the same central area. Fasten off securely. If the tree will hang from the top instead, create this loop at the top point before weaving in the final yarn end.
For a cleaner outline, add an optional single crochet edging around the entire tree. Attach the yarn near the bottom and work sc evenly around, placing 2 or 3 sc into each outer branch point so the corners do not curl. At inside corners between branch tiers, work fewer stitches so the indentation remains visible. Join with a slip stitch and fasten off.
If you would like the rustic bow shown in the inspirational style, cut approximately 12–16 inches (30–40 cm) of thin jute cord, ribbon, or contrasting yarn. Tie it into a small bow and secure it close to the loop or lower center of the tree with several sewing stitches. Keep the bow proportional so it does not hide the crochet texture.
Weave every loose yarn end through the back of several stitches using a yarn needle. Change direction at least once before trimming the yarn because this reduces the chance of the tail working loose. When finished, place the tree on a flat surface and compare the left and right sides. Gently stretch corresponding branch points until the entire Crochet Christmas Tree Pattern appears symmetrical.
Blocking, Color Ideas, Sizing, and Professional Finishing Tips
Blocking can make a major difference with a flat crochet Christmas tree. For cotton yarn, lightly dampen the finished tree, place it on a blocking mat or clean towel, and pin each branch tip into position. Make sure the central line remains straight and allow the project to dry completely before removing the pins.
For acrylic yarn, gentle shaping is normally enough. Avoid applying excessive heat directly to synthetic fibers because heat can permanently alter their texture. Place the tree under a lightweight book between clean towels for several hours if only minor flattening is required. The goal is to define the stepped branches without flattening the crochet stitches completely.
Classic green creates a natural evergreen appearance, but this pattern is especially attractive when made in Christmas red, deep burgundy, winter white, or metallic-accented yarn. You can make several trees in coordinating colors and display them together. A green-and-gold collection offers a traditional look, while red-and-white trees create a bright festive theme.
You can also turn the pattern into a striped Christmas crochet decoration. Change color every two or three rows, always completing the final yarn-over of the previous stitch with the new color. Carrying unused yarn along the edge can work for short sections, but cutting and weaving the yarn ends usually creates a cleaner result for a decorative tree.
To make a miniature version, use lightweight yarn with a 2.5–3.0 mm hook and stop after three or four branch tiers. A miniature finished tree may measure approximately 4–6 inches (10–15 cm) and is ideal for ornaments or gift tags. For a larger wall decoration, use bulky yarn with a 5.5–6.5 mm hook and continue adding tiers.
The best-looking results come from controlling the shape during every stage rather than trying to correct everything at the end. Count your stitches regularly, check that your increases remain balanced, compare opposite branch tips, and keep the center line straight. These small habits make a handmade Crochet Christmas Tree Pattern look much more polished and professional.
FAQ – Frequently Asked Questions About the Crochet Christmas Tree Pattern
Is the Crochet Christmas Tree Pattern suitable for beginners?
Yes. The project mainly uses chains, slip stitches, single crochet, and double crochet, so a beginner who understands basic crochet techniques can follow it. The branch extensions require a little attention, but they become repetitive after the first two tiers.
What yarn is best for a flat crochet Christmas tree?
Cotton is excellent because it produces crisp stitches and responds well to blocking. Acrylic is also a good choice, especially for lightweight ornaments. Medium-weight yarn creates a practical balance between structure and softness.
How large should the finished Christmas tree be?
Using worsted-weight yarn and a 4.0–4.5 mm hook, the pattern can produce a tree around 10 inches (25 cm) tall and 7 inches (18 cm) wide. Exact measurements vary because every crocheter has different tension.
How can I make my tree wider?
Add additional increases at the outside edges or make each branch extension one or two chains longer. Increase gradually rather than adding a large number of stitches in one row, which could cause the fabric to ripple.
Why is my crochet Christmas tree curling?
Curling may result from tight tension, too small a hook, or insufficient increases. Try loosening your stitches slightly or moving up 0.5 mm in hook size. Blocking usually corrects minor curling when the stitch counts are otherwise correct.
Can I use single crochet instead of double crochet?
Yes, but the finished fabric will be denser and shorter. You will also need more rows to achieve the same height. Double crochet is recommended for this version because it creates the elongated texture visible in traditional flat Christmas tree projects.
Can I make the tree in red instead of green?
Absolutely. Red creates a vibrant Christmas decoration, while white can resemble a snowy tree. Green, red, gold, cream, burgundy, and deep blue are all attractive holiday choices.
How do I make sharper branch tips?
Keep the chain extension relatively firm and place a slip stitch near the tip. Blocking each point afterward also helps create crisp, clearly defined branches.
Can this pattern be used as a coaster?
Yes. Cotton yarn is particularly suitable for a decorative coaster or table mat. If you intend to place warm objects on the project, use an appropriate heat-resistant natural fiber and avoid decorative synthetic elements that are not intended for heat exposure.
Can I add beads or buttons to represent Christmas ornaments?
Decorative elements may be added when the tree is intended for adult decoration. Sew them securely. For items that may be handled by babies or very young children, avoid small removable parts that could become choking hazards.
How can I turn several trees into a garland?
Make multiple smaller trees and crochet a long chain. Attach the trees at evenly spaced intervals with slip stitches or sew them to the chain afterward. Using two or three alternating colors creates an especially festive display.
What should I do if one side becomes wider than the other?
Count the stitches in each row and confirm that increases are being placed equally on both edges. You can sometimes correct a difference of one stitch during the following row, but larger errors are usually easier to fix by undoing the incorrect section.
Does gauge matter for this Crochet Christmas Tree Pattern?
Gauge is less critical for decorations than for garments. However, consistent tension matters because it keeps the tree symmetrical and prevents unexpected changes in width. If you are making several matching trees, use the same yarn, hook, and tension for each one.
How can I make the finished crochet tree look more professional?
Careful blocking, symmetrical branch placement, hidden yarn tails, consistent stitch tension, and a neat edging are the most important finishing techniques. Take extra time around the branch corners because these points define the silhouette of the entire project.
Conclusion
The Crochet Christmas Tree Pattern is a versatile holiday project that combines simple crochet stitches with clever shaping to create a beautiful layered evergreen silhouette. In this tutorial, you learned how to begin at the top of the tree, widen the central structure, create stepped branch tiers, shape the lower branches, make a hanging loop, add an optional border, and finish the project with a decorative bow.
You also learned the essential crochet stitch key, including MR, ch, sl st, sc, dc, inc, st, sts, sp, RS, and FO. Understanding these abbreviations makes the written instructions easier to follow and gives you useful knowledge that can be applied to many other crochet projects.
The pattern is easy to personalize. You can make a traditional green tree, a bold Christmas-red version, an elegant winter-white tree, or an entire coordinating collection. Changing the yarn weight and hook size also allows you to transform the same basic design into an ornament, gift decoration, coaster, garland component, or larger wall hanging.
Remember that symmetry is especially important with this project. Count stitches, compare the branch extensions on both sides, keep the center straight, and block the finished piece carefully. These simple finishing steps help transform basic crochet rows into a polished handmade Christmas decoration.
The Crochet Christmas Tree Pattern is also a useful project for practicing increases, turning rows, branch shaping, edging, and finishing without the commitment required by a large blanket or garment. Once you understand the repeating construction, it becomes easy to make several trees for gifts or seasonal decorating.