
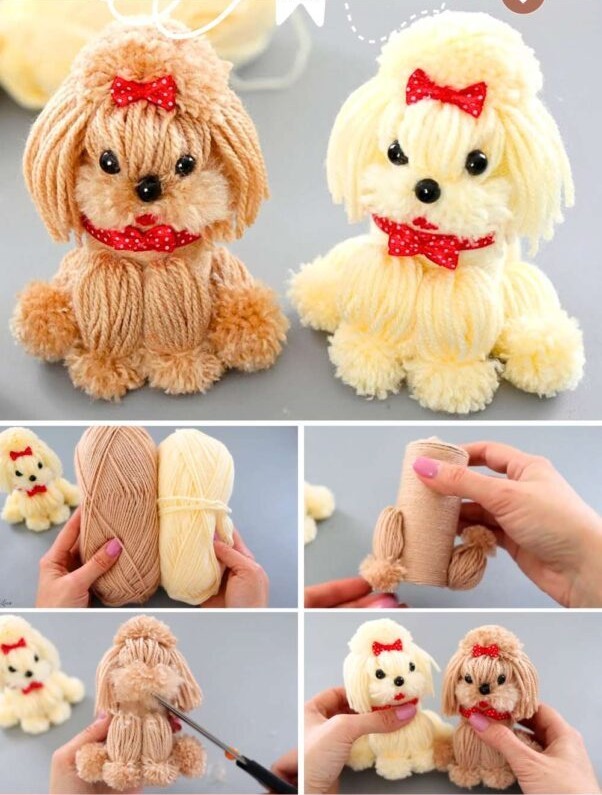
Overview & Design Inspiration
Welcome back to the cozy corner of our crafting community! If you are looking for a project that instantly melts your heart and brings pure joy to your crochet basket, you are going to fall completely in love with the “How to Craft Yarn Dog Pattern.” These charming handmade companions have taken the crafting world by storm, offering a delightful way to create personalized decorations, heartfelt gifts, and whimsical works of art right from your favorite armchair.
The true magic of this design lies in its incredible versatility and cozy texture. Whether you are a beginner eager to master new shapes or an experienced maker looking for a relaxing weekend make, crafting a yarn puppy is wonderfully rewarding. Plus, with the downloadable PDF and step-by-step video tutorial waiting for you below, you’ll have all the visual guidance you need to bring your playful new friend to life!
Materials & Recommended Supplies
Gathering your supplies is the exciting first step toward a successful crafting adventure. Having the right tools on hand ensures your finished pup looks polished, professional, and delightfully cuddly.
- Yarn: Medium-weight (Worsted/Aran) acrylic or cotton yarn. Soft acrylic is fantastic for beginners, while cotton offers gorgeous stitch definition.
- Crochet Hook: 4.0 mm (US G/6) or 4.5 mm (US 7) hook, depending on your personal tension and desired firmness.
- Scissors: Sharp, precision fabric scissors for clean trimming and shaping.
- Stuffing: Lightweight polyester fiberfill to keep your puppy plush and huggable without weighing it down.
- Notions: Tapestry needle for weaving ends, stitch markers, and optional safety eyes or embroidery thread for sweet facial features.
- Adhesive: A reliable glue gun for securing optional decorative accessories like tiny collars or bows.
Essential Techniques & Stitch Highlights
Bringing a yarn dog to life involves a wonderful blend of foundational crochet stitches and clever shaping techniques. Working primarily in the round using simple single crochets creates the dense, sturdy fabric needed to hold the polyester stuffing securely in place.
You will love practicing foundational moves like the magic ring to start your pieces seamlessly without any gaping holes. As you progress, simple increases and decreases allow you to sculpt adorable muzzles, rounded cheeks, and perky ears, turning flat loops of yarn into a three-dimensional character bursting with personality.
Construction & Assembly Highlights
The construction process is designed to be an absolute joy from start to finish. We begin by working on the main body and head separately, ensuring you have total control over your proportions and facial balance before any permanent attachment happens.
Once your pieces are lovingly crocheted and gently stuffed, the assembly phase brings your puppy’s unique character forward. You will attach the head to the body, position those floppy or pointed ears just right, and use your tapestry needle or embroidery floss to stitch on a sweet, soulful expression that makes your handmade dog truly one of a kind.
Customization & Styling Ideas
One of the most thrilling parts of this project is making the design completely your own. You can easily recreate your real-life furry best friend by matching their unique fur colors, patch markings, and ear shapes!
Feel free to lean into seasonal fun by crocheting a tiny holiday scarf, a miniature winter beanie, or a festive bow. These charming little accessories make wonderful holiday ornaments, nursery shelf sitters, or unforgettable handmade gifts for the animal lovers in your life.
Pro Tips for Flawless Results
- Maintain Even Tension: Keep your stitches nice and consistent so your stuffing won’t peek through the gaps in your yarn fabric.
- Stuff Gradually: Add your polyester fiberfill a little bit at a time, using the back of your crochet hook to push stuffing into tight corners like snouts and paws.
- Pin Before You Sew: Use locking stitch markers or sewing pins to test the placement of your ears and muzzle before attaching them permanently.
- Take Your Time Shaping: Spend a few extra moments molding the stuffed pieces with your hands to achieve a wonderfully smooth, symmetrical finish.
Frequently Asked Questions
Is this project suitable for a confident beginner?
Absolutely! The project relies on basic stitches worked in the round. With our accompanying video tutorial and printable PDF guide, crocheters of all skill levels can easily follow along and succeed.
Can I use any yarn weight I have in my stash?
Yes, you can experiment with different yarn weights! Just remember to adjust your hook size accordingly to maintain a dense, firm fabric that keeps your polyester stuffing safely tucked inside.
Are safety eyes safe for children’s toys?
While plastic safety eyes look wonderfully polished, we always recommend embroidering the facial features with yarn or embroidery floss if you are gifting the finished toy to an infant or toddler for safe, worry-free play.
Watch the Full Step-by-Step Video Tutorial
Prefer visual guidance? Follow along with the complete video tutorial below at your own pace: