
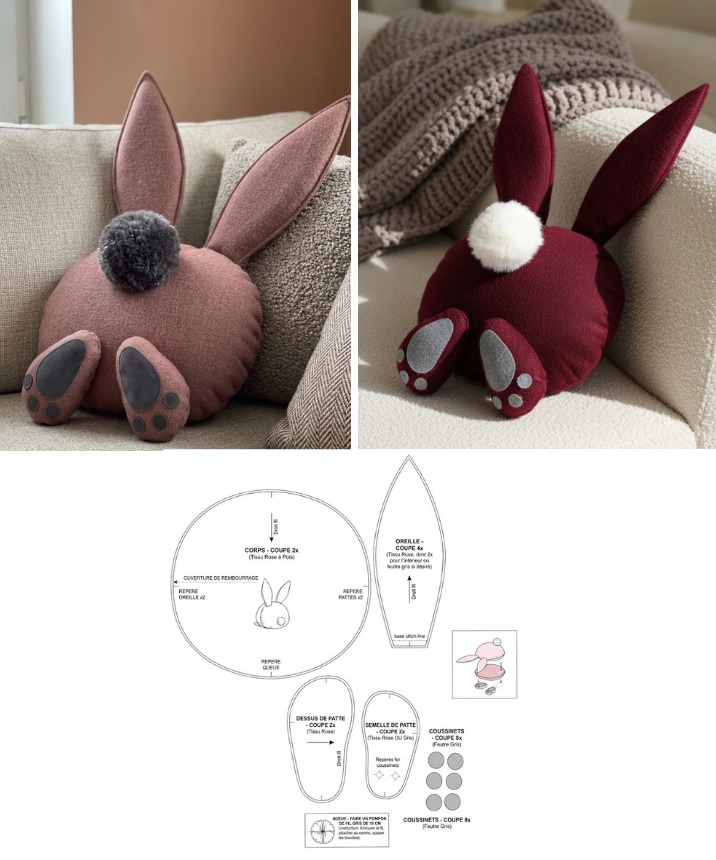
Overview & Design Inspiration
Welcome, fellow makers, to a wonderfully cozy corner of our creative community! Today, we are absolutely thrilled to dive into the delightful world of crafting your very own fabric rabbit cushion, a project that blends pure comfort with irresistible handmade charm.
Whether you are looking to add a playful touch to a little one’s bedroom, create a sweet reading nook companion, or simply indulge in a relaxing weekend sewing session, this adorable design brings instant warmth and personality to any space. It’s a wonderfully rewarding project that celebrates the joy of handmade home decor!
Materials & Recommended Supplies
Gathering your supplies is half the fun, and this project is wonderfully forgiving when it comes to utilizing your favorite stash items. Here is everything you need to bring your cute bunny cushion to life:
- Main Fabric: Soft, durable cotton works wonderfully, though linen, fleece, or plush velvet add incredible texture.
- Stuffing Material: High-quality polyester fiberfill for a fluffy, huggable finish (or eco-friendly fabric scraps!).
- Basic Sewing Tools: Fabric scissors, pins, hand-sewing needles, and coordinating thread.
- Sewing Machine: Highly recommended for speed and durability, though hand-sewing works beautifully too.
- Decorative Embellishments: Buttons for eyes, embroidery thread for sweet whiskers, and ribbons for extra charm.
Essential Techniques & Stitch Highlights
Bringing this plush little friend to life relies on a few fundamental sewing techniques that make the process smooth and deeply satisfying. Mastering simple curved stitching ensures your rabbit’s signature silhouette flows gracefully without puckering.
You’ll also practice precise corner shaping and seamless turning, which give the ears and body their crisp, professional look. Adding delicate hand-embroidery allows you to paint with thread, giving your bunny a uniquely sweet expression that machine stitching alone simply cannot match.
Construction & Assembly Highlights
The journey begins by sketching and cutting a simple rabbit template from paper, which ensures absolute symmetry for your front and back panels. Once traced onto your chosen fabric, you’ll cut out two identical pieces with a generous seam allowance.
Pin your fabric pieces together with the right sides facing inward, then carefully stitch along the outline while leaving a small opening for turning. After gently flipping the cushion right-side out and defining the ears with a blunt tool, stuff it to your desired plushness before closing the seam with an invisible stitch.
Customization & Styling Ideas
One of the greatest joys of this project is making it entirely your own through endless creative tweaks and personalized details. Try mixing and matching patterned fabrics for the inner ears while keeping the body a solid, soothing pastel.
You can also experiment with scale by stitching up a tiny version for shelf decor or a wonderfully oversized floor pillow for lounging. It also makes a wonderfully thoughtful, heartfelt handmade gift that loved ones will cherish for years to come!
Pro Tips for Flawless Results
- Shorten your stitch length slightly when navigating tight curves to keep your seams secure and smooth.
- Carefully clip small notches into the seam allowances around curved areas so the fabric lays flat when turned.
- Press your seams with an iron before turning the piece right-side out for crisp, professional-looking edges.
- Take your time during the final closing stage using a neat invisible stitch to keep your finish completely seamless.
Frequently Asked Questions
Is this project suitable for absolute beginners?
Yes, absolutely! The simple shape and forgiving nature of this project make it a wonderful, confidence-boosting make for crafters just starting out on their sewing journey.
Can the finished rabbit cushion be safely washed?
Certainly! If you use pre-washed cotton and washable polyester fiberfill, you can gently hand-wash your cushion or run it on a delicate machine cycle to keep it fresh.
How long does it typically take to complete one cushion?
Most crafters can easily complete this delightful project in just a couple of hours, making it an ideal weekend afternoon make or a quick last-minute gift.
Watch the Full Step-by-Step Video Tutorial
Prefer visual guidance? Follow along with the complete video tutorial below at your own pace: