
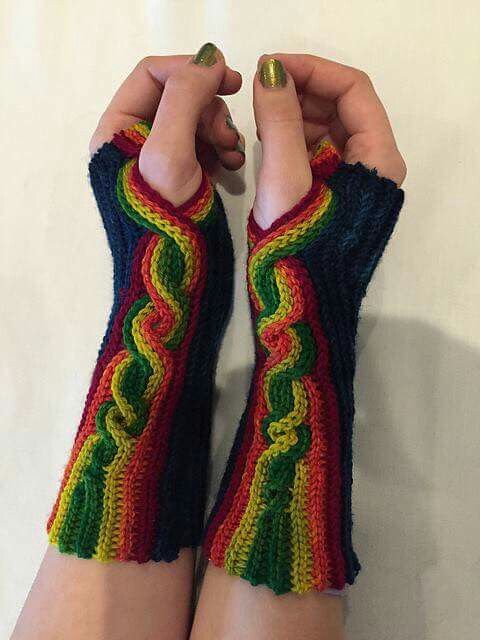
Overview & Inspiration
Welcome, fellow makers, to a truly timeless and elegant project! The Braided Gloves Crochet Pattern combines cozy warmth with gorgeous texture for a handmade accessory you will reach for all winter long.
If you have ever admired the look of knitted cables but prefer your crochet hook, this design is your new best friend. It mimics sophisticated knit braids entirely through clever crochet techniques, offering an approachable challenge that yields stunning results.
Materials & Supplies Needed
- Yarn: Smooth worsted-weight yarn (approx. 150-200 yards), wool or wool-blend recommended for warmth and elasticity. Avoid overly fuzzy yarns to keep the braid definition crisp.
- Colors: Main color for the glove body; optional contrasting color if you want the braided panel to pop.
- Crochet Hook: 4.0 mm (US G/6) or size needed to obtain gauge (a slightly smaller hook is great for creating a dense, wind-blocking fabric).
- Notions: Tapestry needle for weaving in ends, locking stitch markers to track rounds, measuring tape, and sharp scissors.
- Optional: Light steam blocking tools to set your stitches.
Stitches & Abbreviations
- Ch: Chain
- Sl St: Slip stitch
- Sc: Single crochet
- Hdc: Half double crochet
- Fpdc: Front post double crochet
- Bpdc: Back post double crochet
- Blo: Back loop only
- Sk: Skip
- St(s): Stitch(es)
- Rnd(s): Round(s)
Step-by-Step Pattern Instructions
Phase 1: The Ribbed Cuff
Working in rows rather than rounds to create horizontal stretch, ch 11.
Row 1: Sc in 2nd ch from hook and in each ch across, turn. [10 sts]
Row 2: Ch 1, working in Blo, sc in each st across, turn. [10 sts]
Repeat Row 2 until the cuff measures approximately 6 to 7 inches unstretched, long enough to wrap comfortably around your wrist.
Bring the short ends of the cuff together and slip stitch them closed through both thicknesses to form a neat band. Do not fasten off.
Phase 2: Hand Foundation & Braid Setup
Rotate your work to set up for working in the round along the raw edge of the cuff.
Rnd 1: Ch 1, evenly work sc or hdc stitches around the edge of the cuff, join with a sl st to the first st, being careful not to twist your work. [24 sts]
Rnd 2: Establish the placement for your braid panel on the back of the hand. Work standard post stitches and background stitches as designated for your chosen width, maintaining your stitch count around. [24 sts]
Phase 3: Working the Braided Texture
Rnd 3 (Crossing Row): Skip the designated background stitches, work Fpdc around specific previous posts, then cross back over to complete the interwoven braid effect. Fill in remaining hand stitches normally. [24 sts]
Continue repeating the cable sequence every few rounds while working straight stitches in between to let the braid twist naturally.
Phase 4: Thumb Gusset & Shaping
Rnd 8 (Gusset Increases): As you approach the thumb placement, work 2 sts into the same stitch over successive rounds to widen the gusset area for a comfortable, ergonomic fit.
Rnd 12: Skip the gusset stitches, chaining a small bridge across the gap, and continue working the main hand rounds in pattern. [20 sts remaining for hand]
Work even in pattern until the glove reaches just below your knuckles for fingerless style, or continue upward for full-finger coverage.
Assembly & Finishing Touches
Return to the held thumb opening, attach your yarn at the base, and work seamless rounds upward to complete the thumb length. Fasten off securely.
Inspect your entire piece and use your tapestry needle to weave in all yarn tails along the inside of the work. Take your time here to keep the wrong side looking clean and professional.
Give your finished gloves a light steam block if using wool to relax the fibers and make that gorgeous braided cable pop to absolute perfection.
Pro Tips for Flawless Results
- Keep an eye on your tension during the cable-crossing rounds so the fabric doesn’t pucker or pull too tightly.
- Use stitch markers generously to mark the exact start of your rounds and the edges of your braid panel.
- Try the glove on frequently as you approach the thumb gusset to ensure a custom, snug fit.
Frequently Asked Questions
Can I make these into full-finger gloves instead of fingerless?
Absolutely! Simply extend the main hand section past your knuckles, then divide and work individual small tubes for each finger using basic single crochets.
Why is my braided cable leaning to one side?
Cable lean usually happens if a crossed post stitch is worked into the wrong row below. Always double-check that you are skipping the correct number of foundation stitches before crossing your post stitches.
How do I choose the right yarn weight?
A smooth worsted-weight yarn is the gold standard because it highlights stitch definition without making the gloves overly bulky. Avoid novelty or eyelash yarns for this project.
Watch the Full Step-by-Step Video Tutorial
Prefer visual guidance? Follow along with the complete video tutorial below at your own pace: