
Dearest Yarn Lovers and Crafting Enthusiasts,
Oh, the crisp air, the cozy sweaters, the vibrant hues of autumn! It’s that magical time of year when our needles yearn for projects that capture the season’s warmth and charm. Today, I’m absolutely thrilled to unveil a project that perfectly embodies this spirit: our delightful “Crochet Amigurumi Pumpkin Pincushion Pattern.” Get ready to add a touch of handmade magic to your sewing space or create the most thoughtful gift!
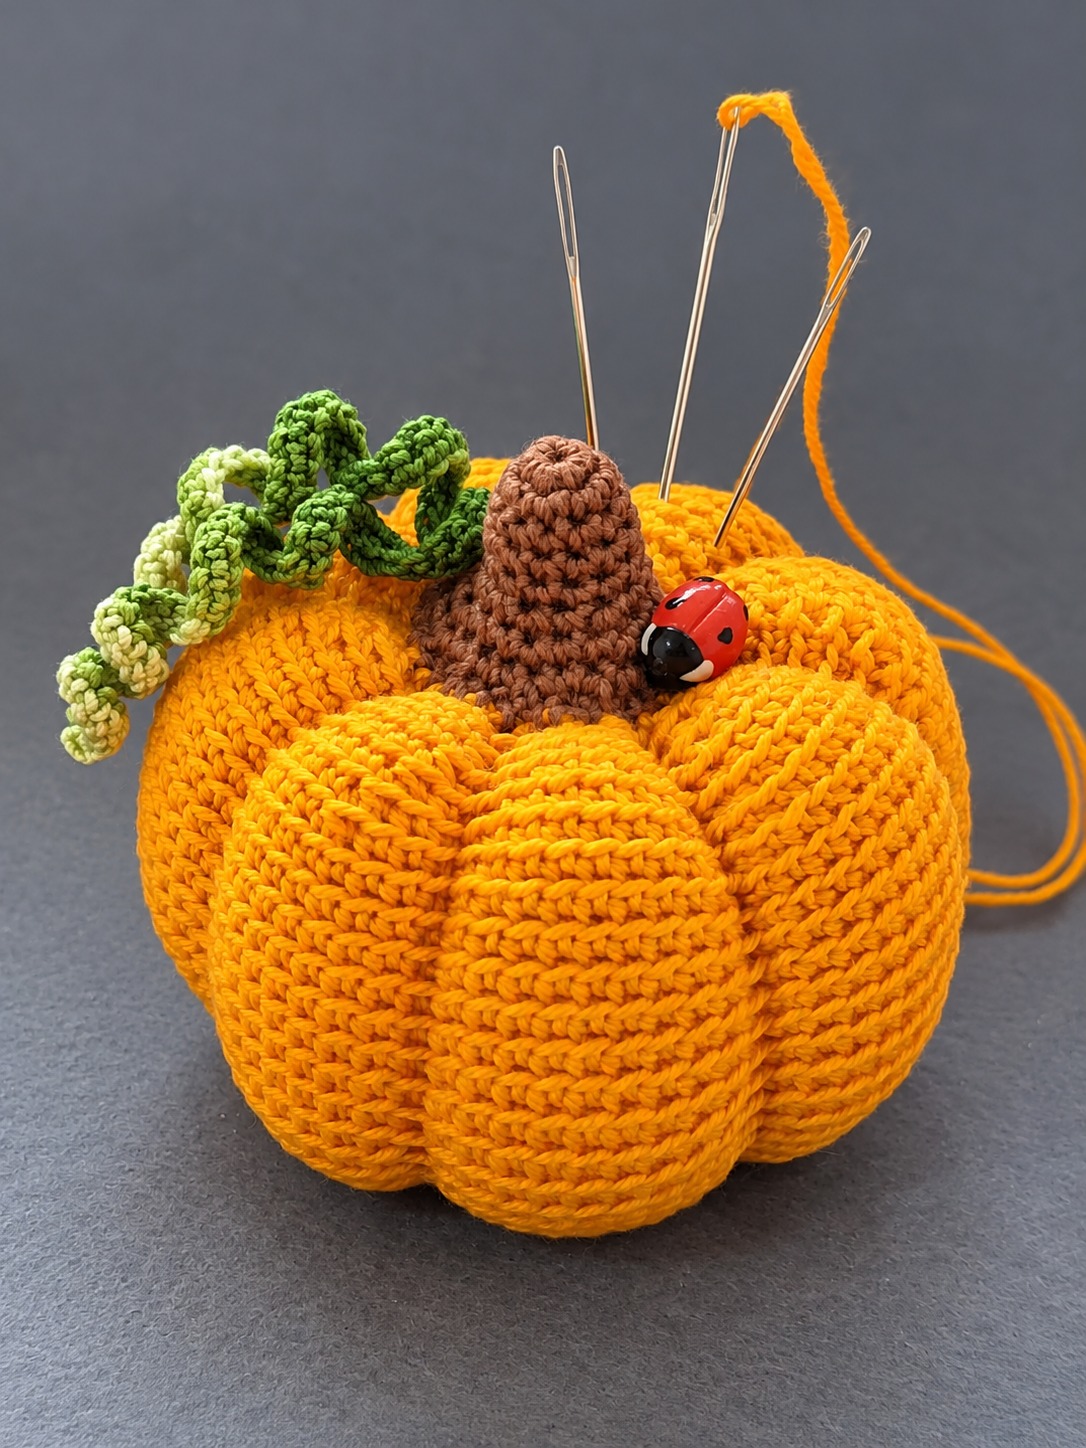
This isn’t just any pincushion; it’s a miniature celebration of harvest, a tiny pumpkin bursting with personality. Imagine a beautifully textured golden-orange body, adorned with playful curly green vines and a sturdy rustic brown stem, all designed to cradle your precious pins and needles. It’s the perfect blend of practical utility and irresistible autumn charm.
What truly makes this pumpkin pincushion a must-make is its captivating design, brought to life through accessible amigurumi techniques. With carefully placed single crochet stitches, increases, and decreases, you’ll sculpt a perfectly rounded pumpkin body, complete with those iconic vertical ridges. The optional addition of a whimsical ladybug simply adds to its undeniable allure, making it a joy to behold and a true conversation starter in any craft room.
While the actual pattern details are just a click away in our downloadable PDF and video tutorial, let’s dive into what makes this project so special, from its materials to its delightful construction.
Overview & Design Inspiration
Fall into the season with our enchanting Crochet Amigurumi Pumpkin Pincushion, a project that beautifully marries the charm of autumn decor with the undeniable practicality of a sewing accessory. Whether you adore crocheting seasonal ornaments or delight in creating useful tools for your craft space, this adorable pumpkin is a truly wonderful addition to your handmade collection. Its rich, textured orange body, whimsical curly green vines, and rustic brown stem perfectly capture the essence of a miniature harvest pumpkin.
The beauty of this design lies in its delightful combination of straightforward construction and captivating finishing details. Crafted using fundamental amigurumi techniques, this pumpkin will guide you through creating its rounded shape and those distinctive pumpkin sections that give it such a realistic appeal. Imagine a vibrant golden-orange pumpkin, its surface gently sculpted with vertical ridges, crowned by a sturdy brown stem, and adorned with playful green tendrils. With just a little patience and attention to detail, even those relatively new to amigurumi can create a breathtaking version of this practical and utterly charming accessory.
Materials & Recommended Supplies
To craft your very own durable and attractive Amigurumi Pumpkin Pincushion, gather the following essentials:
- Yarn: Medium-weight (worsted weight / 4) cotton yarn in golden orange, brown, dark green, and light green. Cotton is ideal for its stitch definition and firm surface, which perfectly supports sewing pins. While acrylic yarn can be used for a softer finish, tightly twisted cotton is generally preferred for regular pin use.
- Crochet Hook: 3.5 mm (US size E/4) crochet hook.
- Stuffing: High-quality polyester fiberfill.
- Notions: A yarn needle for assembly and finishing, sharp scissors, and stitch markers (essential for working in continuous rounds).
- Embellishment: A small decorative ladybug (optional, but highly recommended for an extra touch of whimsy!).
- Optional Weight: A small, securely enclosed fabric pouch filled with crushed walnut shells can be placed inside for added stability, but please avoid if you have nut allergies. Ensure any weighted filling is completely contained.
Essential Techniques & Stitch Highlights
This charming pumpkin pincushion is a fantastic opportunity to hone your amigurumi skills, utilizing core crochet techniques that bring its three-dimensional form to life. You’ll begin with the foundational magic ring (MR), a neat way to start projects in the round without a hole, ensuring a beautifully seamless center.
The body of the pumpkin is primarily shaped using single crochet (sc) stitches, meticulously worked in continuous spiral rounds, with careful increases (inc) and decreases (dec) to achieve its characteristic rounded contours. You’ll gain confidence in shaping as you transform flat circles into a perfectly plump pumpkin! While the main body relies on these core stitches, additional details like the curly vines may incorporate chain (ch) stitches, half double crochet (hdc), and double crochet (dc) to create their unique textures. Paying attention to your tension is paramount in amigurumi, as a tight fabric ensures your stuffing remains hidden and your pumpkin holds its shape beautifully.
Construction & Assembly Highlights
Crafting your Amigurumi Pumpkin Pincushion begins with the pumpkin body itself, a delightful journey in sculpting with yarn. Using your vibrant orange yarn, you’ll start with a magic ring and then incrementally increase your stitches, round by round, to form a flat, circular base. As you continue, working straight single crochet rounds will build the height and gentle curve of the pumpkin’s sides, creating a soft, bowl-like structure.
Once the main height is achieved, you’ll gradually decrease stitches to shape the top of the pumpkin, expertly closing the opening. This is also the perfect moment to begin adding your polyester fiberfill, distributing it evenly to ensure your pumpkin is firm enough to hold pins, yet pliable enough for later shaping. The characteristic vertical ridges of the pumpkin are then added during the finishing process, using your yarn needle to cinch sections and give it that realistic, segmented look.
Next come the charming details: the rustic brown stem, crocheted separately and securely attached to the top. The playful green curly vines are created with chain stitches, adding a touch of organic whimsy before being artfully sewn into place. Finally, for an extra sprinkle of charm, an optional small decorative ladybug can be lovingly stitched onto your finished pumpkin, completing its adorable harvest appeal.
Customization & Styling Ideas
One of the most appealing aspects of this Amigurumi Pumpkin Pincushion is its incredible versatility, allowing you to tailor it perfectly to your style and needs. Beyond its primary role as a functional pincushion, it makes a charming seasonal tabletop decoration, adding a handmade touch to any autumn display. It’s also an utterly thoughtful gift for anyone who cherishes sewing, quilting, or embroidery.
Don’t feel limited to traditional orange and green! Experiment with your color palette to match your personal aesthetic: envision a sophisticated cream or mustard yellow pumpkin with sage green accents, or perhaps deep burgundy and forest green for a more dramatic look. You can even choose a single shade of green for a minimalist take on the vines and leaves. The finished size is also easily adjusted; simply use a different yarn weight and corresponding hook size to create anything from a petite decorative pumpkin to a generously sized sewing-table accessory. Let your creativity bloom!
Pro Tips for Flawless Results
- Master Consistent Tension: Amigurumi projects thrive on tight, even stitches. If you notice small gaps where stuffing might show through, try using a slightly smaller hook. Consistent tension ensures your pumpkin holds its shape beautifully and provides a firm surface for pins.
- Stuff Smart, Not Hard: Add your polyester fiberfill gradually, distributing it evenly throughout the pumpkin’s body. Aim for a firm, yet not overly stretched, feel to ensure it maintains its shape and effectively grips pins.
- Embrace Your Stitch Marker: Since most of the pumpkin body is worked in continuous spiral rounds, a stitch marker is your best friend. Use it faithfully to mark the beginning of each round and avoid losing your place, ensuring perfect shaping.
- Create a Comfortable Workspace: Good lighting is crucial for seeing your stitches clearly, especially when working with darker yarns. Keep all your materials organized and within reach to make your crocheting experience as enjoyable and seamless as possible.
Frequently Asked Questions
What type of yarn is best for a pincushion?
For a durable and functional pincushion, medium-weight cotton yarn is highly recommended. It creates defined stitches and a firm fabric that helps hold pins securely without snagging. While acrylic yarn can also be used for a softer feel, cotton’s sturdiness often makes it the preferred choice for items that will regularly hold pins.
How can I adjust the size of my finished pumpkin?
You can easily change the size of your pumpkin by altering the yarn weight and corresponding crochet hook size. For a smaller decorative pumpkin, use a finer yarn (e.g., sport weight) with a smaller hook. For a larger, more substantial accessory, opt for a bulkier yarn (e.g., chunky weight) and a larger hook. Just remember to ensure your stitches remain tight enough to prevent stuffing from showing!
Why are my stitches gappy, and the stuffing is showing through?
If you’re noticing gaps between your stitches, it likely means your tension is a bit too loose, which is a common occurrence in amigurumi. To fix this, try using a smaller crochet hook with your chosen yarn. A tighter fabric is essential for amigurumi to securely contain the stuffing and maintain a smooth, professional finish.
Watch the Full Step-by-Step Video Tutorial
Prefer visual guidance? Follow along with the complete video tutorial below at your own pace: