
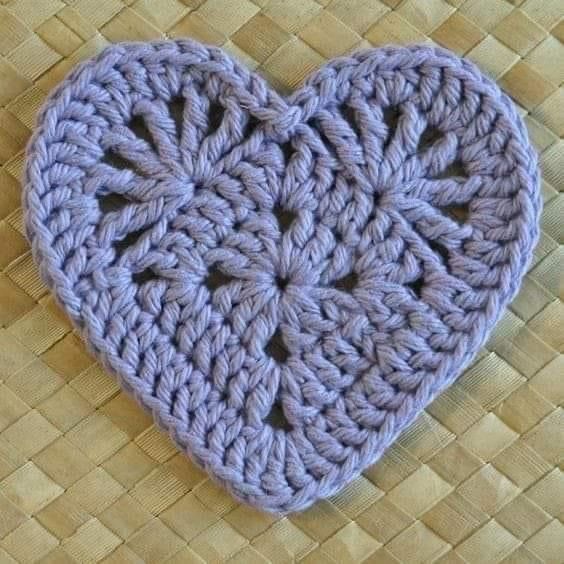
Overview & Inspiration
Welcome, fiber artists! There is something truly magical about transforming a simple string of yarn into a symbol of love, care, and handmade beauty. Whether you are taking your very first steps with a hook or you are a seasoned crocheter looking for a palette cleanser project, a handmade heart is a timeless favorite that never goes out of style.
Working on a heart project allows you to blend technical skill with emotional storytelling, making each piece an ideal gift, seasonal decoration, or sweet accessory. Grab your favorite hook, settle into your favorite crafting chair, and let us dive into the wonderful world of heart-crafting together!
Materials & Supplies Needed
- Yarn: Sport weight, DK, or Worsted weight yarn (cotton for crisp stitch definition, or acrylic for softness and vibrant color options)
- Yarn Color: Traditional red, pink, or any color that suits your creative vision
- Crochet Hook: 3.5 mm (US E/4) or 4.0 mm (US G/6) depending on your yarn weight
- Tapestry Needle: For weaving in loose ends and seamless finishing
- Stitch Markers: Helpful for tracking your beginning stitches or rounds
- Scissors: Sharp crafting scissors for clean snips
- Polyfill Stuffing: Optional, needed only if you are making a stuffed 3D heart variation
Stitches & Abbreviations
- ch – chain stitch
- sl st – slip stitch
- sc – single crochet
- hdc – half double crochet
- dc – double crochet
- tr – treble crochet
- st/sts – stitch/stitches
- rep – repeat
- FO – fasten off
Step-by-Step Pattern Instructions
Follow along with this classic flat heart construction to create a wonderfully symmetrical, beautiful little motif in minutes.
Foundation: Start with a magic ring, or ch 4 and join with a sl st to form a ring.
Round 1: Ch 3 (counts as first dc here and throughout), work 3 dc into the center of the ring, work 3 hdc into the ring, ch 1, work 1 tr into the ring, ch 1, work 3 hdc into the ring, 3 dc into the ring, ch 3, and sl st into the center of the ring to close [14 sts + ch spaces].
Round 2: Work 1 sc and 1 hdc in the first ch-3 space. Work 2 hdc in each of the next 3 sts. Work 1 hdc in the next st. Work (1 hdc, ch 1, 1 hdc) into the bottom point tr st. Work 1 hdc in the next st. Work 2 hdc in each of the next 3 sts. Work 1 hdc and 1 sc in the final ch-3 space, then sl st into the center ring to secure the heart [30 sts].
Finishing: Fasten off, leaving a 6-inch yarn tail for weaving or attaching.
Assembly & Finishing Touches
Once your crocheting is complete, use your tapestry needle to weave in all starting and ending yarn tails securely along the back of the stitches.
If your heart edges are curling, give the piece a gentle steam blocking or pin it down lightly with a mist of water to let the stitches relax and align.
For a three-dimensional stuffed heart, simply crochet two identical flat hearts, place them wrong sides together, single crochet around the outer edge while lightly adding polyfill stuffing before closing the final gap.
Pro Tips for Flawless Results
- Maintain an even tension throughout your stitches so that both lobes of the heart turn out perfectly symmetrical.
- Read through all pattern abbreviations and round steps carefully before starting to prevent accidental missed stitches.
- Do not skip blocking! Taking an extra five minutes to shape your finished hearts makes a dramatic difference in the final professional look.
Frequently Asked Questions
What is a Crochet Heart Pattern?
A Crochet Heart Pattern is a specific set of instructions that guides crafters in creating heart-shaped designs using fundamental crochet stitches like chains, single crochets, and double crochets.
Is the Crochet Heart Pattern suitable for beginners?
Yes, absolutely! Most heart designs use basic stitches, are small in size, and work up quickly, making them fantastic learning tools for building tension control and stitch recognition.
Can I change the size of my crochet heart?
Yes, you can easily scale hearts up or down by experimenting with different yarn weights and corresponding hook sizes, or by following patterns with extended stitch rounds.
Watch the Full Step-by-Step Video Tutorial
Prefer visual guidance? Follow along with the complete video tutorial below at your own pace: