
Overview & Inspiration
Welcome, fellow yarn lovers! There is nothing quite like the magic of transforming a simple ball of string into an adorable, personality-packed companion, and this project is a true crowd-pleaser.
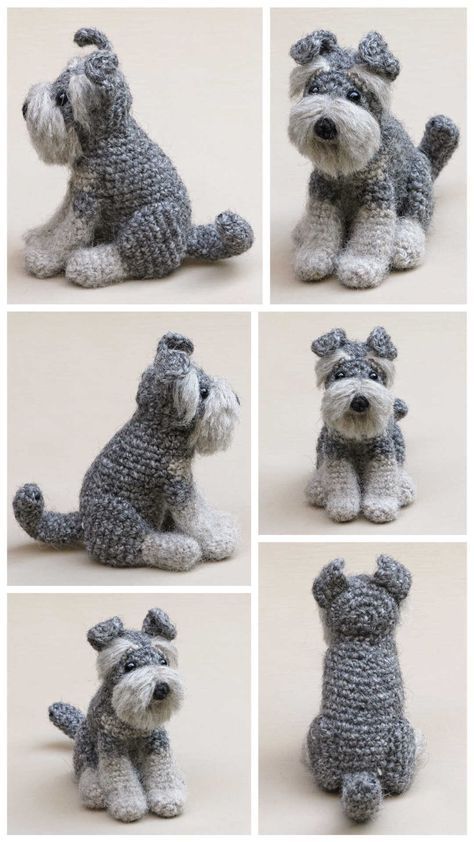
Capturing the iconic square muzzle, bushy beard, and alert posture of everyone’s favorite distinguished pup, this project strikes that wonderful balance between delightful detail and approachable craftsmanship. Whether you are crafting a sentimental keepsake of a beloved pet, creating a heartfelt handmade gift, or stocking your shop inventory, this little guy is guaranteed to steal your heart.
Materials & Supplies Needed
- Medium-weight (Worsted Weight / Category 4) yarn in Schnauzer colors (such as charcoal gray, silver, white, and black)
- Crochet hook: 3.5 mm (US size E/4) to ensure tight stitches and prevent stuffing from showing
- Polyester fiberfill stuffing
- Safety eyes (9mm) or black embroidery floss for a child-safe alternative
- Stitch markers
- Tapestry needle
- Scissors
- Optional small collar or decorative tag
Stitches & Abbreviations
- ch: chain
- sc: single crochet
- inc: single crochet increase (work 2 sc in the same stitch)
- dec: single crochet decrease (sc two stitches together invisibly)
- sl st: slip stitch
- st(s): stitch(es)
- Rnd(s): Round(s)
Step-by-Step Pattern Instructions
Head & Muzzle
Working in continuous rounds from the top of the head downward, using your main gray yarn.
- Rnd 1: Start with a magic ring and work 6 sc into the ring [6 sts].
- Rnd 2: Work an inc in each st around [12 sts].
- Rnd 3: (1 sc, inc) repeat around [18 sts].
- Rnds 4-7: Sc in each st around [18 sts].
- Rnd 8: (2 sc, inc) repeat around [24 sts].
- Rnds 9-12: Sc in each st around [24 sts]. Fasten off, leaving a long tail for assembly.
Body
Starting at the lower torso and working upward.
- Rnd 1: Make a magic ring, 6 sc into the ring [6 sts].
- Rnd 2: (inc) 6 times [12 sts].
- Rnd 3: (1 sc, inc) repeat around [18 sts].
- Rnd 4: (2 sc, inc) repeat around [24 sts].
- Rnds 5-10: Sc in each st around [24 sts].
- Rnd 11: (2 sc, dec) repeat around [18 sts].
- Rnd 12: Sc in each st around [18 sts]. Fasten off and leave a tail for sewing.
Legs (Make 4)
Working in small cylindrical rounds for stability.
- Rnd 1: Magic ring with 6 sc [6 sts].
- Rnd 2: (1 sc, inc) around [9 sts].
- Rnds 3-5: Sc in each st around [9 sts]. Fasten off, leaving a tail for attaching to the body.
Assembly & Finishing Touches
Stuff the head and body firmly with polyester fiberfill, making sure to maintain a balanced, structured shape without over-stretching the stitches. Securely sew the head to the top of the body using your tapestry needle and the remaining yarn tails.
Attach all four legs symmetrically to the lower body so your little pup can stand or sit properly on its own. Finally, embroider the signature bushy eyebrows, signature beard, and nose using contrasting yarn or embroidery floss to bring out that undeniable Schnauzer expression.
Pro Tips for Flawless Results
- Maintain a firm and consistent tension throughout your work to ensure the fiberfill stuffing stays hidden inside the stitches.
- Use stitch markers at the start of every round to keep track of your stitch counts without second-guessing.
- Experiment with custom color palettes to match a real-life family pet or add fun accessories like a miniature collar.
Frequently Asked Questions
What skill level is required for this pattern?
This project is wonderfully suited for adventurous beginners who understand basic amigurumi fundamentals, while offering enough detail to keep intermediate makers engaged.
How long does it take to complete the project?
On average, you can expect to finish your amigurumi in just a few hours spread across a weekend, depending on your personal crafting speed.
Can I sell items made from this pattern?
Yes, you are welcome to sell finished items in small quantities, provided you give design credit back to the original creator and use your own original photographs.
Watch the Full Step-by-Step Video Tutorial
Prefer visual guidance? Follow along with the complete video tutorial below at your own pace: