
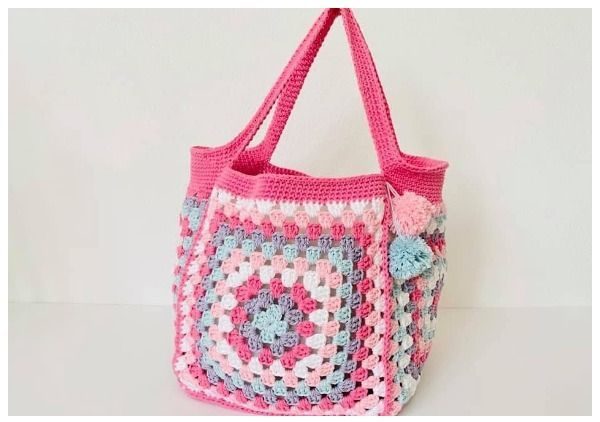
Overview & Inspiration
Hello, fellow yarn lovers! Summer is just around the corner, and nothing captures that sunny, carefree feeling quite like a handmade bag crafted with your own two hands.
This beginner-friendly project brings together the nostalgic charm of classic motifs with the modern practicality of a sturdy seaside tote. Whether you are packing for a beach day, a weekend picnic, or a trip to the local farmers market, this versatile piece is ready to hold all your daily essentials.
Materials & Supplies Needed
- Medium-weight cotton yarn (recommended for strength, structure, and washability) in 15–20 colors or your preferred palette
- Crochet hook size 4.0 mm to 4.5 mm (adjust based on your personal tension)
- Tapestry needle for weaving in loose ends
- Stitch markers for keeping your panels organized during assembly
- Scissors
- Measuring tape
- Cotton or canvas lining fabric and matching thread (optional, for extra durability)
- Magnetic snap or button closure (optional)
- Natural jute rope or matching yarn for handles
Stitches & Abbreviations
- Ch: Chain
- Sl st: Slip stitch
- Sc: Single crochet
- Dc: Double crochet
- Sp: Space
- St(s): Stitch(es)
Step-by-Step Pattern Instructions
To begin your beach bag, you will need to crochet multiple individual motifs (typically 18 squares for a 12-inch-wide and 10-inch-tall bag, arranged in three rows of six).
Granny Square Motif
Make a slipknot and ch 4. Join with a sl st to form a small ring.
Round 1: Ch 3 (counts as first dc here and throughout), work 2 dc into the ring. Ch 2 for a corner, [work 3 dc into the ring, ch 2] 3 times. Join with a sl st to the top of the beginning ch-3. [12 dc, 4 ch-2 sps]
Round 2: Sl st into the next 2 sts and into the next ch-2 corner sp. Ch 3, work (2 dc, ch 2, 3 dc) in the same corner sp. *Work (3 dc, ch 2, 3 dc) in the next ch-2 corner sp; repeat from * around. Join with a sl st to the top of the beginning ch-3. [24 dc, 4 ch-2 sps]
Round 3 and beyond: Continue working in this manner, expanding outward by working 3 dc, ch 2, 3 dc in each corner space and 3 dc in each side space between corners, until your square measures about 4 to 5 inches wide.
Bag Assembly
Block all finished squares to even out their shapes. Lay them flat in your desired layout, then join them row by row using sl st or sc to form the front, back, and side panels of the bag.
Borders and Edging
Crochet a neat border around the entire opening of the bag using sc or a decorative shell stitch to finish the edge cleanly.
Handles and Straps
Create custom straps by chaining enough stitches to reach your desired length, then work several rows of sc to form sturdy straps. Attach them securely to the bag, reinforcing the connection points with extra stitches.
Assembly & Finishing Touches
Weave in all remaining yarn tails securely using your tapestry needle to prevent any unraveling over time. Line the inside of the bag with your chosen cotton or canvas fabric, hand-sewing or machine-stitching the lining so the corners fit snugly and items cannot poke through the stitches.
Press your finished bag gently with a warm iron (using a pressing cloth on top) to smooth the seams and help set your cotton stitches.
Pro Tips for Flawless Results
- If your natural crochet tension tends to be tight, go up a full hook size to keep your individual squares flexible and easy to join.
- Alternate solid-colored squares with multi-colored ones to create a visually balanced, vibrant patchwork effect.
- Always reinforce your handle attachment points with extra stitches if you plan on carrying heavier beach towels and books.
- Opt for breathable, quick-drying lining fabrics like cotton or linen to keep your bag functional near the water.
Frequently Asked Questions
Can I adjust the size of the finished bag?
Yes, absolutely! You can easily make the bag larger or smaller by adding or removing squares from your layout to change the final dimensions.
What is the best way to wash my finished crochet bag?
Hand wash your bag gently in cool water with a mild detergent. Lay it flat to dry, and avoid wringing or twisting it to maintain its structured shape.
Do I really need to add a fabric lining?
While a lining is optional, it adds incredible durability, prevents small items from slipping through the stitch gaps, and helps your bag hold its shape over years of use.
Watch the Full Step-by-Step Video Tutorial
Prefer visual guidance? Follow along with the complete video tutorial below at your own pace: