
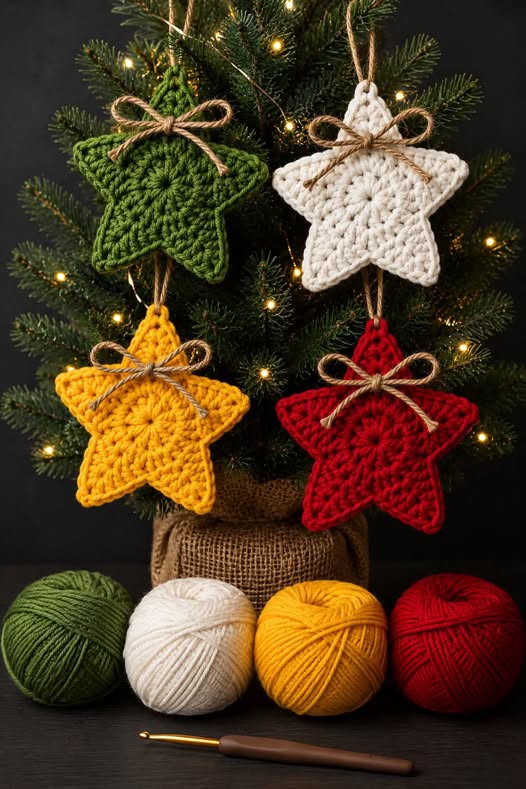
Overview & Design Inspiration
There is a magical feeling that washes over your home when you hang handmade ornaments on the Christmas tree. This charming crochet star project captures that nostalgic holiday warmth, combining classic crochet techniques with the cozy, tactile beauty of holiday decor.
Whether you dream of a tree dressed in traditional crimson and forest green, or prefer a modern neutral palette of cream and gold, this star ornament adds an instant touch of artisanal charm. Best of all, it’s a wonderfully satisfying make that you can whip up in just one cozy afternoon by the fire.
Materials & Recommended Supplies
Gathering your supplies is half the fun of any new holiday make! Here is everything you need to bring your festive star to life:
- Yarn: Approximately 15–25 yards of medium-weight yarn per star. Cotton or cotton-blend yarns offer crisp stitch definition, while acrylic yarn provides a softer, plush finish.
- Crochet Hook: An appropriate hook size for your chosen yarn (typically a US G/6 or H/8, measuring 4.0 mm to 5.0 mm).
- Notions: Yarn needle for weaving in ends, sharp scissors, and optional stitch markers to help map out your points.
- Embellishments: Jute twine, rustic ribbon, or metallic cord for hanging loops and bows.
Essential Techniques & Stitch Highlights
This delightful pattern relies on a symphony of basic U.S. crochet stitches to build its stunning shape. You will start with a secure magic ring (or a simple chain-four loop) as your foundation, establishing ten balanced positions to set the stage for a symmetrical five-point star.
As you work your way outward, the design cleverly plays with varying stitch heights—transitioning smoothly from short single crochets up to tall double crochets. This organic rise and fall creates the graceful slopes of the star’s points and valleys, proving that you don’t need complicated stitches to achieve breathtaking texture.
Construction & Assembly Highlights
The construction journey begins at the very heart of the star, expanding outward into a neat, flat circular foundation before the magic of shaping takes over. By visually dividing your round into five equal sections, you lay the groundwork for those iconic, defined points.
As you build upward, you will work progressive height increases toward the tips—often featuring a small chain space to create a crisp corner—and then gently decrease your way back down into the valleys. A final, polished border round reinforces the entire silhouette, tightening up the edges and giving your star that wonderfully professional, finished look.
Customization & Styling Ideas
One of the greatest joys of this pattern is how effortlessly you can make it your own. Try diving into your stash basket to create a vibrant scrap-yarn garland, or stick to a cohesive monochromatic color scheme for a sleek, Scandinavian-inspired tree.
Beyond the Christmas tree, these charming stars make incredible gift toppers, wreath accents, or festive package tie-ons. Swap out the rustic jute twine for a shimmering velvet ribbon or metallic gold cord to instantly elevate the look for an extra touch of holiday glamour.
Pro Tips for Flawless Results
- Maintain Relaxed Tension: Avoid pulling your stitches too tight, especially around the center and tips, to ensure your star lies completely flat and is easy to work into.
- Pause and Check: Lay your star on a flat surface after completing each section to spot any curling or waviness early, making adjustments on the fly a breeze.
- Tame the Valleys: Utilize clever single-crochet decreases (sc2tog) in the deepest parts between points to draw the fabric inward for extra-sharp definition.
Frequently Asked Questions
Is this project beginner-friendly?
Absolutely! Because it relies on foundational stitches like single, half double, and double crochet, confident beginners can easily tackle this project while practicing shaping and working in rounds.
Can I use leftover yarn from past projects?
Yes, this is the ultimate holiday stash-busting project! Needing only 15 to 25 yards per star, it is a fantastic way to transform small yarn leftovers into gorgeous holiday treasures.
How do I make the star points look extra sharp?
When working the corner space at the tip of each point, you can adjust your chain spaces or finish with a crisp border round. Blocking your finished star with a light steam or pinning it flat will also lock in those clean, striking angles.
Watch the Full Step-by-Step Video Tutorial
Prefer visual guidance? Follow along with the complete video tutorial below at your own pace: