
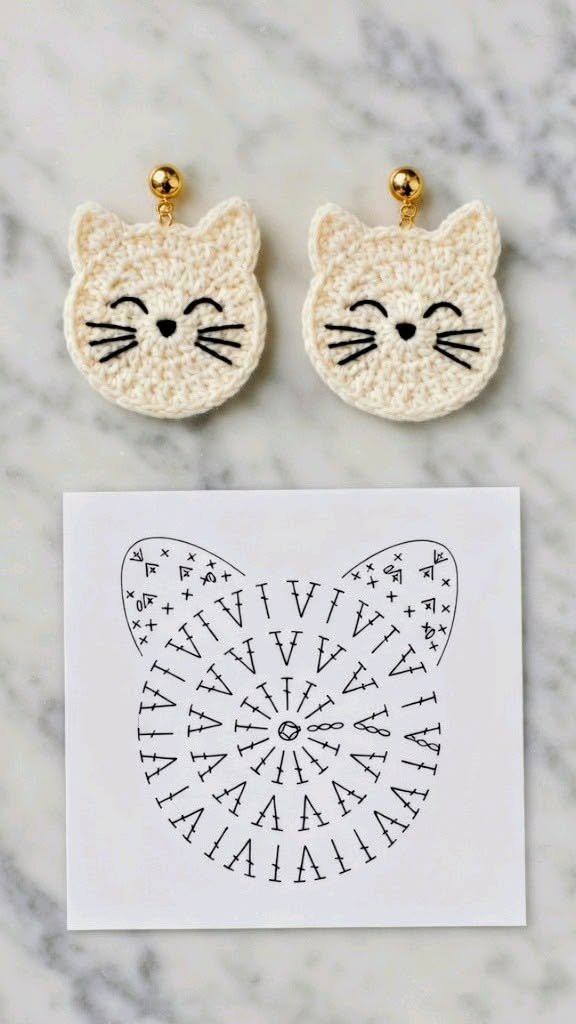
Overview & Design Inspiration
Welcome, fellow yarn lovers! There is something utterly magical about turning a tiny scrap of yarn into a wearable work of art, and our latest obsession is guaranteed to steal your heart. The Crochet Kitten Earrings Pattern is a delightful, beginner-friendly project that combines creativity, wearable style, and the undeniable charm of sweet little whiskered faces.
Crocheting miniature accessories has become a massive trend in the craft community, and for good reason! These adorable little projects work up in a flash, making them the ultimate stash-busting project while offering a wonderful way to practice your stitch consistency and precision. Whether you are crafting a pair for yourself or prepping inventory for your next craft fair, these lightweight cuties deliver maximum style with minimal yarn.
Materials & Recommended Supplies
Before diving into your hookwork, gathering the right toolkit ensures your project flows smoothly from start to finish. Because these are wearable accessories, choosing the right fiber makes all the difference in keeping your kittens crisp and sturdy.
- Yarn: Lightweight cotton yarn (Category 2 or 3). Mercerized cotton is a top pick for its gorgeous stitch definition and durability.
- Crochet Hook: 2.25 mm to 2.75 mm hook. Using a smaller hook than usual creates the dense, floppy-free fabric you need.
- Notions: Tapestry needle, sharp scissors, stitch marker, and black embroidery floss for facial details.
- Hardware: Small jump rings, and your choice of earring posts, ball studs, French hooks, or lever-back findings.
Essential Techniques & Stitch Highlights
This charming little pattern relies on foundational US crochet terminology, making it wonderfully approachable for adventurous beginners. You will practice working in the round starting with a classic Magic Ring, building a flat, even circular base that forms the foundation of the kitten’s head.
Precision is key when working on such a small scale! By combining standard stitches like single crochets, half double crochets, and double crochets, you build up height rapidly in specific spots. This clever technique allows the ears to form naturally out of the final round without the fuss of sewing separate pieces.
Construction & Assembly Highlights
The construction journey begins at the center of the face, spiraling outward in continuous rounds until the soft, rounded silhouette of a kitty head emerges. The real magic happens in the final round, where a clever sequence of varying stitch heights pops the pointed ears right into place.
Once your crochet base is finished and all ends are neatly woven in, it is time for the fun part: giving your kitten personality! Using black embroidery floss and simple satin stitches, you will embroider an upside-down triangular nose, sweet sleepy eyes, and delicate whiskers. A touch of diluted fabric stiffener to the back ensures your earrings hold their shape proudly before you securely attach your jump rings and hardware.
Customization & Styling Ideas
One of the best things about this project is how endlessly customizable it is! You can easily play with different yarn colors—think classic black, sleek grey, fiery orange tabby, or calico-inspired combinations—to match your personal style or a beloved pet.
Feel free to dress up your kittens for different occasions by embroidering tiny bows, stitching miniature flowers beside an ear, or adding pearl beads for an extra touch of elegance. They make phenomenal, lightning-fast gifts for birthdays, holidays, and craft exchanges, and they are guaranteed best-sellers at artisan markets.
Pro Tips for Flawless Results
- Maintain Firm Tension: Keeping your stitches tight and even prevents the un-stuffed design from becoming flimsy or stretching out over time.
- Anchor Your Hardware: When attaching jump rings, thread them through several stitches near the center between the ears rather than just one for extra security.
- Symmetry is Key: Take your time with the embroidery; mirroring the eye placement and whisker lengths makes your finished earrings look professionally made.
- Light Blocking: A gentle steam-block can help square up your pieces and ensure both earrings match in shape and symmetry.
Frequently Asked Questions
Is this a beginner-friendly project?
Yes, absolutely! Anyone familiar with basic US crochet stitches like single crochet, half double crochet, and the Magic Ring can dive right in and create a stunning pair.
Can I use safety eyes instead of embroidery?
For earrings, embroidered facial features are strongly recommended because they are significantly lighter, safer, and lie much flatter against the wearer’s ear.
How long does it take to make a pair?
Most makers can comfortably crochet, embroider, and assemble a complete pair of kitten earrings in just one to two hours, depending on detail work.
Crochet Kitten Earrings Pattern – Printable PDF Pattern
Download the clean, printer-friendly PDF to follow along with this pattern offline anywhere.