
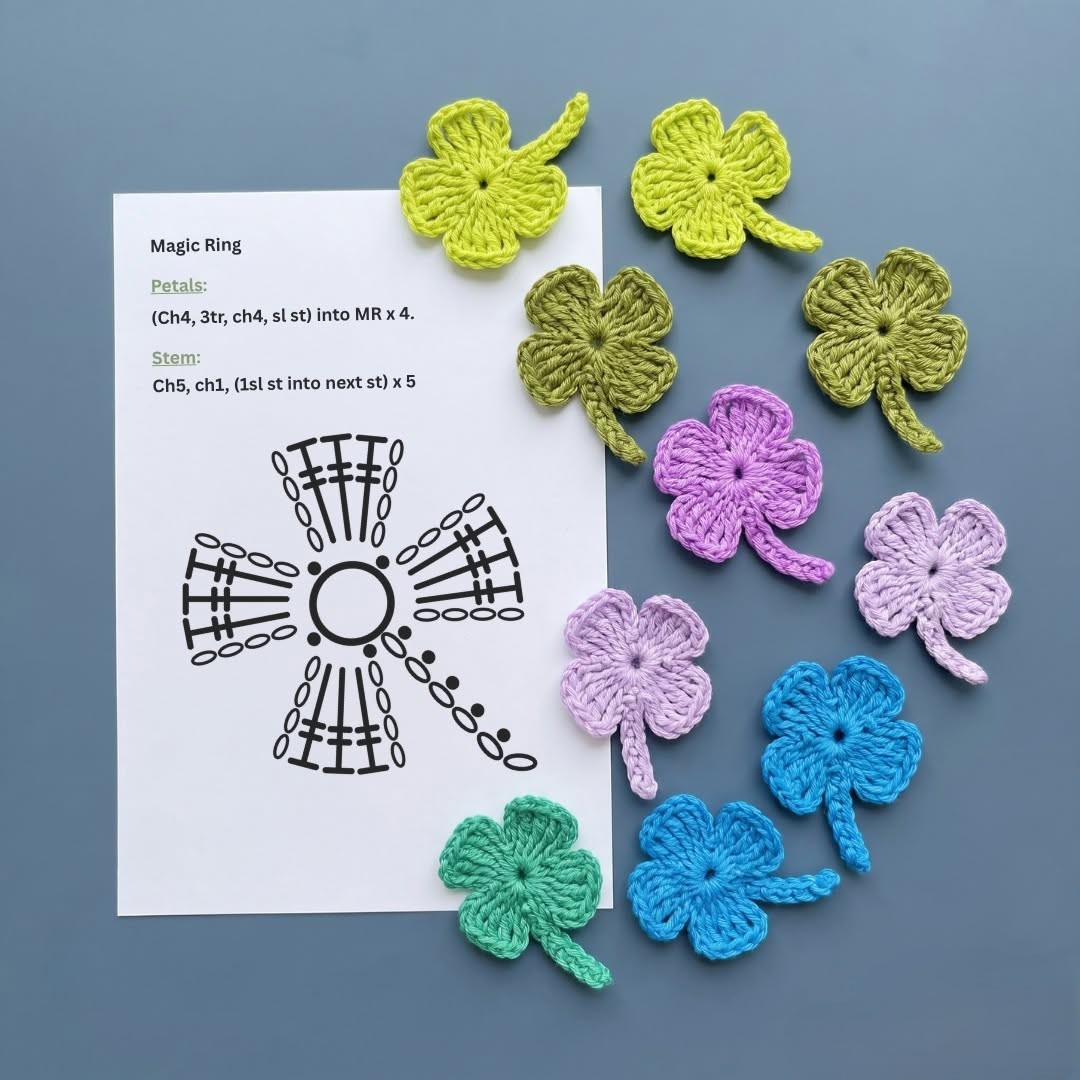
Overview & Design Inspiration
Welcome, fellow yarn lovers, to your next favorite quick-make obsession! The Crochet Lucky Charm Pattern is a delightful blend of creativity, tradition, and accessible crochet techniques that results in a charming, handcrafted treasure.
Whether you want to decorate bags, fashion lucky keychains, embellish greeting cards, or craft festive seasonal garlands, this four-leaf clover design delivers endless joy. It is wonderfully quick to whip up, making it an absolute dream for stash-busting your leftover yarn scraps while creating something truly meaningful.
Materials & Recommended Supplies
- Yarn: Lightweight cotton yarn (DK or light worsted) for crisp stitch definition and a lightweight, durable finish.
- Crochet Hook: 3.5 mm or 4 mm hook (E/4 or G/6) depending on your personal tension and desired fabric firmness.
- Embroidery Scissors: Sharp snips for clean yarn trimming.
- Tapestry Needle: Essential for weaving in ends securely and invisibly.
- Stitch Markers: Helpful little helpers if you are just getting comfortable working into a Magic Ring.
Essential Techniques & Stitch Highlights
This charming little motif relies on standard US crochet terminology to keep things smooth and approachable. You will work with common building blocks like the Magic Ring (MR), chains (ch), slip stitches (sl st), and treble crochets (tr).
Starting with a Magic Ring is a game-changer for this design. It allows the center hole to close completely tight after your petals are finished, creating a polished, professional look that a simple chain circle just cannot match.
Construction & Assembly Highlights
Even though this motif looks intricate, it is actually built through a clever and repetitive petal sequence. Once you master the first petal, the remaining three practically crochet themselves right around your adjustable center ring.
The entire motif blooms outward from the center, finishing with a delicate, flexible stem worked straight from the base. A quick weave of the yarn tails on the reverse side locks everything securely in place, leaving you with a gorgeous, symmetrical clover ready for action.
Customization & Styling Ideas
One of the best things about this project is its incredible versatility. Switch up your yarn weights and colors to create anything from miniature jewelry accents using fine crochet cotton to oversized wall hangings made with bulky yarn.
Traditional emerald green is a classic choice for luck, but soft mint, sage, blush pink, or even joyful rainbow palettes make stunning modern variations. Try sewing a tiny pearl or wooden button in the center for an extra touch of handmade artisan charm.
Pro Tips for Flawless Results
- Master Your Tension: Keep your stitches consistent so all four petals match in size and shape.
- Embrace Blocking: Lightly dampen your finished clovers and pin them flat to a blocking board to ensure crisp, symmetrical petals.
- Secure Your Ends: Weave your yarn tails through multiple stitches on the back to prevent any unraveling over time.
- Experiment with Scale: Altering your hook size is an easy way to adjust the finished clover’s size without changing the pattern.
Frequently Asked Questions
Is this project beginner-friendly?
Absolutely! The pattern uses basic stitches and is built by repeating a simple petal sequence four times around a Magic Ring, making it a fantastic confidence-builder for newer crocheters.
What can I do with finished crochet clovers?
The possibilities are endless! You can turn them into bag charms, keychains, garment patches, greeting card embellishments, or string them together into a lovely decorative garland.
Do I really need to block my finished clovers?
While blocking is optional, it is highly recommended if you want your petals to look extra crisp, symmetrical, and polished for gifts or home decor.
Watch the Full Step-by-Step Video Tutorial
Prefer visual guidance? Follow along with the complete video tutorial below at your own pace: