
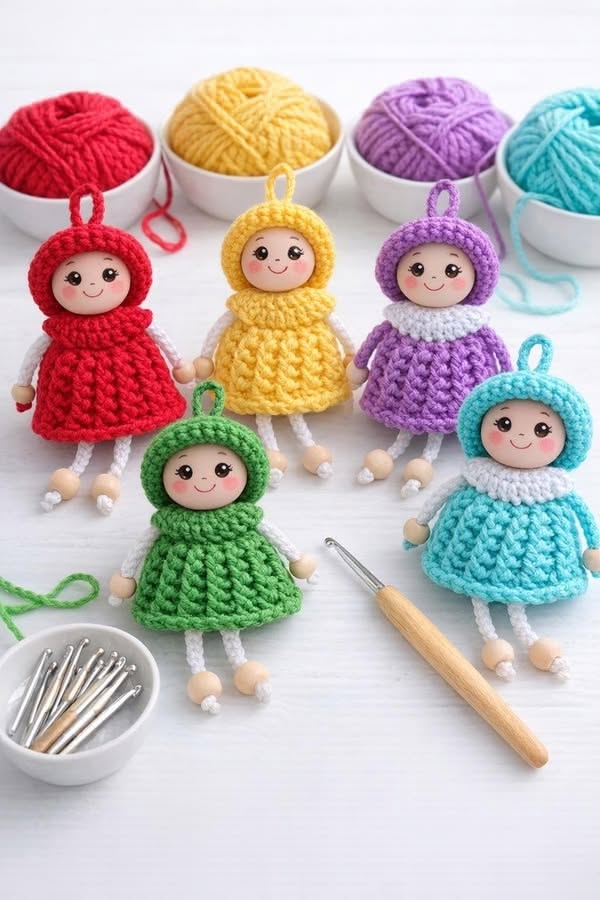
Overview & Design Inspiration
Welcome to your next crochet obsession! The Crochet Girl keychain Pattern brings together the charm of amigurumi with everyday practicality, creating an adorable, pocket-sized companion that goes wherever you do.
Whether you need a thoughtful handmade gift, a quick stash-busting project, or a fast-selling craft fair favorite, this little doll checks every single box. It’s compact, endlessly customizable, and an absolute joy to stitch from start to finish.
Materials & Recommended Supplies
Gathering your supplies is half the fun! To achieve that crisp, professional amigurumi finish, choose the right tools for your crafting station:
- Yarn: Smooth cotton or cotton-blend yarn in skin tones, dress colors, and hood shades. Cotton holds its shape brilliantly and prevents pilling.
- Crochet Hook: A 2.0 mm to 2.5 mm hook ensures your stitches stay tight and secure, keeping the stuffing hidden away.
- Notions: Polyester fiberfill, black embroidery thread for sweet facial details, tapestry needle, stitch markers, and scissors.
- Hardware: Wooden beads for hands and feet (optional), plus a sturdy keychain ring and jump ring.
Essential Techniques & Stitch Highlights
Working on miniature crochet projects is a fantastic way to refine your amigurumi skills without committing to a massive heirloom piece. This pattern utilizes standard US crochet terminology, making it wonderfully approachable.
You’ll practice foundational techniques like the Magic Ring for a seamless center, invisible decreases for smooth shaping, and working in the front or back loops only to create crisp dress lines. Mastering these simple methods gives you the confidence to tackle more complex doll patterns in the future!
Construction & Assembly Highlights
Bringing your tiny doll to life happens in delightful, manageable stages. You begin by crocheting a perfectly round head, carefully inserting safety eyes, and embroidering a cheerful smile before stuffing it firmly.
Next comes the body and flared dress, featuring lovely textural elements likeBLO rounds to form a gentle bell shape. Once you’ve crafted the cozy hood, tiny sleeves, and optional wooden bead accents, everything is securely sewn together and attached to a durable metal keychain ring.
Customization & Styling Ideas
The true magic of this keychain lies in how easy it is to personalize! Swap out dress colors to match seasonal holidays, or experiment with tiny embroidered bows, flowers, and scarves.
Want to change her look entirely? Adjust your yarn weight to create a chunkier backpack charm or a delicate, miniature purse accessory. From pastel spring palettes to cozy winter hoods, the creative possibilities are truly endless.
Pro Tips for Flawless Results
- Maintain Firm Tension: Keep your stitches tight and consistent so the polyester fiberfill never peeks through the gaps.
- Embrace Stitch Markers: Always drop a marker in the first stitch of every round to keep your shaping symmetrical and stress-free.
- Secure Every Seam: Because keychains handle daily wear and tear, double-knot your yarn and weave in tails securely with multiple passes.
- Shape the Stuffing: Gently massage the finished head and body with your fingers before final closure to ensure a smooth, professional silhouette.
Frequently Asked Questions
Is the Crochet Girl keychain Pattern suitable for beginners?
Yes, absolutely! Beginners who feel comfortable with basic single crochets, increases, decreases, and working in the round will find this project approachable and fun.
What is the best yarn to use for amigurumi keychains?
Cotton or cotton-blend yarns are highly recommended because they create clean stitch definition, maintain structural integrity, and stand up well to daily handling.
Can I wash my finished crochet keychain?
Yes, you can! Gently hand wash your keychain using a mild soap, reshape it with your fingers, and allow it to air dry completely.
Watch the Full Step-by-Step Video Tutorial
Prefer visual guidance? Follow along with the complete video tutorial below at your own pace: