
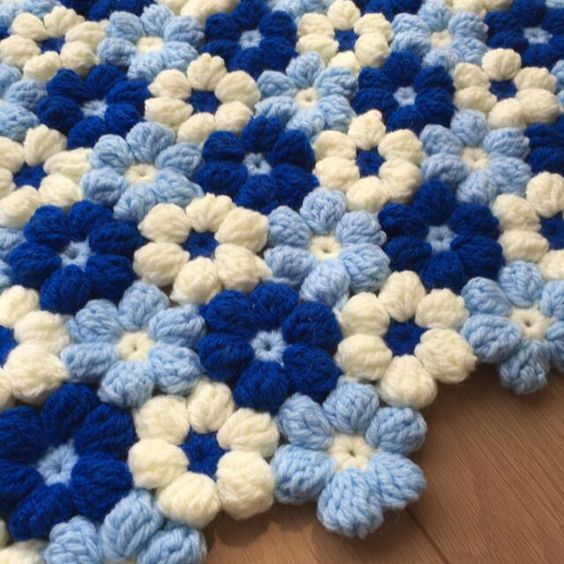
Introduction & Project Overview
Hey there, crafty friends! Are you ready to add a delightful pop of texture and dimension to your next crochet creation?
Today, we’re diving into the wonderful world of Crochet Puff Flowers – those charming, three-dimensional blossoms that instantly elevate any project from lovely to absolutely stunning!
These little beauties are renowned for their soft, voluminous look, created with a special puff stitch that makes them truly irresistible.
Imagine them adorning blankets, scarves, hats, or even brightening up your home décor. They’re such a versatile design element, and mastering them opens up a world of creative possibilities.
Whether you’re new to crochet or a seasoned hooker, this easy-to-follow guide will walk you through creating your very own puff flowers. Let’s get blooming!
Materials & Yarn Suggestions
Before we pick up our hooks, let’s gather everything we need. Having your tools ready makes the crafting process so much smoother and more enjoyable!
- Yarn: A light to medium-weight yarn (like DK, Worsted, or Aran) works wonderfully for puff flowers.
- Fiber Choice: Cotton yarn offers a more structured, crisp finish, perfect for appliqués or coasters. Acrylic yarn provides a softer, cozier texture, ideal for blankets and wearables. Feel free to grab multiple colors for a vibrant bouquet!
- Crochet Hook: A 4.0mm to 5.0mm hook is usually ideal, but always check your yarn label for recommended sizes. You might adjust slightly to achieve your desired flower size and drape.
- Notions: Don’t forget your trusty scissors and a yarn needle for weaving in those ends neatly.
Technique Breakdown & Step-by-Step Guide
Ready to make some magic? We’ll break down each step of creating your gorgeous puff flower. Just follow along, and you’ll have a beautiful blossom in no time!
Creating Your Flower Foundation
First, we’ll establish the center of our flower, making sure it’s nice and snug without a hole.
Begin by making a magic ring. This clever technique allows you to pull the center tight later on. Chain one to secure your ring, creating a firm base to work into.
Next, you’ll work eight puff stitches into this magic ring. To make a puff stitch, yarn over, insert your hook into the ring, yarn over again, and pull through (you’ll have three loops on your hook).
Repeat this action twice more into the *same* spot, so you have seven loops on your hook. Yarn over one last time and pull through all seven loops on your hook, then chain one to close off that cozy puff stitch.
Once you have eight beautiful puff stitches, gently pull the tail of your magic ring to close the center tightly. Finish this round by slip stitching into the very top of your first puff stitch.
You’ve just created the lovely, textured base for your flower!
Adding Petals to Your Crochet Puff Flower
Now for the fun part – watching your flower truly bloom as we add the signature puffy petals!
After closing your foundation round, chain three. This chain will create a little bridge for your first petal cluster.
Locate the space *between* your first and second puff stitches from the previous round. Into this inviting space, you’ll create a cluster of three puff stitches.
Remember to chain one between each of these three puff stitches to give them definition and separation. This forms your first lovely petal!
Continue this delightful process all the way around your flower. In each space between the foundational puff stitches, you’ll create another cluster of three puff stitches, chaining one between each puff.
Finishing Your Blossom
Once you’ve worked all your charming petals around the flower, it’s time to bring it all together.
Simply slip stitch into the base of your very first petal to seamlessly complete your flower. Fasten off your yarn, leaving a tail long enough to weave in.
Grab your yarn needle and carefully weave in all your loose ends. A neat finish always makes your handmade items shine!
Finishing, Assembly & Styling Ideas
Congratulations, you’ve crocheted a gorgeous puff flower! Now, let’s explore all the amazing ways you can use it.
These versatile flowers are perfect as appliqués. Use your yarn needle to whip stitch them onto blankets, scarves, hats, headbands, or even plain tote bags for an instant upgrade.
Imagine a colorful cluster of puff flowers transforming a simple throw blanket into a whimsical work of art. Or, attach just one or two to a plain beanie for a touch of handmade charm.
They also make fantastic standalone decorations! Think coasters, ornaments, garland accents, or even adorable gift toppers. The possibilities are truly endless!
Pro Crafter Tips
Want to make your puff flowers truly shine? Here are a few tips from the crafting pros:
- Consistency is Key: When making your puff stitches, try to pull the loops to a uniform height. This ensures each puff is equally plump and gives your flower a beautifully polished, even appearance.
- Mind Your Tension: Crochet tension can make a big difference! If your stitches are too tight, your flower might feel stiff and lose some of its soft volume. Too loose, and your petals could look floppy. Experiment to find that perfect, happy medium where your stitches are firm but flexible.
- Experiment with Yarn & Hook Sizes: Don’t be afraid to play around! A bulkier yarn with a larger hook will create a big, fluffy, statement flower. A finer yarn and smaller hook will give you a delicate, intricate blossom. Each combination offers a unique aesthetic!
Frequently Asked Questions
Q: Can I use different yarn weights for puff flowers?
Absolutely! The beauty of puff flowers is their adaptability. Using a chunkier yarn (like super bulky) with a larger hook will result in a much bigger, more dramatic flower, while a lighter yarn (like fingering weight) with a smaller hook will create a delicate, petite bloom. Always match your hook size to your chosen yarn for the best results!
Q: How do I attach my finished puff flowers to a project?
The simplest way is to use a yarn needle and the tail you left when fastening off. Position your flower on your project and use a simple whip stitch or small running stitches, working around the base of the flower, to securely attach it. You can even use a contrasting yarn for a fun accent!
Crochet puff flowers are such a joyful and versatile addition to any crafter’s repertoire. Their textured appearance adds incredible depth and style, making them perfect for everything from cozy blankets to chic accessories.
With this step-by-step guide and a little practice, you now have all the tools you need to create your own beautiful, unique Crochet Puff Flowers. Get creative with different colors and styling!
Happy crocheting, my friends! Can’t wait to see what you make!
Watch the Full Step-by-Step Video Tutorial
Prefer visual guidance? Follow along with the complete video tutorial below at your own pace: