
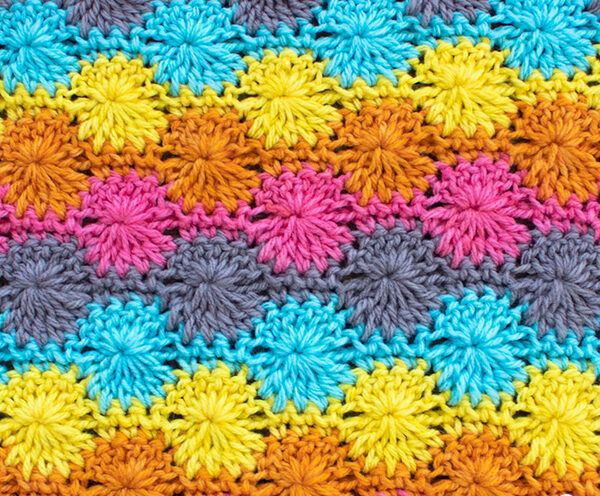
Hey there, fabulous crafters! Are you ready to dive into a stitch that’s as enchanting as it is stunning? Today, we’re unraveling the beauty of the Catherine’s Wheel stitch, a true showstopper that will elevate your crochet projects from lovely to absolutely legendary.
This exquisite stitch creates a captivating textured pattern, reminiscent of charming, swirling wheels. It’s perfect for adding a touch of vintage elegance and incredible depth to anything you make.
Introduction & Project Overview
The Catherine’s Wheel stitch is a beloved classic in the crochet world, cherished for its distinctive circular, wheel-like design. It’s crafted by cleverly combining clusters of double crochets with chain stitches, which truly bring those beautiful, raised wheels to life.
While it might look intricate at first glance, I promise you, once you understand the rhythm, it becomes incredibly satisfying to create. This stitch is fantastic for intermediate crocheters looking to expand their repertoire, but with a little patience, even adventurous beginners can master it!
Its visual impact and durable fabric make it an excellent choice for a wide array of projects, from cozy blankets to stylish bags.
Materials & Yarn Suggestions
Before we start creating some magic, let’s gather our essential tools. Choosing the right materials makes all the difference in achieving that perfect Catherine’s Wheel texture!
- Yarn: For beginners, a worsted weight (medium) yarn is ideal as it provides clear stitch definition. Craving extra coziness or bold texture? Try a chunky yarn to make those wheels really pop!
- Crochet Hook: A 5.5mm or 6mm hook pairs beautifully with worsted weight yarn. Always double-check your hook size against your yarn label to ensure your stitches are just right—not too tight, not too loose.
- Other Tools: Grab a sharp pair of scissors and a tapestry needle for weaving in those ends. Stitch markers can also be your best friend when you’re keeping track of repeats in a busy row!
Technique Breakdown & Step-by-Step Guide
Ready to form those gorgeous wheels? The Catherine’s Wheel stitch builds its magic over a few alternating rows, creating a delightful ripple of texture.
You’ll begin with a foundation chain, ensuring it’s a multiple of 10 stitches, plus an additional 6 for turning and edges. After a foundational row of single crochets, the wheels start to take shape.
The core of the stitch involves alternating rows. One row will feature clusters of double crochets (often 7 DCs worked into a single stitch), forming the lovely fan-like shells that are the start of your wheels, broken up by single crochets. The following row strategically works into these shells and intervening stitches, effectively closing off the previous wheel while simultaneously setting up the base for the next set of wheels to emerge.
It’s this clever dance between shell-forming rows and shell-closing rows that gives the Catherine’s Wheel its distinctive, enchanting appearance. You’ll find a steady rhythm as you alternate these row types, watching your beautiful fabric grow!
Finishing, Assembly & Styling Ideas
Once you’ve mastered the technique, the creative possibilities with the Catherine’s Wheel stitch are truly endless! This pattern is a dream for projects that crave texture and visual interest.
Imagine a luxurious blanket or throw, its plush texture inviting cozy cuddles. Or perhaps a stunning scarf or cowl, where the repetitive nature of the stitch makes for a meditative project and beautiful color transitions.
Its inherent density also makes it perfect for sturdy items like bags and totes, ensuring they hold their shape while showcasing your incredible artistry. Don’t be afraid to experiment with different yarn weights and colors to bring your unique vision to life!
Pro Crafter Tips
To ensure your Catherine’s Wheel projects turn out perfectly professional, keep these expert tips in mind:
- Consistent Tension: This is key! Uneven tension can make your wheels look wonky. Pay attention to how you’re holding your yarn and hook.
- Count Your Stitches: Accuracy is vital for the wheel pattern to align. Don’t be shy about using stitch markers to keep track of your progress, especially around those beautiful shells.
- Experiment with Hooks: For a lacier, more open fabric with larger, more defined wheels, try going up a hook size. For a denser, warmer fabric, stick to the recommended size or go down a size.
- Color Play: Changing colors between rows or every few rows can dramatically enhance the wheel effect, making each circle truly stand out!
Frequently Asked Questions
Q: Is the Catherine’s Wheel stitch suitable for beginners?
A: While often recommended for intermediate crocheters due to its stitch counting and pattern repeat, an adventurous beginner with a grasp of basic stitches (SC, DC, chains) can certainly tackle it with patience and practice!
Q: Can I use different yarn weights than worsted?
A: Absolutely! The Catherine’s Wheel looks stunning in various weights. Just remember to adjust your hook size accordingly and be aware that the final look and drape will change. A chunky yarn will create bold, large wheels, while a finer yarn will produce a more delicate texture.
There you have it, lovely crafters! The Catherine’s Wheel stitch is truly a joy to create and a magnificent addition to your crochet toolkit. Grab your hook, choose your favorite yarn, and get ready to create something absolutely breathtaking. Happy crocheting!
Watch the Full Step-by-Step Video Tutorial
Prefer visual guidance? Follow along with the complete video tutorial below at your own pace: