
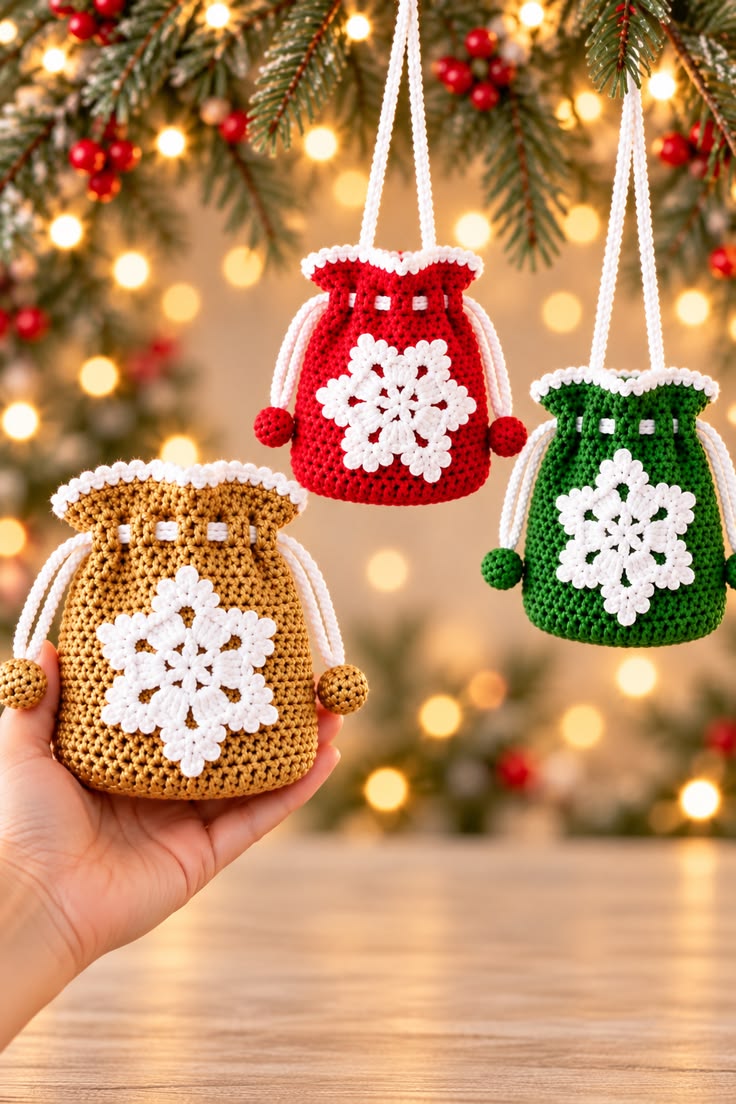
The beautiful design features three traditional Christmas colors: bright red, deep green, and golden mustard, each complemented by a white crocheted snowflake. The rounded pouch shape creates a cozy appearance, while the white scalloped edging adds an elegant finishing detail. Small crocheted balls at the ends of the drawstrings make the design even more attractive. These details transform a simple crochet pouch into a festive accessory that looks wonderful hanging from a Christmas tree.
Another reason to love this Christmas crochet pattern is its versatility. You can customize the bags in different sizes, experiment with color combinations, and use leftover yarn from previous projects. They are wonderful for holding wrapped candies, small jewelry boxes, holiday notes, and other lightweight surprises. This tutorial explains how to recreate a similar design using simple crochet techniques, clear measurements, and step-by-step instructions suitable for crocheters who already know the basic stitches.
Materials and Supplies for Crochet Christmas Snowflake Bags
Before beginning your crochet Christmas gift bag, prepare the materials and choose the colors that best match your holiday decorations. Cotton yarn is an excellent option because it creates defined stitches, maintains its shape, and provides a beautiful finish. Acrylic yarn can also work well, especially if you prefer a softer and lighter bag.
For a traditional Christmas appearance, use red, green, and mustard-colored yarn for the main bodies. White yarn will be used for the snowflakes, scalloped borders, and drawstrings. A smooth, medium-weight yarn makes the project easier to work with and helps the decorative elements stand out against the colorful background.
Materials needed:
-
Worsted-weight cotton or acrylic yarn in red, green, mustard yellow, and white
-
4.0 mm crochet hook, or a hook suitable for your yarn
-
Yarn needle for sewing and weaving in ends
-
Stitch markers
-
Small scissors
-
Measuring tape
-
Optional cotton fabric for lining
-
Optional ribbon or decorative holiday tags
The suggested finished size for each bag is approximately 14 cm tall and 12 cm wide when laid flat, excluding the hanging cords. These measurements are adjustable, and your exact results will depend on yarn thickness, crochet tension, and the number of rounds completed.
For this tutorial, an approximate working gauge is 16 single crochet stitches and 18 rounds per 10 cm, measured in continuous rounds. The project is forgiving, but checking your gauge helps you make matching bags. A slightly tighter fabric is preferable because it prevents small objects from slipping between the stitches.
All crochet instructions use US crochet terminology. The main stitches include chain (ch), slip stitch (sl st), single crochet (sc), half double crochet (hdc), double crochet (dc), and treble crochet (tr). You will also use increases, decreases, and a simple decorative picot technique for the snowflake.
The most important design feature is the combination of a sturdy cylindrical bag and a separate snowflake applique. This approach keeps the construction simple while allowing the snowflake to remain visually prominent. By making the snowflake separately, you can position it precisely and attach it securely after completing the bag.
Step-by-Step Instructions for the Christmas Drawstring Bag
Begin by crocheting the circular bottom of the pouch. The foundation should be flat and firm enough to support the sides without becoming excessively stiff. A magic ring is recommended because it allows the center opening to close neatly and creates a professional-looking base.
Step 1: Crochet the circular base
Work the following rounds in your chosen main color. Use a stitch marker to indicate the beginning of each continuous round.
-
Round 1: Make 6 sc into a magic ring. (6)
-
Round 2: Work 2 sc into each stitch. (12)
-
Round 3: Repeat (1 sc, increase) around. (18)
-
Round 4: Repeat (2 sc, increase) around. (24)
-
Round 5: Repeat (3 sc, increase) around. (30)
-
Round 6: Repeat (4 sc, increase) around. (36)
-
Round 7: Repeat (5 sc, increase) around. (42)
-
Round 8: Repeat (6 sc, increase) around. (48)
-
Round 9: Repeat (7 sc, increase) around. (54)
At the end of Round 9, the base should measure approximately 10–11 cm across with the suggested gauge. If you want a wider bag, continue increasing by six stitches per round. Keep the circle flat, and adjust your hook size if the fabric begins to curl or ripple.
Step 2: Build the sides of the pouch
For the next round, work 1 sc in the back loop only of each stitch. This creates a subtle turning ridge that helps define the transition between the flat base and the vertical walls. Continue crocheting in continuous rounds without increasing.
Work approximately 17–20 additional rounds of single crochet, or until the bag measures about 11–12 cm from the bottom. Maintain even tension and check the height occasionally. The sides should rise naturally and form a rounded cylinder.
For a slightly textured appearance, you can alternate rounds of regular single crochet with rounds of half double crochet. However, using single crochet throughout provides a dense and durable fabric that closely complements the decorative snowflake.
Step 3: Create the drawstring openings
Once the body has reached the desired height, create a round of evenly spaced eyelets. These openings will allow the white drawstring to pass through the upper section of the bag.
For a 54-stitch circumference, work the following eyelet round:
Repeat (sc in next 3 stitches, ch 2, skip next 2 stitches, sc in next 4 stitches) six times.
This creates six openings around the top edge while maintaining 54 stitch positions. Work one additional round of sc, placing 1 sc in each stitch and 2 sc in each chain-2 space. The result is a neatly reinforced upper section.
Step 4: Add the white decorative border
Join the white yarn at the top edge of the pouch. To create the scalloped effect, repeat the following sequence around the upper circumference: skip 1 stitch, work 5 dc into the next stitch, skip 1 stitch, and sl st into the next stitch.
For a 54-stitch edge, repeat this four-stitch shell sequence 13 times, then work a smaller shell across the final two stitches to finish the edge smoothly. Alternatively, adjust the stitch count to a multiple of four before beginning the border for perfectly uniform scallops.
This delicate white edging gives the bag a festive, snow-covered appearance. Keep your tension relaxed so the border remains soft and slightly wavy rather than pulling the top inward. Fasten off and carefully weave in the yarn ends.
Step 5: Make the drawstrings and decorative balls
Using white yarn, create a chain approximately 40–45 cm long. Slip stitch back along the chain to form a firmer cord, or use a crocheted Romanian cord if you prefer a rounded finish. Make two cords if you want a two-sided drawstring closure.
Thread the cords through the eyelets in opposite directions so that pulling their ends closes the pouch. If you want to hang the bag as an ornament, leave a long loop above the opening or add a separate hanging cord attached securely to the sides.
To create the decorative balls, make 6 sc in a magic ring. Increase to 12 sc in the second round, then work two rounds without increases. Stuff lightly with yarn scraps, decrease to 6 stitches, and close the opening. Attach one small crocheted ball to each cord end.
How to Crochet and Attach the White Snowflake Decoration
The white snowflake is the centerpiece of this handmade Christmas crochet bag. Its delicate shape creates beautiful contrast against the bright-colored pouch. Although the design looks intricate, it can be made using a combination of chains, slip stitches, and basic crochet clusters.
Begin the snowflake separately using white yarn and a slightly smaller hook if necessary. A 3.0 mm or 3.5 mm crochet hook helps maintain crisp details, especially when using cotton yarn. For the suggested pouch size, aim for a snowflake approximately 7–8 cm wide.
Step 1: Create the snowflake center
Make a magic ring and chain 3, counting as the first double crochet. Work 1 dc into the ring, then ch 3. Repeat the sequence of 2 dc followed by ch 3 until you have six groups of two double crochet stitches.
Close the round with a slip stitch into the top of the beginning chain-3. Pull the magic ring tight to create a small center opening. The six chain spaces form the foundation for the six snowflake branches.
Step 2: Build the six branches
Slip stitch into the first chain-3 space. Work (sc, ch 5, sc) into the same space. Repeat this sequence in each of the remaining five chain spaces, working slip stitches across the double crochet groups to reach each new space.
You should now have six evenly spaced chain loops extending from the center. These loops create the basic six-pointed shape. Check that the branches are symmetrical before beginning the final decorative round.
Step 3: Add the decorative snowflake points
Into each chain-5 loop, work the following sequence: sc, hdc, dc, ch 3, sl st into the third chain from the hook, dc, hdc, sc. Repeat across all six loops.
The small chain-3 picot creates a pointed tip on each branch. Work carefully and keep the stitches relaxed so the loops do not become distorted. This produces an attractive six-pointed snowflake with a slightly raised texture.
If you prefer a fuller snowflake similar to the layered decoration in the image, add small chain loops between the branches or crochet a second smaller snowflake and sew it over the center. This creates additional dimension without making the ornament excessively heavy.
Step 4: Block and shape the snowflake
After finishing the applique, weave in the loose ends and lightly dampen the snowflake. Place it on a flat towel or foam blocking mat, gently arranging all six points into a symmetrical shape. Allow it to dry completely.
Blocking is especially helpful when working with cotton yarn. It opens the decorative stitches, improves the definition of the points, and makes the snowflake easier to attach to the bag.
Step 5: Sew the snowflake onto the pouch
Position the finished snowflake on the front of the bag, approximately 2–3 cm below the drawstring openings. Use white yarn and a tapestry needle to secure the center and several outer points to the fabric.
Avoid pulling the applique too tightly against the bag. Small, carefully placed stitches allow the snowflake to retain its textured appearance. After attaching it, gently shape the pouch with your hands and check that the snowflake sits centered.
For an especially elegant appearance, use the same white yarn for the scalloped edging, snowflake, and drawstrings. This creates a coordinated finish that brings all the decorative elements together.
Creative Ideas for Decorating and Using Your Christmas Crochet Bags
One of the greatest advantages of this Christmas snowflake crochet pattern is the opportunity to personalize it. The traditional red, green, and mustard combination looks beautiful, but countless other color palettes can create different holiday styles.
For an elegant winter theme, try white and silver-gray yarn with subtle metallic accents. A deep navy-blue pouch with a bright white snowflake resembles a snowy winter night. Burgundy and cream create a vintage Christmas appearance, while emerald green and gold offer a luxurious holiday style.
These small pouches also make lovely reusable gift holders. Instead of wrapping a tiny present in disposable paper, place it inside a handmade crochet bag and close the drawstring. The recipient receives two gifts: the surprise inside and a reusable accessory that can be enjoyed for years.
If you plan to use the bags for Christmas tree decorations, make sure the hanging cords are securely attached. Lightweight items such as folded holiday wishes, small wrapped candies, or miniature ornaments work best. Avoid overfilling the bags, as excessive weight may stretch the stitches or distort the decorative shape.
Another creative option is to make a coordinated collection in different sizes. Smaller versions can decorate a Christmas tree, while medium-sized pouches can hold stocking stuffers. Larger versions can serve as gift bags for handmade soaps, accessories, and other lightweight presents.
You can also experiment with different applique designs. Although the snowflake is the main feature of this pattern, small stars, Christmas trees, hearts, and gingerbread motifs can be attached using the same method. This allows you to create a matching holiday collection with varied decorations.
For a professional finish, always weave in yarn ends securely and inspect each drawstring opening. If the bag will contain small objects, consider adding a simple cotton lining. The lining can be sewn by hand or machine and should be slightly smaller than the crochet pouch to fit comfortably.
Handmade crochet decorations can also become meaningful family traditions. Making a new set each year, choosing different colors, or personalizing the bags with small embroidered initials adds sentimental value to the project. Over time, these little creations can become treasured parts of your holiday collection.
Frequently Asked Questions About Crochet Christmas Snowflake Bags
Is this Christmas crochet bag suitable for beginners?
Yes. The pouch itself uses simple single crochet stitches, basic increases, and a drawstring opening. Beginners can start with the bag construction and practice the more decorative snowflake separately.
What type of yarn works best for this pattern?
Medium-weight cotton yarn is an excellent choice because it creates defined stitches and maintains a stable shape. Acrylic yarn is also suitable, especially for lightweight Christmas tree decorations.
How long does it take to crochet one bag?
The time depends on your experience and the complexity of your snowflake. Many crocheters can complete a bag in approximately three to five hours, including the decorative details.
Can I make the crochet pouch bigger?
Absolutely. Increase the circular base until it reaches your desired diameter, then continue the sides without additional increases. Adjust the snowflake size and drawstring length to match the larger bag.
How can I make the snowflake more three-dimensional?
Use a smaller hook for tighter stitches, add decorative picots, and attach a second smaller snowflake layer over the center. Light blocking also helps emphasize the raised details.
Can these bags be washed?
Most cotton and washable acrylic yarns can be gently hand-washed in cool water. Always check the yarn label, avoid aggressive twisting, and allow the bag to dry flat to preserve its shape.
Are these crochet Christmas bags suitable for selling at craft fairs?
Yes, they can be attractive handmade craft-fair items. Neat stitching, coordinated color collections, and secure finishing are especially important when creating items intended for sale.
Can I use the bags for food gifts?
You can place commercially wrapped candies or other sealed treats inside the pouches. Avoid placing unwrapped food directly against the crochet fabric, as the yarn is not a food-safe barrier.
Conclusion
The Crochet Christmas Snowflake Drawstring Bag Pattern is a delightful combination of creativity, functionality, and traditional holiday charm. With its rounded pouch shape, beautiful white snowflake applique, decorative scalloped edging, and practical drawstring closure, this project is perfect for adding handmade warmth to Christmas celebrations.
Whether you choose classic red, deep green, elegant gold, or your own favorite colors, each finished bag becomes a unique holiday decoration. These versatile little creations make wonderful Christmas tree ornaments, reusable gift holders, and thoughtful handmade presents.
Best of all, this easy Christmas crochet project allows you to practice useful crochet techniques while creating something beautiful and meaningful. Gather your favorite yarn colors, prepare your crochet hook, and enjoy making a festive collection of snowflake bags that can brighten your home throughout the holiday season.