
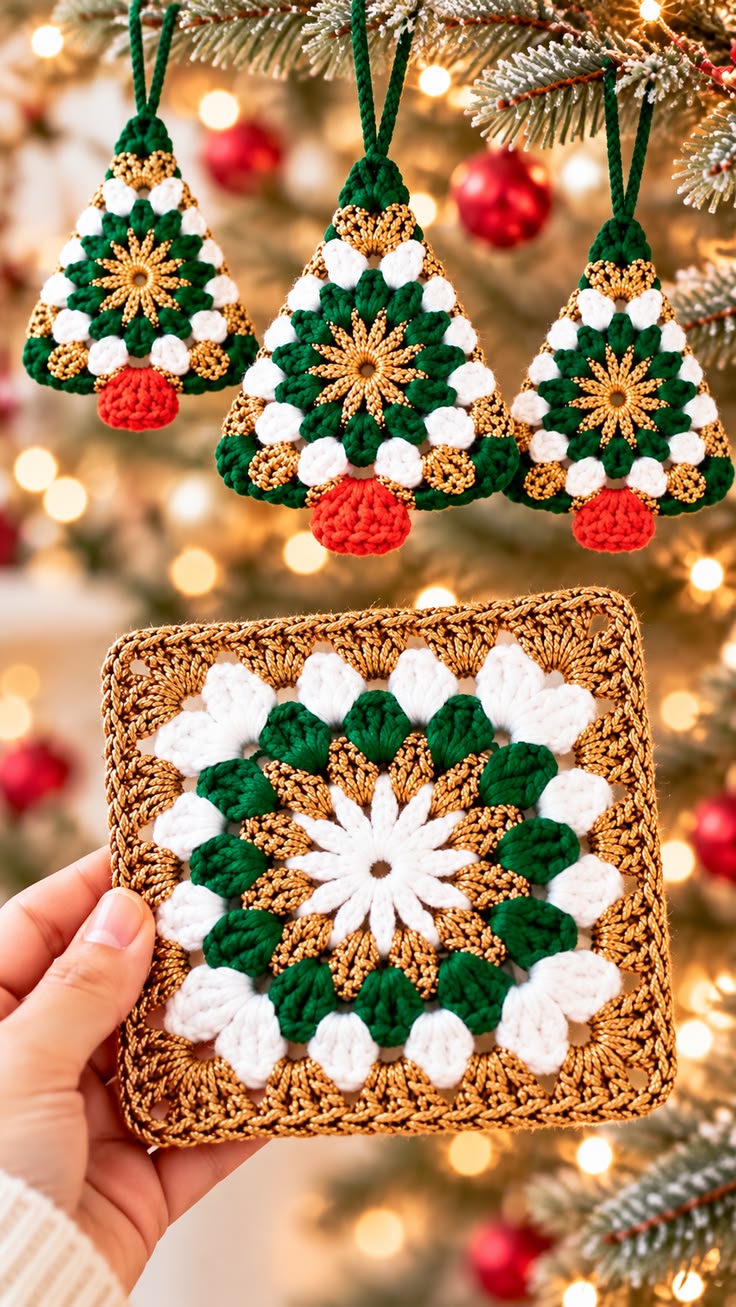
The design features an elegant combination of emerald green, snowy white, metallic gold, and Christmas red, creating a classic holiday color palette. At the center of each ornament is a decorative flower-inspired motif surrounded by textured crochet clusters. The finished pieces have a triangular Christmas tree shape, complete with a small red trunk at the bottom and a green hanging loop at the top. The raised stitches add dimension, while the shimmering gold details give the ornaments a sophisticated appearance that looks especially beautiful under warm Christmas lights.
One of the most appealing features of this handmade crochet Christmas decoration is its versatility. The design begins with a decorative square motif that can be adapted into a triangular ornament using carefully arranged shaping stitches. Experienced crocheters can enjoy experimenting with different textures, while confident beginners can use the project to practice cluster stitches, color changes, and decorative edging. These little Christmas trees can decorate holiday branches, embellish wrapped presents, become part of festive garlands, or serve as meaningful keepsakes that families treasure for years.
1. Materials and Preparation for Crochet Christmas Tree Ornaments
Creating beautiful crochet Christmas tree ornaments begins with selecting the right materials. Since these decorations are designed to hang from Christmas branches, lightweight yarn is important. Cotton yarn provides excellent stitch definition and helps maintain the shape of the ornament, while a small amount of metallic thread creates an elegant finishing touch.
For the design shown, use medium-fine cotton yarn or lightweight acrylic yarn in traditional Christmas colors. Emerald green forms the rich foliage, white represents snowy accents, gold creates the decorative floral details, and bright red completes the little tree trunk. Using yarns with a similar thickness will help keep the stitches balanced.
Materials Needed
-
Emerald green cotton yarn, approximately 25–35 g
-
White cotton yarn, approximately 15–20 g
-
Metallic gold yarn, approximately 10–15 g
-
Bright red cotton yarn, approximately 5–10 g
-
Crochet hook, 3.0 mm or 3.5 mm
-
Yarn needle for weaving in ends
-
Sharp scissors
-
Stitch markers
-
Measuring tape
-
Optional fabric stiffener for a firmer finish
The suggested materials should be enough for approximately three small ornaments, depending on their size, stitch density, and yarn thickness. You can also use leftover yarn from previous Christmas projects, making this an excellent way to turn small amounts of yarn into attractive decorations.
For a balanced result, aim for finished ornaments measuring approximately 10–12 cm tall and 8–10 cm wide, excluding the hanging loop. The decorative starting square can measure approximately 10 × 10 cm before shaping, although the exact size will depend on your gauge and the number of rounds completed.
A gauge of approximately 20 single crochet stitches across 10 cm is a useful starting reference for lightweight yarn with a 3.5 mm hook. However, decorative cluster stitches will produce a different measurement, so it is more important to maintain consistent tension than to achieve an exact gauge.
Before starting, become familiar with the crochet stitches used throughout the project. This tutorial follows US crochet terminology, making the instructions suitable for readers who use American crochet patterns.
| Abbreviation | US Crochet Term |
|---|---|
| ch | Chain |
| sl st | Slip stitch |
| sc | Single crochet |
| hdc | Half double crochet |
| dc | Double crochet |
| tr | Treble crochet |
| st | Stitch |
| sp | Space |
| BLO | Back loop only |
| rep | Repeat |
The raised texture is created using puff and cluster stitches. For a simple puff stitch, yarn over, insert the hook into the designated stitch, pull up a loop, and repeat this process three times before pulling the yarn through the accumulated loops and securing the stitch with a chain.
A crochet cluster stitch is created by working several partially completed double crochet stitches into the same space and closing them together. These techniques create the rounded green and white details that make the ornaments look full and dimensional.
2. Step-by-Step Crochet Christmas Granny Square Motif
The decorative center is the main feature of this Christmas granny square crochet pattern. The image shows flower-like centers surrounded by green, white, and gold textured details. The following instructions provide an original, adaptable method inspired by that arrangement rather than an exact stitch-by-stitch reconstruction from the photograph.
Step 1: Crochet the Golden Flower Center
Begin with metallic gold yarn and create a magic ring. Chain 3, which counts as the first double crochet, then work 11 additional double crochet stitches into the ring. Pull the ring closed and join with a slip stitch to the top of the beginning chain.
You should now have 12 double crochet stitches forming a small circular center.
For the next round, chain 3 and work a small decorative petal into each stitch around the ring. One simple method is to work 3 double crochet stitches into a stitch, chain 1, and move to the next stitch with a slip stitch.
Continue until you have created 12 decorative petals around the center.
Fasten off the gold yarn and weave in the loose end.
Step 2: Add the White Floral Details
Attach white yarn behind one of the golden petals. Chain 3 and work a double crochet cluster into the available space between the petals.
Repeat around the center, placing one raised white cluster in each designated space.
The white stitches should form a soft floral ring around the golden center.
To increase the three-dimensional appearance, pull each cluster gently into shape before continuing.
Step 3: Introduce the Emerald Green Clusters
Attach emerald green yarn in a space between two white clusters. Work a puff stitch into the space and secure it with one chain.
Continue around the motif, alternating green puff stitches with chain spaces as needed to prevent the fabric from curling.
The green stitches create a foliage-inspired appearance that contrasts beautifully with the snowy white petals.
When the round is complete, join with a slip stitch and check that the motif lies reasonably flat.
Step 4: Add the Metallic Gold Accents
Attach metallic gold yarn in one of the spaces between the green clusters.
Work decorative groups of three double crochet stitches into selected spaces, separating each group with one or two chains.
Continue around the motif, maintaining even spacing.
The gold stitches should appear as decorative highlights rather than covering the green clusters completely.
For a more delicate effect, use a thinner metallic yarn or combine metallic embroidery thread with cotton yarn.
Step 5: Form the Square Corners
To transform the circular motif into a granny square, identify four equally spaced positions around the outer round.
At each corner, work the following sequence:
3 dc, ch 2, 3 dc
Work one or more groups of three double crochet stitches along each side, adjusting the number of chain spaces to accommodate the existing motif.
Repeat until all four corners are established.
The square should gradually take shape while preserving the decorative floral center.
Step 6: Complete the Decorative Square
Continue working additional rounds using white, emerald green, and metallic gold yarn.
Place larger groups of stitches at the corners and smaller groups along the sides.
For a look similar to the image, create an outer border using gold yarn with small open spaces between the stitch groups.
Finish by working a round of single crochet around the square, placing three single crochet stitches in each corner.
The completed crochet Christmas granny square can be used as an independent decoration, incorporated into a holiday blanket, or adapted into the Christmas tree ornament described below.
3. How to Transform the Motif Into a Christmas Tree Ornament
The triangular silhouette is what makes this project particularly special. Rather than creating a conventional flat granny square, the ornament features a softly pointed top, wider lower edges, and decorative floral details arranged inside a Christmas tree shape.
There are several ways to achieve this appearance. For a consistent handmade result, the following method uses a triangular construction with textured stitches inspired by the original square motif.
Step 1: Create the Triangular Foundation
Using emerald green yarn, make a magic ring.
Work 3 dc, ch 2, 3 dc, ch 2, 3 dc, ch 2 into the ring.
Join with a slip stitch and tighten the center.
This creates three distinct corner spaces that will form the foundation of a triangular crochet motif.
Step 2: Build the Triangle
In the following round, work 3 dc, ch 2, 3 dc into each of the three corner spaces.
Separate the corner groups with one chain.
Continue adding rounds, increasing at each corner while maintaining an even triangular shape.
For larger ornaments, add more rounds until the triangle measures approximately 9–10 cm across its widest point.
Step 3: Add the Raised Christmas Colors
Introduce white yarn to create raised clusters along the outer sections.
Use emerald green puff stitches between the white details to create the appearance of layered evergreen branches.
Add gold clusters at regular intervals.
Maintain the triangular outline by concentrating increases at the three corners.
The combination of raised white and green stitches gives the tree a textured, festive appearance.
Step 4: Decorate the Center
Create a small golden flower separately using a magic ring and a round of decorative petal stitches.
Position the flower at the center of the triangular motif.
Sew it securely using matching yarn and a yarn needle.
Alternatively, work the flower directly into the center of the foundation during the early rounds.
This decorative detail connects the triangular tree design with the original granny square pattern.
Step 5: Crochet the Red Tree Trunk
Using bright red yarn, chain 7.
Starting in the second chain from the hook, work 6 single crochet stitches.
Chain 1, turn, and work another row of 6 single crochet stitches.
Repeat until the trunk measures approximately 2–2.5 cm tall.
Fasten off, leaving a long yarn tail for sewing.
Attach the trunk to the center of the lower edge of the Christmas tree.
For a fuller appearance similar to the image, replace the flat rectangle with a small rounded oval worked in joined rounds.
Step 6: Add the Hanging Loop
Attach emerald green yarn to the top corner of the triangle.
Chain approximately 35–45 stitches, depending on the desired hanging length.
Join the final chain to the attachment point with a slip stitch.
Fasten off securely and weave in the yarn ends.
The hanging loop should be strong enough to support the ornament without stretching excessively.
For a more polished appearance, work slip stitches along the entire chain loop to make it thicker.
Your handmade crochet Christmas tree ornament is now ready for finishing and decorating.
4. Finishing Techniques, Creative Variations, and Christmas Decorating Ideas
The final finishing process is essential for giving handmade crochet ornaments a professional appearance. Even beautifully executed crochet stitches can look uneven if the finished ornament is not properly shaped. Gentle blocking helps define the corners, smooth the decorative edges, and showcase the raised floral details.
Begin by carefully weaving in all loose yarn ends. Use a yarn needle to hide the ends behind clusters or inside thicker sections of the stitches. Avoid cutting yarn tails too close to the surface, especially when working with metallic thread, which can sometimes loosen more easily than cotton yarn.
Lightly dampen the ornaments with clean water and gently press them between two towels to remove excess moisture. Lay each ornament flat on a blocking mat and adjust the shape with rustproof pins. Allow the pieces to dry completely before removing the pins.
For ornaments that need additional firmness, apply a small amount of diluted fabric stiffener according to the product instructions. Shape the ornaments while damp and allow them to dry completely. Avoid excessive stiffener, as it may flatten the raised crochet texture.
One attractive variation is to create an entire collection using coordinated holiday colors. Traditional green, red, and white ornaments look beautiful on natural Christmas trees, while cream, champagne gold, and soft beige can create a more elegant, neutral holiday theme.
You can also transform this design into different Christmas accessories. Make several small ornaments and connect them with a long crochet chain to create a festive garland. Sew a single ornament onto a fabric gift bag, attach one to a wrapped present, or use the motif as a decorative centerpiece for handmade holiday cards.
For a coordinated collection, crochet matching granny squares and turn them into coasters, table decorations, pillow covers, or seasonal wall hangings. The repeating flower motif creates visual harmony throughout your holiday decorating scheme.
These ornaments also make thoughtful handmade gifts. Package three or four finished trees in a small kraft box lined with tissue paper. Add a handwritten note describing the handmade design and the materials used.
If giving the ornaments to families with young children or pets, make sure every component is securely attached. Avoid loose beads or detachable embellishments, and keep hanging cords out of reach where they might create an entanglement hazard.
The beauty of this easy Christmas crochet decoration lies in the combination of simple crochet techniques and carefully selected colors. Once the basic construction becomes familiar, you can experiment with different yarn weights, larger sizes, additional floral details, and creative edging styles.
Frequently Asked Questions About Crochet Christmas Tree Ornaments
Is this crochet Christmas tree ornament suitable for beginners?
Yes, confident beginners can make a simplified version of this design. However, the raised flower details, cluster stitches, and triangle shaping may require some practice.
Start by mastering chain stitches, single crochet, double crochet, and slip stitches before attempting the textured sections.
What is the best yarn for crochet Christmas ornaments?
Lightweight cotton yarn is an excellent option because it provides good stitch definition and holds decorative shapes well.
Acrylic yarn can also work, especially for softer ornaments. Metallic yarn is best used as an accent because it can sometimes be more difficult to handle.
How long does it take to crochet one Christmas tree ornament?
A simplified ornament may take approximately one to two hours.
A more detailed version with floral motifs, metallic accents, and raised clusters may take two to four hours, depending on experience.
Can I make these ornaments without metallic yarn?
Absolutely. Gold-colored cotton yarn creates a similar visual effect without the shine of metallic fibers.
Cream, mustard yellow, champagne, or beige can also be used for decorative accents.
How can I make the ornaments larger?
Use thicker yarn and a larger crochet hook, or add more rounds to the triangular foundation.
For larger ornaments, maintain consistent increases at the triangle corners so the piece keeps its shape.
Can I wash handmade crochet Christmas ornaments?
Most cotton ornaments can be gently hand-washed in cool water with mild detergent.
Check the care instructions for all yarns used, particularly metallic fibers. Reshape the ornaments while damp and dry them flat.
Can these Christmas tree ornaments be sold at craft fairs?
Yes, ornaments made from your own crochet work can be attractive items for seasonal craft markets.
Offering coordinated sets, different color combinations, and beautiful gift packaging can help make your handmade decorations more appealing.
How should I store crochet Christmas ornaments after the holidays?
Store the ornaments completely dry in a clean box or breathable fabric bag.
Place tissue paper between delicate pieces to protect the raised stitches and prevent metallic threads from catching.
Conclusion
The Crochet Christmas Tree Ornament Pattern is a delightful way to celebrate the holiday season through handmade creativity. By combining emerald green foliage-inspired stitches, snowy white clusters, golden floral accents, and a cheerful red trunk, this design captures the timeless charm of traditional Christmas decorating.
From the decorative granny square center to the triangular tree shape, every stage offers an opportunity to practice crochet skills and explore beautiful textures. The completed ornaments are lightweight, versatile, and suitable for decorating Christmas trees, gifts, garlands, and festive displays.
Whether you make a single ornament or an entire collection, these handmade crochet Christmas decorations bring warmth, personality, and a special handmade touch to your home. With a little yarn, a crochet hook, and a creative holiday spirit, you can create meaningful decorations that become part of your family’s Christmas traditions for years to come.