
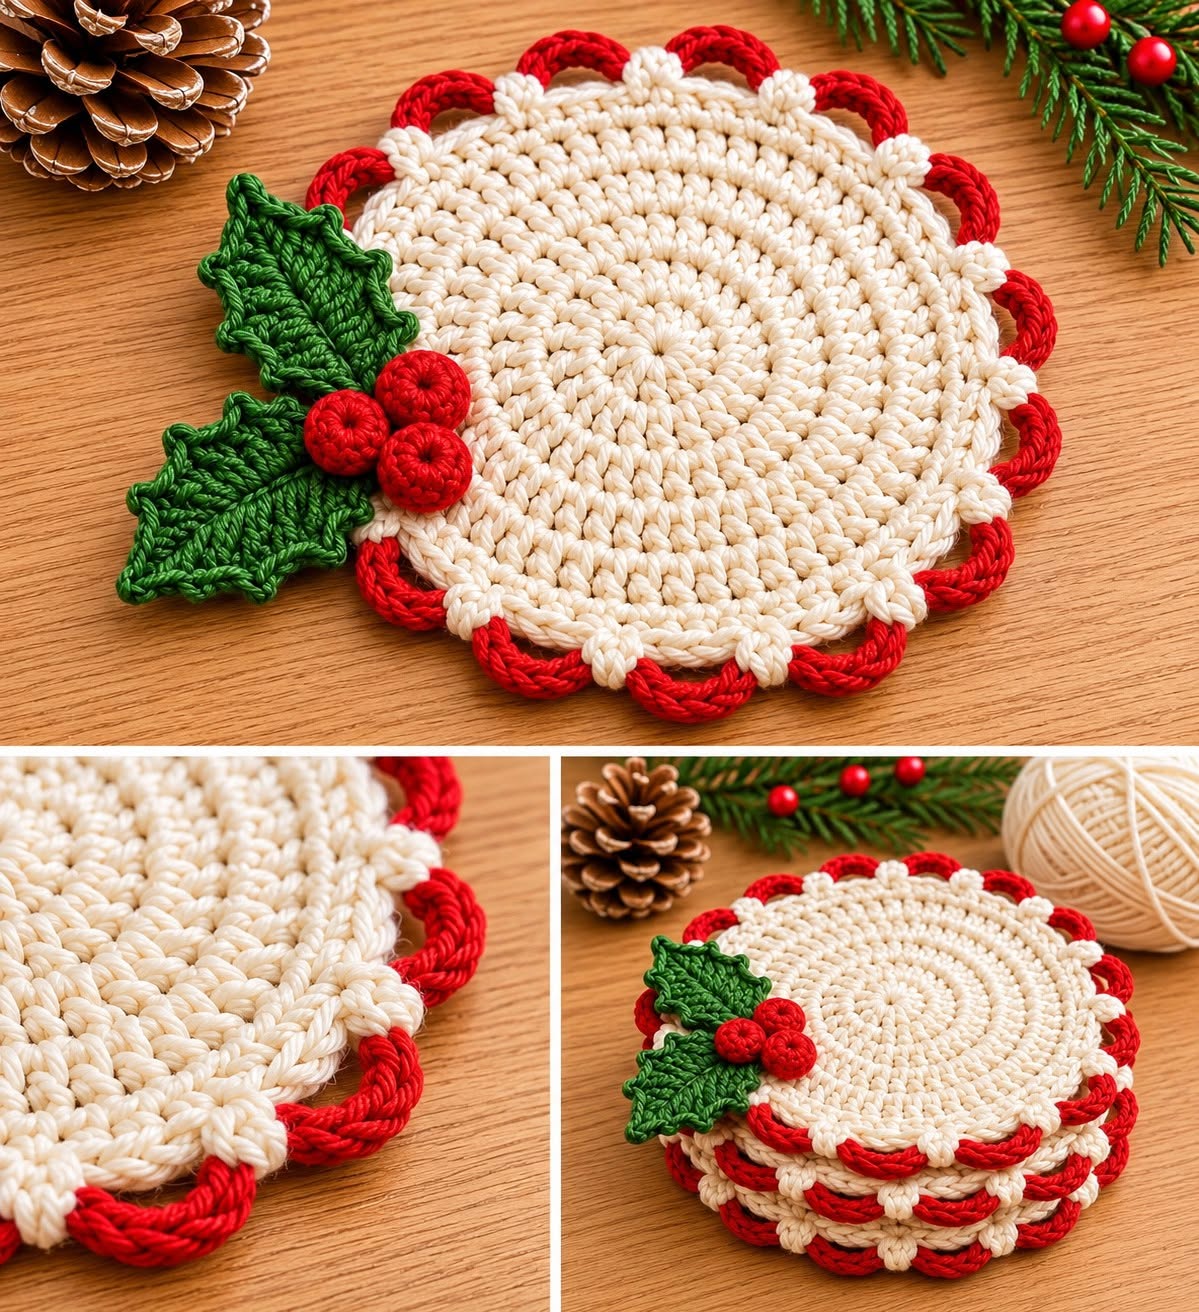
The beauty of this crochet Christmas coaster pattern is its combination of simplicity and decorative detail. The circular base features neatly arranged crochet stitches that create a soft yet structured surface, while the red scalloped border adds a festive touch.
The handmade holly leaves and berries make the project especially appealing because they introduce a three-dimensional effect. Whether placed under a coffee mug, hot chocolate cup, or small holiday centerpiece, this coaster adds a special handmade feeling to any Christmas celebration.
Another wonderful advantage of this project is its versatility. You can make a single coaster for a decorative display or create an entire matching set for your Christmas dining table. These handmade crochet coasters also make thoughtful gifts for friends, family members, neighbors, and coworkers. With basic crochet techniques, suitable cotton yarn, and a little patience, you can recreate this beautiful holiday accessory while enjoying a relaxing and creative seasonal activity.
Materials and Crochet Stitches Needed for the Christmas Holly Coaster
Before beginning your Christmas crochet project, gather all the materials and prepare a comfortable workspace. Choosing the right yarn is particularly important because the coaster should maintain its shape while remaining practical for everyday use.
For a design similar to the photograph, choose a soft ivory or cream yarn for the circular base, rich Christmas red for the decorative scalloped border and berries, and deep forest green for the holly leaves. These classic holiday shades create a beautiful contrast that makes the finished coaster stand out.
Materials required:
-
Worsted-weight 100% cotton yarn in cream or ivory, approximately 35–45 g.
-
Worsted-weight cotton yarn in Christmas red, approximately 10–15 g.
-
Worsted-weight cotton yarn in forest green, approximately 8–12 g.
-
4.0 mm crochet hook, or a size that produces firm stitches.
-
Yarn needle for sewing and weaving in ends.
-
Sharp embroidery scissors.
-
Stitch markers for identifying the beginning of rounds.
-
Measuring tape for checking the coaster diameter.
-
Small amount of polyester stuffing for the berries, optional.
Using cotton yarn for crochet coasters is especially beneficial because cotton creates clearly defined stitches, offers good absorbency, and generally maintains its structure after washing. It is also a practical option for items that will frequently come into contact with cups and glasses.
The finished coaster in this tutorial measures approximately 16–18 cm (6.3–7.1 inches) in diameter, including the decorative border. The holly decoration extends slightly beyond the circular edge. Measurements may vary according to yarn thickness, crochet tension, and hook size.
All instructions below use standard US crochet terminology. The stitches include chain (ch), slip stitch (sl st), single crochet (sc), half double crochet (hdc), double crochet (dc), treble crochet (tr), and single crochet decrease (sc2tog). You will also work increases, decorative chain arches, and small puff-like attachment stitches.
If you are relatively new to crochet, practice working in continuous or joined rounds before beginning the complete project. Maintaining consistent tension is essential for achieving a smooth circular surface without unwanted ripples or curling.
The sample shown inspires the overall appearance of this project. The following instructions provide an original, workable interpretation of its round base, red looped edging, holly leaves, and three-dimensional berries rather than an exact stitch-by-stitch transcription from the photograph.
Step-by-Step Instructions for the Circular Crochet Base and Red Scalloped Border
The central portion of this Christmas Holly Crochet Coaster is constructed in rounds, beginning with a magic ring and gradually expanding outward. The goal is to create a flat circular surface with evenly distributed stitches that resemble the neat, textured appearance visible in the finished design.
Step 1: Create the magic ring. Using cream cotton yarn, make a magic ring. Work 6 single crochet stitches into the ring, gently pull the yarn tail to close the center, and join with a slip stitch to the first stitch. At the end of this round, you should have 6 stitches.
Step 2: Begin increasing the circle. For Round 2, work 2 single crochet stitches into each stitch around, giving you 12 stitches. In Round 3, repeat 1 single crochet followed by an increase around the circle, creating 18 stitches. For Round 4, repeat 2 single crochet stitches followed by an increase, reaching 24 stitches.
Step 3: Continue shaping the base. In Round 5, repeat 3 single crochet stitches and an increase for a total of 30 stitches. Continue this pattern in subsequent rounds, adding one additional single crochet between increases every round. This creates an evenly expanding circular foundation.
Step 4: Complete the main circle. Continue through Round 15, which should have 90 stitches. The increase sequence in Round 15 is 13 single crochet stitches followed by 2 single crochet stitches in the next stitch, repeated six times. Join the round and check that the circle lies flat. If needed, adjust your tension or hook size.
Step 5: Add a decorative cream finishing round. Work one single crochet into every stitch around the circle. Join with a slip stitch, leaving a total of 90 stitches. This creates a stable outer foundation for attaching the red decorative loops.
Step 6: Crochet the red scalloped edging. Attach the red yarn to any stitch along the outer edge. Chain 8, skip 8 stitches, and slip stitch into the next stitch. Repeat around the coaster, making 10 loops in total. Fasten off and weave in the ends carefully. These chain arches create the distinctive bright red scalloped appearance.
To make the red arches slightly thicker, work one additional round using the red yarn, placing 10 single crochet stitches around each chain-8 arch and working a slip stitch into each anchor point between arches. This optional technique gives the border a fuller, more structured look.
For a decorative cream accent between the arches, attach the cream yarn at each red anchor point and work a small puff stitch. A simple puff can be made by pulling up three elongated loops in the same space, then drawing the yarn through all loops and securing it with a chain. Repeat at the anchor points.
If the finished border feels uneven, lightly dampen the coaster and gently shape it into a circle. Allow it to dry completely on a flat towel before attaching the holly decorations. Blocking crochet projects helps improve stitch definition and gives the final coaster a more polished appearance.
How to Crochet the Holly Leaves and Three-Dimensional Red Berries
The holly decoration is one of the most attractive details of this festive coaster. The combination of textured green leaves and rounded red berries gives the project its traditional Christmas character while adding depth and visual interest to the finished piece.
To create the crochet holly leaves, begin with the forest green cotton yarn. Chain 13. Starting in the second chain from the hook, work 1 sc, 1 hdc, 2 dc, 4 tr, 2 dc, 1 hdc, and 1 sc. You will have worked along one side of the foundation chain.
Chain 2 at the tip, then rotate the work and crochet along the opposite side of the foundation chain. Repeat the stitch sequence in reverse order, adjusting the placement to fit the available loops. Join with a slip stitch. This creates an elongated leaf that can be shaped into a pointed holiday design.
To add the characteristic holly leaf points, work a decorative edging around the leaf. Along each side, crochet several short sections of single crochet interrupted by chain-3 picots. To make a picot, chain 3 and slip stitch into the first chain. Distribute approximately three points along each side, depending on the leaf length.
Create two matching crochet holly leaves using the same instructions. For a more natural appearance, gently shape one leaf slightly upward and the other downward. This arrangement creates the layered appearance shown in the photograph.
The red berries are constructed separately using the same Christmas red yarn as the border. Begin with a magic ring and crochet 6 single crochet stitches into the center. In Round 2, work 2 single crochet stitches into each stitch, creating 12 stitches.
For Rounds 3 and 4, work one single crochet into every stitch around. In Round 5, repeat one single crochet and one single crochet decrease six times, leaving 6 stitches. Add a tiny amount of stuffing if desired, then close the remaining opening with the yarn needle.
Repeat these instructions until you have three small crochet berries. Each berry should be approximately 2–2.5 cm in diameter, depending on the yarn and tension. Keeping the berries firm but not excessively stuffed will help them maintain an attractive rounded shape.
Arrange the leaves along one side of the coaster, allowing their pointed ends to extend beyond the circular base. Position the three berries where the leaves overlap, forming a compact triangular cluster. Sew each component securely to the coaster using matching yarn and small hidden stitches.
Finishing, Decorating, and Caring for Your Christmas Crochet Coasters
Once all the crochet pieces are complete, the final stage is to assemble the decorations and ensure the coaster is ready for use. A carefully finished handmade Christmas coaster should look beautiful from the front while remaining neat and comfortable on the reverse side.
Begin by checking the attachment points of the leaves and berries. Make sure all loose yarn ends are woven securely into the back of the crochet fabric. Avoid leaving long strands that could become visible or catch on other objects during use.
If you plan to make a complete matching set, crochet four to six identical coasters. Matching sets create a coordinated appearance for Christmas dinners, holiday brunches, and festive coffee gatherings. They also offer an opportunity to experiment with subtle color variations.
For a traditional Christmas appearance, retain the classic red, green, and cream color combination. If you prefer a sophisticated holiday theme, consider ivory with burgundy accents and dark olive leaves. Another attractive combination is white with deep emerald green and bright cranberry red.
These crochet coasters can also be displayed in a small decorative stack, tied together with a festive ribbon, or placed inside a handmade gift basket. Including a matching holiday mug or a small package of hot chocolate can turn the set into a thoughtful Christmas gift.
For cleaning, gently hand-wash the coaster in cool or lukewarm water using mild detergent. Avoid aggressive rubbing, particularly around the berries and leaves. Press out excess water with a towel and reshape the coaster while damp. Allow it to air-dry completely.
For best results, keep the coasters away from direct flames and extremely hot cookware. Although cotton yarn is suitable for many coaster applications, the decorative surface is not intended to function as a protective trivet for hot pans. Regular care will help preserve the stitches, colors, and beautiful handmade appearance.
Frequently Asked Questions About the Christmas Holly Crochet Coaster
1. Is this Christmas crochet coaster suitable for beginners?
Yes. The circular base uses simple single crochet stitches and basic increases, making it suitable for confident beginners. The holly leaves, decorative edging, and three-dimensional berries require slightly more attention, but they are manageable with practice.
2. What is the best yarn for Christmas crochet coasters?
100% cotton yarn is an excellent choice because it absorbs moisture, provides good stitch definition, and holds its shape well. Worsted-weight cotton is particularly useful for creating a sturdy coaster with an attractive textured finish.
3. How large should the finished coaster be?
A practical finished diameter is approximately 16–18 cm, including the red edging. You may create a smaller version by stopping the increasing rounds earlier and adjusting the number of decorative border loops.
4. Can I make the coaster without the holly leaves and berries?
Absolutely. The cream circle and red scalloped border already create an attractive Christmas design. Omitting the holly decorations produces a simpler coaster that works beautifully in matching sets.
5. How do I prevent the circular coaster from curling?
Curling can happen when the increases are insufficient or the stitches are too tight. Check the stitch count after every round, maintain consistent tension, and experiment with a slightly larger hook if necessary.
6. Can these crochet coasters be sold as handmade products?
Yes, you can sell coasters you make using this original tutorial. The design is well suited to seasonal craft fairs, handmade gift collections, and small holiday product lines. Always consider material costs, labor, packaging, and any applicable selling requirements.
7. How many coasters can I make with one ball of yarn?
The exact quantity depends on the yarn weight, ball size, and finished coaster dimensions. A standard 100 g ball of cream worsted-weight cotton may provide enough yarn for approximately two to three coasters of this size, with additional red and green yarn needed for decoration.
8. How can I make the berries look more realistic?
Use consistent tension, add only a small amount of stuffing, and sew the berries closely together. Slightly varying their placement creates a natural cluster resembling traditional Christmas holly berries.
Conclusion
The Christmas Holly Crochet Coaster Pattern is a wonderful way to combine traditional holiday colors, practical crochet techniques, and charming handmade details. Its soft cream circular center, cheerful red scalloped border, and delicate holly decoration create a timeless Christmas accessory that can brighten any festive table.
Whether you are crocheting decorations for your own home, preparing thoughtful handmade gifts, or creating matching sets for seasonal craft sales, this design offers endless opportunities for creativity. The combination of simple circular construction and decorative finishing makes each coaster both enjoyable to create and rewarding to display.
With a few basic materials, carefully worked stitches, and a little holiday inspiration, you can transform ordinary cotton yarn into a beautiful handmade Christmas crochet coaster that brings warmth, color, and festive charm to your celebrations year after year.