
This combination makes it suitable for hair accessories, clothing decorations, handmade gifts, and seasonal ornaments. The design looks sophisticated without requiring complicated crochet techniques.
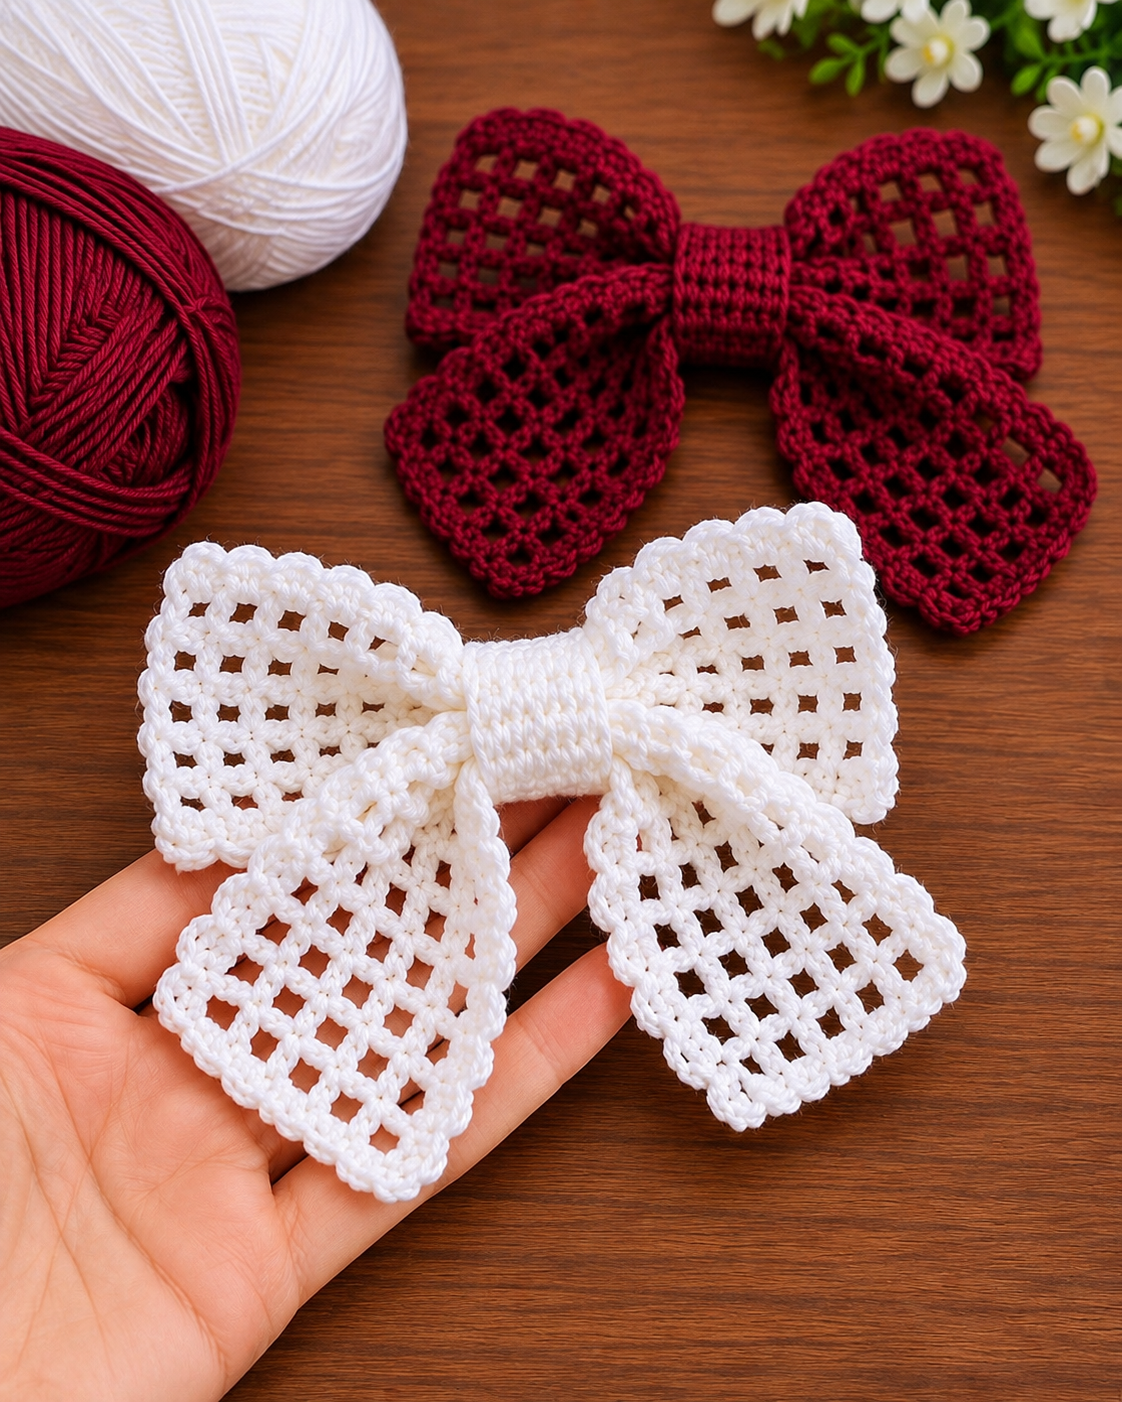
Creating your own crochet lace ribbon bow is also a wonderful way to practice basic stitches while making something beautiful and useful. The project requires relatively little yarn, making it an excellent choice for using leftover cotton from previous creations. With the right materials, careful measurements, and a few simple finishing techniques, you can create a bow inspired by the elegant white and deep burgundy examples shown in the image.
1. Materials and Essential Crochet Techniques for a Delicate Lace Bow
Choosing the correct materials is one of the most important steps when creating a beautiful crochet bow. Because this design features delicate openwork details, cotton yarn is an excellent option. It provides stitch definition, maintains the shape of the bow, and gives the finished accessory a smooth appearance.
For a result similar to the image, choose sport-weight or fine cotton yarn in white, burgundy, or another elegant shade. Mercerized cotton is especially suitable because of its subtle sheen and durability. A 2.5 mm or 3.0 mm crochet hook generally works well with fine cotton, although your ideal hook size will depend on the yarn.
Materials Needed
-
Fine cotton yarn in white, burgundy, or your preferred color
-
2.5 mm to 3.0 mm crochet hook
-
Sharp scissors
-
Yarn needle
-
Measuring tape
-
Stitch markers, if desired
-
Small hair clip, elastic, or brooch pin for optional attachment
-
Fabric stiffener, optional
The finished crochet lace bow in this tutorial is designed to measure approximately 15 cm across and 11–12 cm from top to bottom, depending on how the tails are arranged. These measurements can easily be adjusted by changing the number of foundation chains or working additional rows.
Understanding a few basic US crochet stitches will make the process much easier. The pattern uses chain stitches, single crochet, double crochet, and slip stitches. These common techniques create the mesh openings, decorative borders, and neatly finished center.
Crochet Abbreviations — US Terms
| Abbreviation | Stitch |
|---|---|
| ch | Chain |
| sc | Single crochet |
| dc | Double crochet |
| sl st | Slip stitch |
| st | Stitch |
| sp | Space |
| rep | Repeat |
| RS | Right side |
| WS | Wrong side |
The main lace texture is created using a simple double crochet mesh stitch. By alternating double crochet stitches with chain spaces, you can produce the open squares visible throughout the bow. Consistent tension is important for maintaining evenly spaced openings.
Before beginning the complete project, consider making a small practice swatch. This allows you to become comfortable with the crochet mesh pattern and check whether the finished fabric is flexible enough to fold into a bow. Avoid pulling the yarn too tightly because the mesh should remain soft and slightly flowing.
2. Step-by-Step Instructions for Making the Crochet Lace Bow
The design is constructed from two main crocheted pieces: a folded lace rectangle that forms the upper loops and a separate lace strip that creates the flowing lower tails. A narrow crocheted band wraps around the center, bringing all the pieces together into an elegant decorative crochet bow.
Step 1: Crochet the Main Bow Rectangle
Begin with your chosen cotton yarn and make a foundation chain of 49 stitches. This creates a rectangle approximately 28–30 cm long with the suggested yarn and hook, although actual measurements depend on your tension.
Row 1: Work 1 dc into the fourth chain from your hook. Continue working 1 dc into each remaining chain. Turn your work.
Row 2: Ch 3 (counts as 1 dc), skip the next stitch, then work ch 1, skip 1 st, dc in the next st. Repeat across, working the final dc into the top of the turning chain as needed to maintain the mesh.
Row 3: Ch 3, turn. Work 1 dc into each dc and 1 dc into each chain space across. This creates a reinforced row that helps stabilize the fabric.
Continue alternating the mesh row with the solid double crochet row until your rectangle measures approximately 9 cm wide. To achieve a more open lace appearance, you can repeat the mesh rows instead, maintaining the same stitch positions.
Once the rectangle reaches the desired dimensions, fasten off and leave a long yarn tail. This tail can later be used to secure the folded loops. Your completed rectangle will become the upper portion of the crochet ribbon bow.
Step 2: Create the Flowing Lace Tails
The long lower tails give this crochet bow pattern its romantic appearance. Their delicate mesh texture should coordinate with the main rectangle while allowing the ends to hang naturally.
Make a foundation chain of 19 stitches. Work 1 dc into the fourth chain from the hook and continue with double crochet stitches across. Turn your work.
For the following row, ch 3 and work a mesh pattern by alternating double crochet stitches and chain-one spaces. Continue with this pattern, keeping the same number of openings in each mesh row.
Work until the strip measures approximately 25–27 cm long. The strip should be wide enough to create attractive tails without looking too bulky beneath the center.
To create gently rounded ends, finish each short edge with a row of single crochet stitches. Work 3 sc into each corner to help the border curve smoothly without pulling the lace out of shape.
Lay the completed strip flat and fold it at its midpoint. When positioned behind the upper bow loops, each half will form one flowing tail.
Step 3: Shape the Upper Bow Loops
Place the large lace rectangle on a flat surface with the right side facing downward. Bring the two short ends toward the center, allowing them to overlap slightly.
The folded rectangle should now resemble a wide ribbon with two rounded sides. Adjust the overlap until both loops appear symmetrical and balanced.
Using a yarn needle and the long yarn tail, stitch the overlapping ends together through the center. These stitches will remain hidden beneath the decorative band.
Pinch the middle of the rectangle together, forming small folds that create the characteristic bow silhouette. A few secure stitches through the gathered center will help maintain its shape.
Do not pull so tightly that the lace becomes distorted. The finished crochet bow loops should look full, soft, and gracefully rounded.
Step 4: Attach the Lower Tails
Place the folded lace strip behind the gathered upper loops. Position the midpoint of the strip directly behind the bow’s center.
Arrange the two tails so they spread outward in a gentle V shape. The lower ends should remain visible beneath the upper loops, creating a balanced decorative appearance.
Use matching yarn and a needle to stitch the folded midpoint securely to the back of the upper bow. Work through several stitches to ensure the two pieces remain connected.
At this stage, your handmade lace bow should resemble the reference design, with wide upper loops, flowing lower sections, and a gathered center.
Step 5: Crochet the Center Band
The center band is a small but essential detail because it conceals the joining stitches and gives the entire accessory a beautifully finished appearance.
Ch 9 and work 1 sc into the second chain from the hook and each remaining chain. You should have 8 sc stitches.
Continue working rows of single crochet until the strip is long enough to wrap snugly around the gathered center, usually approximately 9–11 cm.
Wrap the strip around the middle of the bow, with the seam positioned at the back. Sew the two short ends together, ensuring the band fits securely without crushing the lace.
For an elegant finish, adjust the crochet center band so its edges lie flat and the upper loops remain evenly gathered.
Step 6: Finish and Shape the Bow
After assembling all the pieces, carefully weave in every loose yarn end using a yarn needle. Avoid cutting the yarn too close to the stitches because the accessory may loosen after repeated use.
Lay the bow on a clean towel and gently shape both upper loops. Arrange the lower tails so they hang symmetrically beneath the center.
Lightly dampen the bow and pin it into shape if necessary. Allow it to dry completely before removing the pins.
For a firmer crochet hair bow, use a small amount of fabric stiffener on the loops and tails, following the manufacturer’s instructions. This is optional, especially when working with cotton yarn that already maintains its shape.
3. Beautiful Color Combinations and Creative Ways to Use Crochet Lace Bows
One reason the crochet lace bow pattern is so appealing is its versatility. Even a simple change in yarn color can completely transform the finished accessory, allowing it to coordinate with different seasons, outfits, and decorative themes.
The elegant white bow shown in the image has a delicate and classic appearance. White cotton highlights the openwork stitching and creates a clean finish, making it particularly suitable for bridal accessories, romantic decorations, and special handmade gifts.
Deep burgundy creates an entirely different effect. Its rich tone emphasizes the dimensional texture of the stitches and produces a sophisticated accessory that works especially well with autumn and winter decorations.
Elegant Color Combinations
| Color combination | Suggested style |
|---|---|
| White and ivory | Classic, bridal, romantic |
| Burgundy and cream | Vintage, elegant, festive |
| Blush pink and white | Soft, feminine, delicate |
| Navy blue and white | Timeless, sophisticated |
| Emerald green and gold | Christmas, luxurious |
| Lavender and pearl white | Spring, graceful |
| Dusty rose and beige | Vintage, neutral |
For a more decorative variation, use one color for the upper loops and another for the lower tails. This creates subtle contrast while preserving the delicate appearance of the crochet lace accessory.
These bows can also become beautiful handmade hair accessories. Attach a metal alligator clip or fabric-covered hair elastic to the back of the center band. The lace construction makes the bow lightweight, while the wide loops create an eye-catching silhouette.
Another creative possibility is using crochet bows as embellishments for handmade handbags, dresses, cardigans, or decorative baskets. Their graceful shape can transform even a simple fabric accessory into a unique handcrafted piece.
During the holiday season, burgundy, forest green, ivory, and metallic-inspired yarn combinations are particularly attractive. A Christmas crochet bow can decorate wreaths, gift packages, stockings, or even a beautifully arranged Christmas tree.
Crochet bows are also wonderful small gifts for friends and family. Because they require relatively little yarn, you can create several pieces in coordinating shades and package them together as a thoughtful collection of handmade accessories.
4. Professional Finishing Tips, Size Adjustments, and Common Mistakes
Achieving a polished crochet lace bow depends on more than simply following the stitches. Paying attention to tension, symmetry, joining methods, and final shaping will make a noticeable difference in the appearance of your finished project.
One of the most common mistakes is working the mesh stitches too tightly. Excessively tight chains can make the openwork sections appear uneven and prevent the bow from folding naturally. Maintain a relaxed, consistent tension throughout the project.
Another important detail is creating evenly sized upper loops. Before permanently attaching the center band, arrange the folded rectangle so both sides have approximately equal width. Adjust the gathered folds until the bow looks balanced.
If your finished lace appears too soft or floppy, consider using a slightly smaller crochet hook or a firmer cotton yarn. You can also apply a small amount of fabric stiffener after assembly to help maintain the desired shape.
Recommended Finished Sizes
| Bow size | Approximate width | Best use |
|---|---|---|
| Mini | 6–8 cm | Hair clips, baby accessories |
| Small | 9–11 cm | Clothing, small gifts |
| Medium | 12–15 cm | Hair bows, handbags |
| Large | 16–20 cm | Home decorations, wreaths |
To create a smaller version of the crochet bow, reduce the length and width of the main rectangle proportionally. Remember to keep the foundation-chain count compatible with the mesh stitch repeat.
For a larger bow, increase the foundation chain and add additional rows until the fabric reaches the desired measurements. The lower tail strip should also be enlarged so the entire design maintains its proportions.
Always check that the center band completely covers the gathering stitches. A narrow or loosely fitted band can make the bow appear unfinished, while an overly tight band may flatten the upper loops.
Finally, take time to block the completed accessory. Blocking crochet lace helps straighten the mesh openings, smooth the edges, and define the bow’s elegant silhouette. It is particularly helpful when working with cotton yarn.
Frequently Asked Questions About Crochet Lace Bows
Is this crochet bow suitable for beginners?
Yes. The pattern uses basic crochet stitches, including chains, single crochet, double crochet, and slip stitches. Beginners who are familiar with these techniques can complete the project with a little patience.
What is the best yarn for a crochet lace bow?
Fine cotton yarn is an excellent option because it produces well-defined stitches and helps maintain the delicate mesh texture. Mercerized cotton is especially attractive for accessories that require a smooth, elegant finish.
How much yarn is needed for one bow?
A medium-sized bow generally requires approximately 20–35 grams of fine cotton yarn, depending on the yarn thickness, stitch tension, and final dimensions.
Can I make this crochet bow without sewing?
Some assembly is necessary to achieve the layered design. However, the sewing is minimal and can be completed with a yarn needle and matching yarn.
How can I make the crochet bow more rigid?
Try using a firmer cotton yarn, a slightly smaller crochet hook, or a suitable fabric stiffener. Gentle blocking can also improve the shape and appearance of the finished accessory.
Can this pattern be used for Christmas decorations?
Absolutely. Burgundy, red, green, ivory, and gold-inspired shades are beautiful choices for festive crochet bows. You can attach them to wreaths, decorative garlands, gift packages, and Christmas trees.
How should I wash a handmade crochet bow?
Hand-washing in cool water with mild detergent is usually the safest option for cotton crochet accessories. Gently press out excess moisture without twisting, reshape the bow, and allow it to air-dry flat. Always follow the yarn manufacturer’s care instructions.
Can I sell bows made using this tutorial?
You can use these instructions to create handmade bows for personal use, gifts, or sale. When selling finished accessories, consider using secure attachments, accurate product descriptions, and appropriate care instructions.
Conclusion
The elegant crochet lace bow is a delightful project that proves how basic crochet techniques can produce beautiful and sophisticated results. Its delicate mesh stitching, flowing tails, and neatly wrapped center combine to create a handmade accessory with timeless appeal.
Whether you choose classic white, rich burgundy, or another favorite shade, this crochet bow pattern offers endless opportunities for creativity. By following the step-by-step instructions, adjusting the measurements, and finishing each detail carefully, you can create an accessory that looks graceful and professionally handmade.
With its versatile design and relatively small yarn requirements, the handmade crochet lace bow is a wonderful addition to any crochet collection. It can be a lovely personal accessory, a thoughtful gift, or a decorative element that adds warmth and beauty to special occasions throughout the year.