
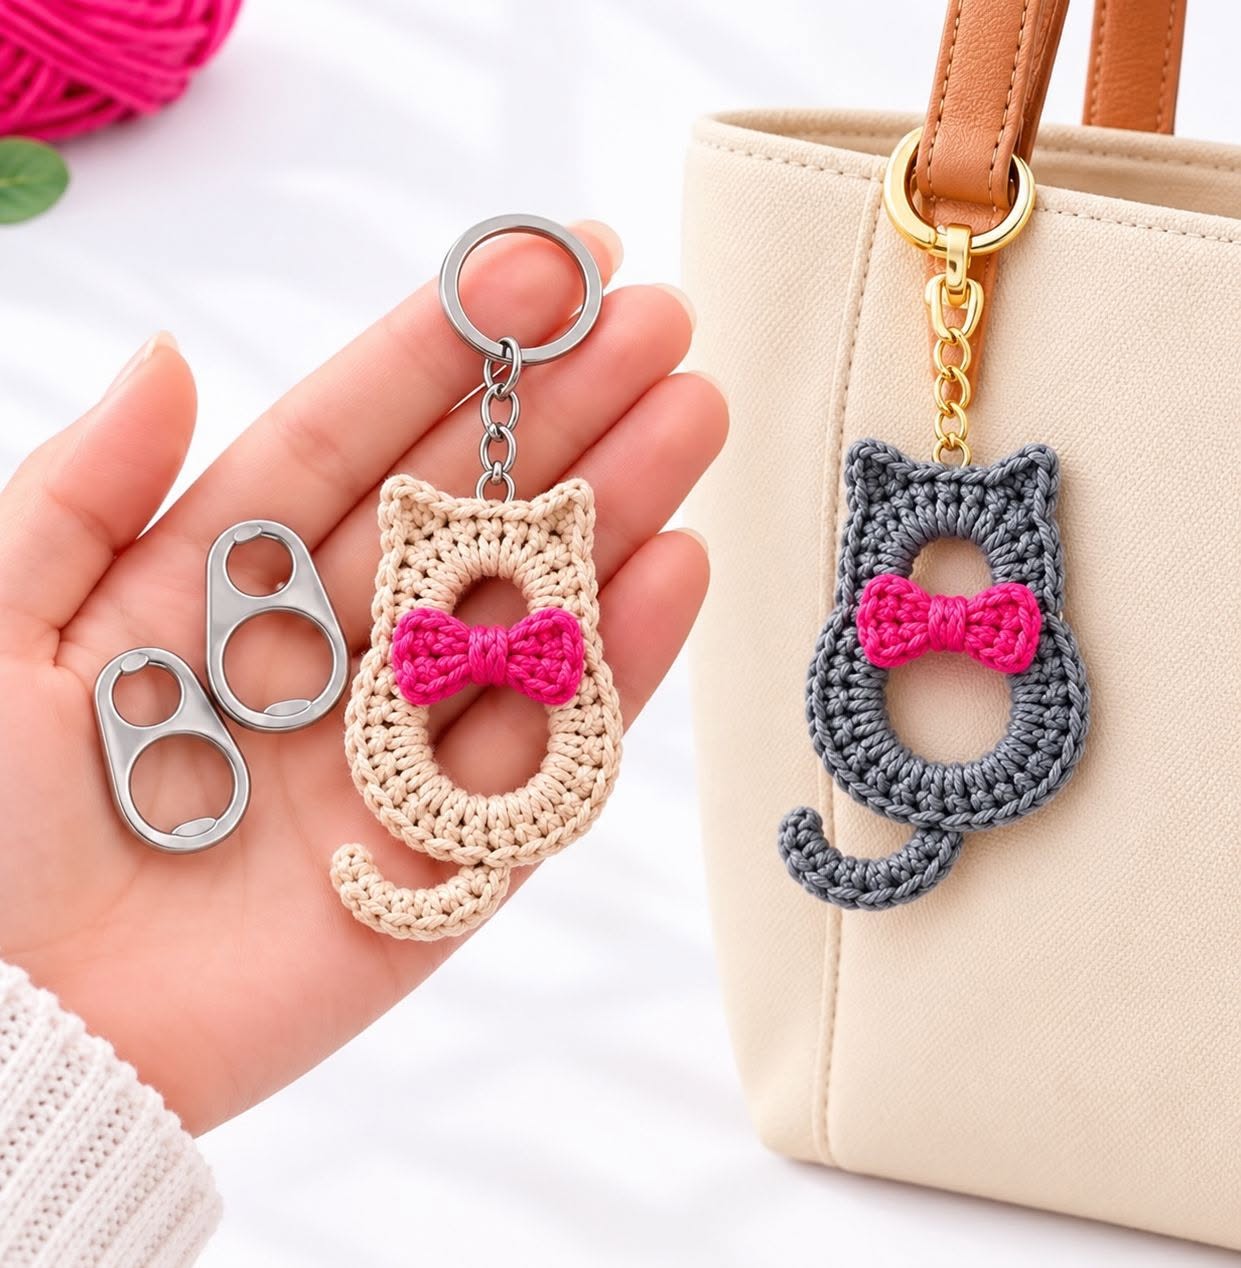
The handmade crochet cat keychain is especially appealing because it combines traditional crochet techniques with a modern and playful appearance. Its open-centered body gives the piece an elegant shape while keeping it lightweight.
The delicate stitches around the circular openings create an attractive texture, and the small bow adds a colorful finishing touch. Whether made in soft beige, sophisticated gray, or vibrant shades, these miniature cats can become beautiful personalized gifts.
Another wonderful feature of this easy crochet cat keychain pattern is its versatility. Crafters can use small amounts of leftover yarn, recycled materials, or matching colors to create different designs. The project is suitable for adventurous beginners who are comfortable with basic stitches and crocheting around small rings. With clear instructions, the right supplies, and a little patience, you can create a lovely crochet accessory inspired by the charming cats shown in the image.
1. Materials and Supplies for the Crochet Cat Keychain
Creating a beautiful crochet cat keychain begins with selecting suitable materials. Because this project is small, lightweight yarn and precise stitching are essential for achieving a neat and professional appearance. Cotton yarn is particularly recommended because it produces well-defined stitches, maintains its shape, and resists excessive stretching.
For a design similar to the photograph, choose beige or gray cotton yarn for the cat’s body and bright pink yarn for the decorative bow. The contrast between the neutral body and vibrant accessory makes the finished keychain more attractive. Other popular color combinations include white and red, lavender and cream, black and pink, or navy blue and yellow.
You will also need two small recycled aluminum can tabs of similar size. These form the internal structure of the cat and help create the two characteristic openings. Carefully inspect the tabs before use, making sure there are no sharp edges. Smooth any rough areas and discard damaged tabs. If you prefer, use purpose-made craft rings instead.
The crochet hook should match the thickness of your yarn. A 2.0 mm to 2.5 mm crochet hook generally works well with fine cotton yarn, producing compact stitches that cover the metal structure completely. A smaller hook can be helpful when working around narrow openings or attaching decorative elements.
Additional supplies include a yarn needle, sharp scissors, a stitch marker, a metal key ring, several small chain links, and a sturdy jump ring. Jewelry pliers are helpful when connecting the finished crochet cat to the keychain hardware. Choose quality metal accessories that can withstand daily use without opening or bending easily.
For this tutorial, the finished cat will measure approximately 7–9 cm tall, including its curled tail but excluding the metal key ring. The width will be approximately 4–5 cm, depending on the tabs, yarn thickness, and crochet tension. These measurements are estimates rather than exact dimensions taken from the photograph.
Materials Checklist
-
Fine cotton yarn in beige, gray, or your preferred color
-
Small amount of bright pink cotton yarn
-
2.0 mm–2.5 mm crochet hook
-
Two matching aluminum can tabs with smooth edges
-
Metal key ring and short chain
-
Small jump rings
-
Yarn needle
-
Sharp scissors
-
Stitch marker
-
Jewelry pliers
-
Fabric glue, optional
-
Measuring tape
Crochet Abbreviations – US Terms
| Abbreviation | Meaning |
|---|---|
| ch | Chain |
| sl st | Slip stitch |
| sc | Single crochet |
| hdc | Half double crochet |
| dc | Double crochet |
| tr | Treble crochet |
| inc | Increase |
| st | Stitch |
| sts | Stitches |
| FO | Fasten off |
All instructions below use US crochet terminology.
2. Step-by-Step Crochet Cat Body Pattern
The main structure of this crochet cat keychain pattern is created by joining two recycled aluminum tabs vertically. Their openings form the distinctive hollow sections of the cat’s body. One opening represents the upper portion of the cat, while the second creates the rounded lower body.
Begin by cleaning and drying both aluminum tabs thoroughly. Place one tab above the other, overlapping their narrow ends slightly. Secure them with several tight wraps of cotton yarn. The two openings should remain visible and aligned vertically. This basic arrangement provides a stable foundation for crocheting the cat’s silhouette.
Attach your main-colored yarn to the lower tab using a slip knot. Work single crochet stitches evenly around its outer edge, inserting the hook through the metal opening and bringing the yarn around the tab. Add enough stitches to cover the metal completely without overcrowding the surface. For many standard tabs, approximately 22–30 stitches will be sufficient.
When you reach the joining area between the two tabs, continue crocheting around the upper tab. Keep your stitches compact and close together. The upper tab should receive approximately 18–26 single crochet stitches, depending on its size. Adjust the number as necessary to prevent gaps and maintain an even appearance.
To create the characteristic pointed ears, work a small cluster of taller stitches at the upper corners of the top tab. At the first corner, crochet 1 sc, 1 hdc, 1 dc, 1 hdc, and 1 sc into the same corner area or neighboring anchor points. Repeat at the opposite corner. These groups create two raised triangular shapes resembling cat ears.
Finish the body by working a decorative round of single crochet around the outside edges wherever an additional round can be made without covering the openings. Slip stitch into the first stitch, cut the yarn, and weave in the loose end. The result should resemble a miniature cat silhouette with two hollow sections and two clearly visible ears.
Creating the Curled Crochet Tail
The curled tail is one of the most distinctive features of this handmade accessory. It extends from the lower side of the cat and creates a playful shape that makes the silhouette instantly recognizable.
Step 1: Attach the main-colored yarn near the lower-right side of the cat’s body.
Step 2: Chain 18 stitches. If you prefer a longer tail, increase the chain to 22 stitches.
Step 3: Starting in the second chain from the hook, work 1 sc into each of the first 5 chains.
Step 4: Work 2 sc into each of the next 6 chains. These increases encourage the tail to curve naturally.
Step 5: Work 1 sc in each remaining chain. Fasten off, leaving a long yarn tail for sewing.
Step 6: Shape the tail into a gentle upward curl and secure its base firmly to the body with the yarn needle.
The finished tail should be flexible but firmly attached. Avoid excessive tension while sewing, since tight stitches may distort the lower opening of the cat.
3. How to Crochet the Pink Bow and Assemble the Keychain
The decorative bow gives this cute crochet cat keychain its charming personality. In the reference design, a vibrant pink bow is positioned between the two openings, creating a balanced and attractive contrast against the neutral-colored body.
Begin the bow by making a magic ring with pink yarn. Chain 3, then work 3 double crochet stitches into the ring. Chain 3 and slip stitch into the center of the ring. This forms the first half of the bow and gives it a soft, rounded triangular shape.
To create the second half, chain 3 again and work another 3 double crochet stitches into the same magic ring. Chain 3 and finish with a slip stitch into the center. Pull the magic ring closed carefully, bringing both bow sections together in the middle.
Fasten off, leaving a long yarn tail. Wrap this yarn around the center of the bow approximately 6–8 times. The wraps should be firm enough to define the center without crushing the stitches. Secure the yarn at the back with a small knot and weave in the remaining end.
Position the completed bow across the central joining area of the cat’s body. The bow should cover the connection between the two metal tabs while leaving both circular openings visible. Sew it in place using matching pink yarn. Small, discreet stitches will provide a stronger attachment than glue alone.
Next, prepare the keychain hardware. Open a metal jump ring using jewelry pliers and attach it to a reinforced crochet loop at the top center of the cat. A small loop of tightly stitched cotton yarn can be added between the ears, provided it is secured through several body stitches and around the underlying structure.
Connect the jump ring to a short metal chain and attach the chain to the key ring. Close all jump rings completely to prevent accidental separation. Gently pull on the finished attachment to make sure the crochet piece is firmly connected.
Before using your handmade cat keychain, inspect all stitches and attachments. Trim loose yarn ends, adjust the ears, and reshape the curled tail if necessary. The finished accessory should be lightweight, comfortable to carry, and sturdy enough for decorative everyday use.
Tips for a Professional Finish
Choose a consistent crochet tension throughout the project. Uneven stitching can cause the metal tabs to remain visible or make the cat’s outline appear asymmetrical.
When working around the aluminum tabs, distribute stitches evenly and check the shape frequently. If the yarn bunches together, remove a few stitches. If gaps appear, add more stitches where necessary.
For the bow, use a slightly finer yarn or smaller crochet hook if you want a compact decorative detail. A smaller bow will give the cat a delicate appearance, while a larger bow can create a more playful design.
Avoid attaching heavy charms or beads to the body. Lightweight decorations are better suited to small crocheted accessories because they reduce tension on the stitches and keychain connections.
If you plan to make several keychains as gifts, consider creating a coordinated collection using different yarn colors. Matching bows, colorful metal chains, and small personalized tags can make each piece unique.
For a more refined appearance, lightly shape the finished crochet with your fingers. If needed, use a little moisture to smooth the stitches and allow the piece to dry completely before attaching it to a handbag.
4. Creative Ideas, Color Combinations, and Handmade Gift Inspiration
One of the most enjoyable aspects of making a crochet cat keychain is experimenting with different colors and decorative details. Although the photograph features elegant beige and gray cats with bright pink bows, the same basic design can be adapted to many styles and occasions.
For a romantic appearance, combine cream-colored cotton yarn with a dusty rose or burgundy bow. This combination works beautifully with neutral handbags and makes an attractive accessory for everyday use. Soft pastel shades can also create charming designs suitable for birthdays and thoughtful handmade gifts.
If you prefer a sophisticated color palette, try charcoal gray with a gold-colored bow, deep navy with ivory, or warm caramel with cream. These combinations produce a refined appearance while preserving the playful cat shape. Small metallic accessories can enhance the overall design.
Seasonal versions are another creative possibility. For Christmas, make red, green, and white crochet cats with contrasting bows. Halloween-inspired keychains can feature black bodies with orange or purple bows. Spring versions look especially lovely in lavender, mint green, pale yellow, and baby blue.
These miniature cats are also an excellent way to use leftover yarn from larger crochet projects. Because the main body requires only a small amount of cotton yarn, you can create several accessories from materials already available in your craft supplies. This makes the project economical and practical.
For crafters interested in selling handmade accessories, crochet cat keychains can be presented as coordinated sets or personalized gifts. Carefully finished stitches, durable hardware, harmonious colors, and attractive packaging can help improve their perceived quality. Always calculate material expenses and labor before setting a selling price.
Creative Variations to Try
Minimalist Cat Keychain: Use a single neutral yarn color for the entire piece, including the bow.
Pastel Cat Collection: Create multiple cats in baby pink, lavender, mint green, and powder blue.
Christmas Cat Keychain: Combine a deep green body with a red bow and gold-colored hardware.
Elegant Vintage Cat: Use cream-colored cotton with a dusty rose bow and antique brass keychain findings.
Personalized Gift Cat: Add a small initial charm to the metal chain rather than directly to the crochet stitches.
Matching Friendship Keychains: Make two cats in complementary colors and package them together as a handmade gift set.
Frequently Asked Questions About Crochet Cat Keychains
1. Is this crochet cat keychain suitable for beginners?
Yes. This project is appropriate for adventurous beginners who already understand chains, single crochet, double crochet, and slip stitches. Working around small metal tabs may require additional patience, but the basic techniques are straightforward.
2. Can I make this keychain without recycled aluminum tabs?
Yes. You can substitute small purpose-made craft rings or create two crocheted rings using chains joined into circles. A version made entirely from yarn may be softer and require additional edging to maintain its shape.
3. What is the best yarn for crochet keychains?
Fine cotton yarn is an excellent choice because it creates defined stitches and maintains its shape. Mercerized cotton can give the finished accessory a smooth, slightly polished appearance.
4. How large should the finished crochet cat be?
The example in this tutorial measures approximately 7–9 cm tall, including the tail, and 4–5 cm wide. The final dimensions depend on the size of the tabs, yarn weight, hook size, and individual crochet tension.
5. Can I wash a crochet cat keychain?
A yarn-only version can generally be hand-washed according to the yarn manufacturer’s instructions. For versions containing aluminum tabs and metal hardware, gently spot-clean with a damp cloth and allow the accessory to dry completely.
6. How do I prevent the pink bow from falling off?
Sew the bow directly to the crochet body using several secure stitches. Reinforce the center and both sides of the bow to prevent it from rotating or loosening during use.
7. Can I sell handmade crochet cat keychains?
Yes. Original handmade accessories can be offered at craft fairs, local markets, and online shops. Focus on quality materials, secure construction, accurate product descriptions, and attractive presentation.
8. How long does it take to make one crochet cat keychain?
An experienced crocheter may complete a simple version in approximately 30–60 minutes. Beginners may need more time to cover the tabs evenly, shape the ears, and attach the decorative elements.
9. Are recycled aluminum tabs safe to use?
Only use thoroughly cleaned tabs with smooth, undamaged edges. They should be completely covered or otherwise protected from contact with sharp metal. The finished item is a decorative accessory, not a toy for small children.
10. What makes this crochet cat keychain different from traditional amigurumi?
Unlike stuffed amigurumi animals, this design uses a flat, open-centered structure. It does not require fiberfill or complicated shaping, making it a lightweight alternative to traditional three-dimensional crochet toys.
Conclusion
The Crochet Cat Keychain Pattern is a creative and practical project that combines simple crochet techniques with an adorable decorative design. Its pointed ears, hollow body, curled tail, and bright pink bow give the finished accessory a distinctive appearance that can complement handbags, purses, backpacks, and key collections.
By choosing quality cotton yarn, carefully covering the underlying structure, and securing every decorative detail, you can create a beautiful handmade accessory with a professional finish. The design also offers endless opportunities for personalization through different colors, bows, and metal findings.
Whether you enjoy crochet as a relaxing hobby, love making thoughtful gifts, or create handmade products for sale, this DIY crochet cat keychain is a delightful addition to your collection of small crochet projects. With just a little yarn, basic supplies, and creativity, you can turn simple materials into a charming accessory that celebrates the beauty of handmade craftsmanship.