
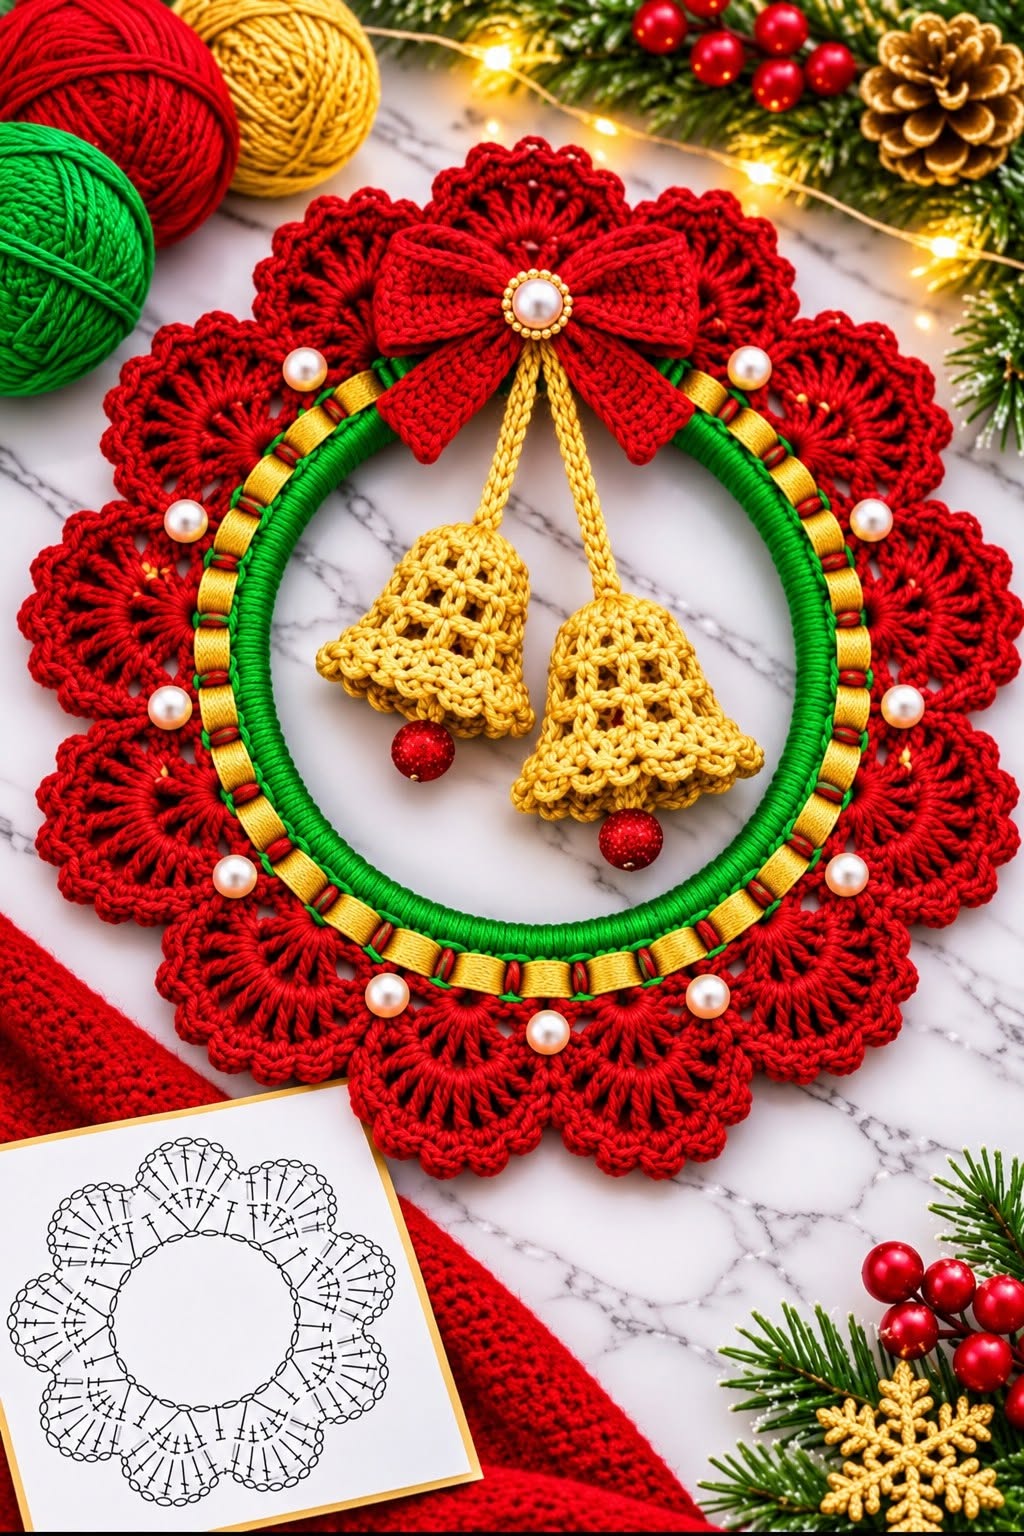
One of the most attractive features of this handmade crochet Christmas wreath is its combination of intricate craftsmanship and classic seasonal colors. The red scalloped motifs create a luxurious floral appearance, while the green wrapped ring provides a sturdy foundation. Small pearl embellishments add elegance, and the golden crochet bells hanging in the center make the decoration especially festive. This project is ideal for crafters who enjoy creating unique Christmas decorations.
Although the finished wreath looks sophisticated, it can be made using familiar crochet techniques and a little patience. The project involves crocheting decorative fan motifs, covering a circular base, making a beautiful red bow, and creating two miniature golden bells.
In this tutorial, you will learn how to create your own Christmas crochet wreath pattern, including the materials, measurements, stitches, assembly instructions, and finishing details needed to achieve a professional handmade appearance.
1. Materials and Preparation for Your Crochet Christmas Wreath
Before beginning your crochet holiday wreath, gather all the materials and choose yarn colors that complement each other. Traditional Christmas red, emerald green, and metallic gold create a timeless combination that looks wonderful on doors, walls, windows, or above a fireplace.
For the best results, use smooth cotton yarn or a cotton-blend yarn. These fibers provide defined stitches and help the decorative motifs maintain their shape. Slightly shiny yarn can also enhance the appearance of the golden bells and ribbon details.
Materials Needed
-
Red cotton yarn, approximately 100–130 g.
-
Emerald green cotton yarn, approximately 50–70 g.
-
Golden yellow or metallic gold yarn, approximately 30–40 g.
-
Crochet hook: 3.0 mm or 3.5 mm.
-
Circular wreath base, approximately 20 cm in diameter.
-
Small white pearl beads, approximately 12–16 pieces.
-
Two small red decorative beads for the bell clappers.
-
Golden satin ribbon, approximately 1 cm wide.
-
Yarn needle and sewing needle.
-
Matching sewing thread.
-
Scissors and stitch markers.
-
Optional fabric stiffener for shaping the crochet decorations.
Recommended Finished Measurements
| Component | Approximate size |
|---|---|
| Inner wreath base | 20 cm diameter |
| Finished wreath | 29–32 cm diameter |
| Red decorative motifs | 6–7 cm wide |
| Golden bells | 6–7 cm tall |
| Red crochet bow | 11–13 cm wide |
| Hanging cords | 8–11 cm long |
These measurements are suggestions for a medium-sized decorative wreath. You can make a larger wreath by increasing the diameter of the foundation ring and adding more red motifs around the outside.
Crochet Abbreviations (US Terms)
| Abbreviation | Meaning |
|---|---|
| ch | Chain |
| sl st | Slip stitch |
| sc | Single crochet |
| hdc | Half double crochet |
| dc | Double crochet |
| tr | Treble crochet |
| st | Stitch |
| sts | Stitches |
| sp | Space |
| rep | Repeat |
| BLO | Back loop only |
The decorative red petals are created primarily with double crochet, treble crochet, chains, and slip stitches. These stitches form the openwork floral design visible around the wreath.
It is helpful to make one complete decorative motif before producing the remaining pieces. This allows you to check the size, test the yarn tension, and make adjustments before assembling the wreath.
2. Step-by-Step Crochet Pattern for the Red Floral Wreath
The impressive red outer border is the centerpiece of this Christmas wreath crochet design. Its repeating fan-shaped decorations resemble small flowers or scalloped petals, creating an elegant circular frame around the green center.
For an easy-to-assemble version, make twelve individual fan-shaped motifs and attach them around the wreath. This modular method is beginner-friendly and allows each motif to be positioned neatly before sewing.
Step 1: Prepare the Circular Foundation
Begin with a sturdy plastic, wooden, or foam wreath ring measuring approximately 20 cm in diameter. Choose a smooth foundation that will hold its shape when the decorations are attached.
Using emerald green yarn, wrap the entire circular foundation tightly. Keep each wrap close to the previous one so that the underlying ring is completely covered.
For extra security, apply small amounts of craft glue to the back of the foundation as you wrap. Avoid excessive glue because it can make the yarn stiff or uneven.
After covering the ring, secure the yarn end with a yarn needle. The completed green foundation should have a smooth, consistent appearance.
Step 2: Crochet the Red Fan Motifs
Each motif is worked in turning rows to create a curved, openwork fan. The pattern below makes a scalloped fan inspired by the floral sections of the photographed wreath.
Row 1: With red yarn, ch 5. Work 5 dc into the fifth ch from the hook. Turn. You will have 6 dc, counting the starting chain as a stitch.
Row 2: Ch 3 (counts as first dc), dc in the same stitch, then work 2 dc in each remaining stitch across. Turn. (12 dc.)
Row 3: Ch 4 (counts as a tr), tr in the same stitch. Work 2 tr in each of the next 11 stitches. Turn. (24 tr.)
Row 4: Ch 1. Work (sc in next st, skip next st, 5 dc in next st, skip next st) six times. Finish with a sl st along the side edge and fasten off.
This creates a curved fan with a decorative scalloped upper edge. The increases produce the spreading petal shape, while the final row adds the delicate rounded border.
Make twelve matching motifs, or adjust the quantity to achieve a full floral appearance around the ring. Exact spacing will depend on your yarn thickness and finished motif width.
Step 3: Shape and Arrange the Motifs
Lay the motifs flat and gently shape them with your fingers. If necessary, lightly dampen each piece and pin it into the desired shape until completely dry.
Place the motifs around the outer edge of the green ring, with the narrow ends facing inward and the scalloped edges pointing outward.
Overlap neighboring motifs slightly to create a continuous floral border. Aim for an evenly spaced design with no large gaps between the red sections.
Temporarily secure the pieces with removable stitch markers or pins. Check the arrangement from above before permanently attaching them.
Step 4: Attach the Red Decorations
Thread a yarn needle with matching red yarn. Sew the narrow base of each fan motif to the back or outer edge of the green-covered ring.
Use several small stitches to keep each motif secure. Avoid pulling too tightly, as this may distort the shape of the decorative fans.
Once all the motifs are attached, inspect the front of the wreath. Adjust any overlapping petals so the circular border looks balanced.
For a more decorative finish, weave narrow golden ribbon around the outside of the green foundation, just below the red crochet motifs. Secure the ribbon at regular intervals.
Step 5: Add the Pearl Embellishments
Small white pearl beads provide a beautiful contrast against the red and green yarn. They also give the wreath a more elegant Christmas appearance.
Sew one pearl near the inner edge of each red fan motif using strong matching thread. Keep the pearls evenly positioned around the circle.
If you prefer a simpler design, replace the pearls with small white crochet bobbles. This creates a fully crocheted decoration without separate beads.
The completed wreath foundation should now feature a bright green inner ring, a golden decorative border, and a full circle of textured red crochet petals.
3. How to Crochet the Golden Christmas Bells and Red Bow
The hanging golden crochet Christmas bells give this wreath its distinctive holiday character. They create a beautiful focal point inside the circular opening, while the oversized red bow completes the festive arrangement.
The bells are worked from the top down in continuous spiral rounds. A small expansion at the bottom creates the flared shape of traditional Christmas bells.
For a more luxurious finish, use metallic gold cotton yarn or golden yellow yarn with a subtle sheen. A 3.0 mm crochet hook will help produce firm stitches and a structured shape.
Step 6: Crochet the First Golden Bell
Begin with a magic ring using golden yarn.
Round 1: Work 6 sc into the magic ring. (6 sts.)
Round 2: Work 2 sc into each stitch around. (12 sts.)
Round 3: (Sc in next st, 2 sc in next st) repeat around. (18 sts.)
Round 4: Work 1 sc in each stitch around. (18 sts.)
Round 5: (Sc in next 2 sts, 2 sc in next st) repeat around. (24 sts.)
Rounds 6–7: Work 1 sc in each stitch around. (24 sts.)
Round 8: (Sc in next 3 sts, 2 sc in next st) repeat around. (30 sts.)
Round 9: Work 1 sc in each stitch around. (30 sts.)
Round 10: (Sc in next 4 sts, 2 sc in next st) repeat around. (36 sts.)
Round 11: Work 1 sc in each stitch around. (36 sts.)
Round 12: (Sc in next 5 sts, 2 sc in next st) repeat around. (42 sts.)
Round 13: Work 1 sc in each stitch around. (42 sts.)
Round 14: Work 2 dc in each stitch around. (84 sts.)
Round 15: (Sc in next st, skip next st, 5 dc in next st, skip next st) repeat around 21 times. Join with sl st and fasten off.
The last two rounds create a decorative flared edge. If the bell becomes too ruffled, replace Round 14 with one dc in each stitch and work a smaller scalloped edging.
Step 7: Make the Second Bell and Add the Clappers
Repeat the same pattern to create a matching golden bell. Use identical yarn, hook size, and tension so both bells have a similar shape.
Attach a small red bead to a short strand of golden yarn. Secure the strand inside the top of each bell, allowing the bead to hang just below the lower edge.
For a softer, child-friendly alternative, crochet a small red ball instead of using a separate bead. This reduces the number of small detachable components.
If the finished bells need additional structure, gently shape them with a suitable fabric stiffener. Allow them to dry completely before hanging.
Step 8: Create the Hanging Cords
Using golden yarn, make a chain approximately 10 cm long. Work slip stitches back along the chain to create a stronger cord.
Repeat for the second bell. You can make one cord slightly longer than the other for a layered appearance.
Secure each cord to the top of its bell using a yarn needle. Pull gently to ensure the connection is strong enough to support the decoration.
Attach the opposite ends near the upper inside edge of the wreath. Position the bells so they hang freely in the central opening without covering too much of the red floral border.
Step 9: Crochet the Large Red Bow
The red bow is another important feature of this crochet Christmas wreath pattern. It adds volume, elegance, and a traditional holiday finishing touch.
Using red yarn, ch 41.
Row 1: Starting in the second chain from the hook, work 1 sc in each chain. (40 sc.)
Rows 2–12: Ch 1, turn, and work 1 sc in each stitch across. (40 sc.)
Fasten off, leaving a long sewing tail. Join the two shorter ends together to form a loop, then flatten the loop with the seam centered at the back.
Wrap red yarn tightly around the middle several times to create the bow’s pinched center. Secure the yarn at the back and shape the two loops evenly.
For the ribbon tails, crochet two separate strips approximately 3–4 cm wide and 9–11 cm long. Shape the ends into decorative points if desired.
Sew the tails behind the bow and attach the entire decoration to the top of the green wreath. Add a large pearl or decorative golden bead to the center for a polished finish.
4. Final Assembly, Decorating Ideas, and Professional Finishing Tips
Once the floral foundation, golden bells, and red bow are complete, it is time to assemble the finished handmade Christmas wreath decoration. Careful positioning will make the difference between a simple homemade project and an elegant holiday display.
Begin by placing the wreath on a flat surface. Make sure the floral border forms an even circle and the red bow is centered at the top.
Check the position of the bells before tying or sewing the cords permanently. The two bells should sit near the center of the wreath, with enough space between them to show their individual shapes.
Use matching yarn to hide any visible attachment points. Weave loose ends into the back of the decoration and trim them carefully.
Step 10: Add the Final Decorative Details
Golden ribbon can be woven around the green ring to create a beautiful braided effect. This addition also visually connects the golden bells with the outer wreath.
If you want extra sparkle, incorporate small metallic crochet accents or a few lightweight decorative beads into the red floral border.
A hanging loop can be created using a chain of approximately 15–20 cm, reinforced with slip stitches. Sew both ends securely to the upper back of the wreath.
For a neat appearance, keep all knots and yarn ends on the reverse side. Avoid adding too many embellishments, as the red floral motifs and golden bells are already highly decorative.
Step 11: Shape and Finish the Wreath
After assembly, lay the wreath flat and gently adjust the petals, ribbon, bow, and bells until everything looks symmetrical.
If the red crochet motifs curl excessively, use light blocking to improve their shape. Protect decorative pearls and other embellishments from excessive heat or moisture.
The wreath should feel secure when lifted by its hanging loop. Reinforce any loose seams before placing it on a wall or door.
For seasonal storage, place the completed decoration in a dry box with enough space to protect the raised crochet petals and bell shapes.
Creative Ways to Customize Your Christmas Crochet Wreath
A red, green, and gold color scheme is perfect for traditional Christmas decorating. However, the same pattern can be transformed into several beautiful variations.
A white and gold crochet wreath creates a sophisticated winter appearance. White floral petals combined with metallic golden bells look especially elegant in neutral holiday interiors.
For a colorful modern version, use burgundy petals, dark emerald green yarn, and champagne-colored gold accents. These shades create a rich vintage-inspired look.
You can also replace the golden bells with miniature crochet stars, snowflakes, or small Christmas ornaments. The modular floral base makes it easy to create new designs every holiday season.
Tips for a Professional Handmade Appearance
Maintaining consistent yarn tension is essential when producing multiple decorative motifs. If the red fans vary significantly in size, the finished wreath may look uneven.
Using a smaller crochet hook can help the bells maintain their shape, especially when working with soft cotton yarn. Firm stitches are also helpful for decorative bows.
Choose embellishments in proportion to the finished wreath. Oversized beads may overwhelm the delicate floral texture, while tiny pearls create a softer decorative effect.
Most importantly, secure every component carefully. A well-assembled wreath can become a treasured handmade Christmas decoration that is displayed year after year.
Frequently Asked Questions About Crochet Christmas Wreaths
Is this crochet Christmas wreath suitable for beginners?
Yes, confident beginners can make this project with basic crochet knowledge. However, the scalloped floral motifs and bell shaping require attention to stitch counts and increases. Practicing one motif before beginning the full wreath is recommended.
What is the best yarn for a crochet Christmas wreath?
Cotton yarn or cotton-blend yarn is an excellent choice because it provides defined stitches and maintains its shape. Medium-lightweight yarn works particularly well for the red flowers, decorative bow, and golden bells.
How long does it take to crochet this Christmas wreath?
Depending on your experience, the project may take approximately 8–14 hours. The floral motifs usually require the most time, while covering the ring and assembling the decorations are comparatively straightforward.
Can I make the wreath without a plastic or foam base?
Yes. You can use a wooden embroidery hoop, a sturdy cardboard ring, or another firm circular foundation. Ensure the material is strong enough to support the completed decorations without bending.
Can this wreath be displayed outside?
It is best displayed indoors or in a protected, dry location. Rain, direct sunlight, and prolonged moisture can damage the yarn, fade the colors, and weaken decorative attachments.
How can I make the golden crochet bells more rigid?
A suitable fabric stiffener can help maintain the bell shape. Apply it lightly, shape the bells over an appropriately sized form, and allow them to dry thoroughly before attaching the decorative clappers.
Can I make this Christmas wreath in different sizes?
Absolutely. For a larger wreath, use a wider circular foundation and produce additional floral motifs. The bell size can also be adjusted by using thicker yarn, a larger crochet hook, or additional increase rounds.
Is this wreath a good handmade Christmas gift?
Yes. A crochet Christmas wreath with bells makes a thoughtful seasonal gift for family members, friends, teachers, or neighbors. It can also be personalized with favorite holiday colors and small decorative details.
Conclusion
Making a crochet Christmas wreath with golden bells is a rewarding way to celebrate the holiday season through creativity and handmade craftsmanship. The combination of bright red floral motifs, a rich green foundation, sparkling golden accents, and elegant crochet bells creates a festive decoration full of charm.
This project is especially appealing because every part can be customized. From the size of the floral border to the colors of the bells and bow, there are countless ways to create a unique design that complements your Christmas decorations.
Whether you make this Christmas crochet wreath pattern for your own home, as a thoughtful handmade gift, or as part of a collection of seasonal crafts, the finished piece will bring warmth and a personal touch to your holiday celebrations. With patience, careful assembly, and attention to the decorative details, you can create a beautiful Christmas wreath that becomes part of your family’s holiday traditions for many years.