
Materials and Supplies for the Crochet Christmas Tree Ornament
Before beginning your crochet Christmas tree pattern, gather the materials needed to create a neat, durable, and beautifully finished ornament. Choosing the right yarn and crochet hook is particularly important because this decorative design relies on clearly defined stitches and an attractive triangular structure.
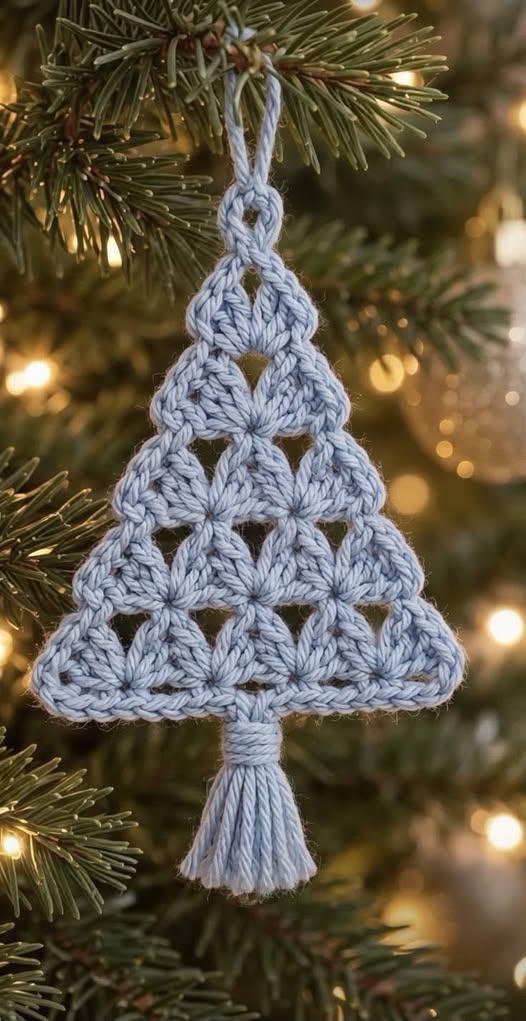
For a result similar to the ornament shown in the picture, choose a smooth cotton yarn in a soft blue shade. Cotton is an excellent option for Christmas ornaments because it provides excellent stitch definition and helps maintain the shape of decorative crochet projects. You can also use acrylic or cotton-blend yarn if you prefer a softer and more affordable alternative.
Materials needed:
-
Approximately 25–40 grams of light blue cotton yarn, DK or light worsted weight.
-
A 3.5 mm or 4.0 mm crochet hook, depending on your yarn.
-
Sharp scissors for cutting the yarn.
-
A tapestry needle for weaving in loose ends.
-
A small piece of cardboard for creating the tassel.
-
A measuring tape for checking the finished dimensions.
-
Optional fabric stiffener or diluted white craft glue for shaping.
-
Optional decorative beads, ribbons, or metallic thread.
The approximate finished size of the ornament is 15–18 cm wide and 20–25 cm tall, including the hanging loop and tassel. These measurements are estimates for the suggested construction, not exact measurements taken from the photograph.
The crochet stitches used in this project are basic enough for adventurous beginners, although the decorative arrangement requires some attention. Understanding how to work chains, slip stitches, single crochet, and double crochet will make the process easier.
All crochet terminology in this tutorial follows US crochet terms.
| Abbreviation | US Crochet Stitch |
|---|---|
| ch | Chain |
| sl st | Slip stitch |
| sc | Single crochet |
| hdc | Half double crochet |
| dc | Double crochet |
| tr | Treble crochet |
| st | Stitch |
| sp | Space |
| rep | Repeat |
| FO | Fasten off |
One of the most recognizable features of this crochet Christmas ornament pattern is the repeated openwork motif. A simple way to recreate the appearance is to crochet small triangular fan motifs separately and connect them into gradually increasing rows.
For a balanced Christmas tree silhouette, use four horizontal rows containing one, two, three, and four motifs. This arrangement creates a broad lower section and a narrow pointed top, closely resembling the shape of a traditional Christmas tree.
Step-by-Step Instructions for Making the Crochet Christmas Tree
The following instructions provide an original, practical interpretation of the ornament in the photograph. Because the exact stitch counts cannot be determined from an image alone, this version uses a repeatable triangular motif and joining method to recreate its overall appearance.
Begin by making a small sample motif before creating the complete ornament. This allows you to check the tension, adjust the crochet hook, and determine whether the finished motif has the desired size. Consistent tension is essential because uneven stitches can make the ornament look asymmetrical.
Step 1: Create the triangular crochet motif
Start with a magic ring, or chain four and join with a slip stitch to form a small ring. Chain three, which counts as your first double crochet, and work two additional double crochet stitches into the ring.
Chain two, work three double crochet stitches into the ring, chain two again, and work another three double crochet stitches. Chain two and join with a slip stitch to the top of the beginning chain three. You now have three groups of three double crochet stitches separated by three chain-two corners.
Step 2: Build a decorative second round
Slip stitch into the next corner space. Chain three and work two double crochet stitches, chain two, and three more double crochet stitches into that corner. This creates the first pointed corner of your triangular motif.
Work one double crochet into each of the three stitches along the next side. In the following corner, work three double crochet stitches, chain two, and three double crochet stitches. Repeat this arrangement around the motif, working the same increases in the remaining corner.
Join with a slip stitch and fasten off, leaving a yarn tail for assembly. Each completed triangle should have three clearly defined corners and decorative spaces that give the motif a delicate, open appearance.
Step 3: Make ten matching motifs
Repeat the triangular motif instructions until you have ten pieces. Keep your stitches consistent so every triangle has approximately the same measurements. Depending on your yarn and tension, each motif may measure approximately 3.5–4.5 cm across.
Arrange the motifs on a flat surface with one at the top, two beneath it, three in the next row, and four along the bottom. Position them point-up, with adjacent corners touching or slightly overlapping. This arrangement produces the recognizable Christmas tree silhouette.
Step 4: Join the crochet triangles
Thread a tapestry needle with matching yarn and connect the motifs at the points where their corners meet. Use several small, secure stitches, hiding the joins between the crochet strands as much as possible.
Begin with the four bottom motifs, then join the three motifs above them. Continue with the second row and finish with the single top triangle. Secure all connections firmly while preserving the decorative spaces between the motifs.
For extra reinforcement, add a small connecting chain between adjacent corners wherever a gap looks too wide. Keep these connections short so the ornament remains light and airy.
Step 5: Crochet the outer border
Attach the yarn at a lower corner and work single crochet stitches around the outside edges of the assembled tree. Work approximately one single crochet into each accessible stitch or space, adjusting the placement to create a smooth outline.
At the tip of the tree, work three single crochet stitches into the corner to maintain a pointed shape. Continue down the opposite side and around the bottom. Use slip stitches at any narrow junctions where adding a full single crochet would create unnecessary bulk.
Join the final stitch with a slip stitch. This simple border adds strength, improves the overall silhouette, and makes the handmade Christmas tree ornament more durable.
Step 6: Add the hanging loop
Attach yarn to the top point of the tree. Chain approximately 20–25 stitches, depending on how long you want the hanging loop to be.
Bring the end of the chain back to the attachment point and secure it with a slip stitch. Fasten off and weave in the yarn end carefully. The hanging loop should be strong enough to support the ornament without stretching excessively.
Creating the Decorative Tassel and Finishing the Ornament
The tassel is an important detail that makes this crochet Christmas tree decoration especially elegant. In the photograph, a soft yarn tassel hangs beneath the tree, creating a graceful finishing touch. It also adds length to the ornament and enhances its handcrafted appearance.
To create the tassel, cut a small rectangular piece of cardboard approximately 7–9 cm long. Wrap your chosen yarn around the cardboard 20–30 times, depending on the desired thickness. More wraps will create a fuller tassel, while fewer wraps produce a lighter and more delicate effect.
Carefully slide a separate piece of yarn under the wrapped strands at the top and tie it securely. Remove the yarn bundle from the cardboard and cut through the loops at the opposite end. You should now have a collection of yarn strands hanging from a secured top.
Wrap another piece of yarn around the bundle approximately 1–1.5 cm below the top knot. Wrap it several times to create a neat decorative band, then secure the end with a small knot. Use a tapestry needle to hide the loose yarn ends inside the tassel.
Attach the completed tassel to the center of the ornament’s bottom edge. You can sew it directly to the lower central motif or create a short chain connector for a slightly longer appearance. Adjust the tassel until it hangs straight and trim the ends evenly.
For a professional finish, gently shape the entire ornament using your hands. If the crochet feels too flexible, lightly apply fabric stiffener according to the manufacturer’s instructions. Place the ornament flat, arrange the triangular edges symmetrically, and allow it to dry completely before hanging.
Blocking your crochet ornament can make a noticeable difference in the final appearance. Pin the corners into an even Christmas tree shape on a blocking mat and lightly mist with water if the yarn allows wet blocking. Avoid soaking the tassel excessively, as this may cause the strands to become tangled.
Once the ornament is completely dry, examine the hanging loop, tassel attachment, and motif connections. Secure any loose stitches and weave in all remaining yarn ends. These small finishing details help create a decoration that can be reused for many Christmas seasons.
Creative Ideas for Decorating and Customizing Your Crochet Christmas Tree
One of the greatest advantages of making a DIY crochet Christmas tree ornament is the freedom to experiment with different styles. Although the soft blue color shown in the photograph is beautiful, the same pattern can be made in countless other combinations to coordinate with your Christmas decorations.
For a classic holiday appearance, use deep green yarn with a bright red tassel. This traditional combination works beautifully with evergreen branches, red ribbons, and golden Christmas ornaments. You can also create a sophisticated design using ivory yarn with champagne-gold decorative details.
If you enjoy winter-inspired colors, consider making several ornaments in icy blue, snowy white, pale silver, and soft lavender. These shades look particularly elegant when displayed on a tree decorated with white lights. Adding a subtle metallic thread can make the crochet stitches shimmer without overwhelming the delicate design.
This crochet holiday decoration is also a wonderful handmade gift idea. Create a small collection of matching Christmas trees, place them inside a decorative gift box, and include a personal holiday message. Friends, neighbors, teachers, and family members often appreciate thoughtful decorations that can be displayed year after year.
For an attractive holiday display, combine these crocheted trees with other handmade ornaments such as crochet snowflakes, miniature stockings, stars, and bells. Using the same yarn colors throughout the collection creates a coordinated appearance while allowing each ornament to have its own distinctive shape.
You can even adjust the size of the design. Use thinner cotton thread and a smaller hook to make miniature ornaments for tabletop Christmas trees, gift tags, or festive garlands. For larger wall decorations, choose bulky yarn and a bigger hook, keeping the same triangular motif arrangement.
Another creative option is to decorate the completed tree with small wooden beads or embroidered details. A few carefully positioned embellishments can resemble tiny Christmas ornaments. However, avoid adding too many decorations because the open crochet structure is the main feature of this beautiful design.
If you plan to make several ornaments for a craft fair or handmade gift collection, choose a consistent color palette and finish each piece with the same tassel style. A neatly crafted set of crochet Christmas decorations can look especially appealing when presented with simple, coordinated packaging.
Frequently Asked Questions About Crochet Christmas Tree Ornaments
Is this crochet Christmas tree suitable for beginners?
Yes, the project is suitable for beginners who already understand basic crochet stitches. Making one triangular motif at a time simplifies construction, although assembling the motifs and maintaining an even shape requires patience.
What is the best yarn for this Christmas ornament?
Smooth cotton yarn is an excellent choice because it provides clear stitch definition and retains its shape well. Acrylic yarn can also work, especially when you want a softer ornament.
How long does it take to make one crochet Christmas tree?
An experienced crocheter may complete the ornament in approximately one to two hours. Beginners may need additional time to practice the motifs, join the pieces, and create the tassel.
Can I make this ornament without a tassel?
Absolutely. The tassel is decorative rather than structural. You can leave it off, replace it with a small crochet trunk, or attach a wooden bead at the bottom.
How can I prevent my crochet Christmas tree from curling?
Use consistent tension, avoid overcrowding the border with stitches, and block the ornament after completion. A small amount of suitable fabric stiffener can also help preserve the triangular shape.
Can I use this pattern to make a Christmas garland?
Yes. Create several crochet trees and connect their hanging loops to a long crocheted chain or decorative cord. Space the ornaments evenly to make a beautiful handmade garland for a mantel, window, or doorway.
How should I store handmade crochet Christmas ornaments?
Store them in a clean, dry box away from moisture and direct sunlight. Place tissue paper between ornaments to prevent the tassels from tangling or the crochet edges from becoming distorted.
Conclusion
Making a crochet Christmas tree ornament is a wonderful way to combine creativity, tradition, and festive decorating. The beautiful triangular motifs, delicate openwork stitches, and soft tassel create a charming design that can complement many different holiday styles.
This project is also an excellent opportunity to use leftover yarn, practice decorative crochet techniques, and create meaningful handmade gifts. With a few basic supplies and careful attention to the finishing details, you can transform simple yarn into an elegant Christmas decoration.
Whether you choose the peaceful icy blue color shown in the image or experiment with traditional Christmas shades, your finished handmade crochet Christmas tree will add warmth and personality to your holiday celebrations.
The most special part of handmade Christmas decorating is knowing that every stitch contributes to something personal and memorable. Create one beautiful ornament or an entire collection, and enjoy the timeless charm of crochet Christmas decorations for years to come.