
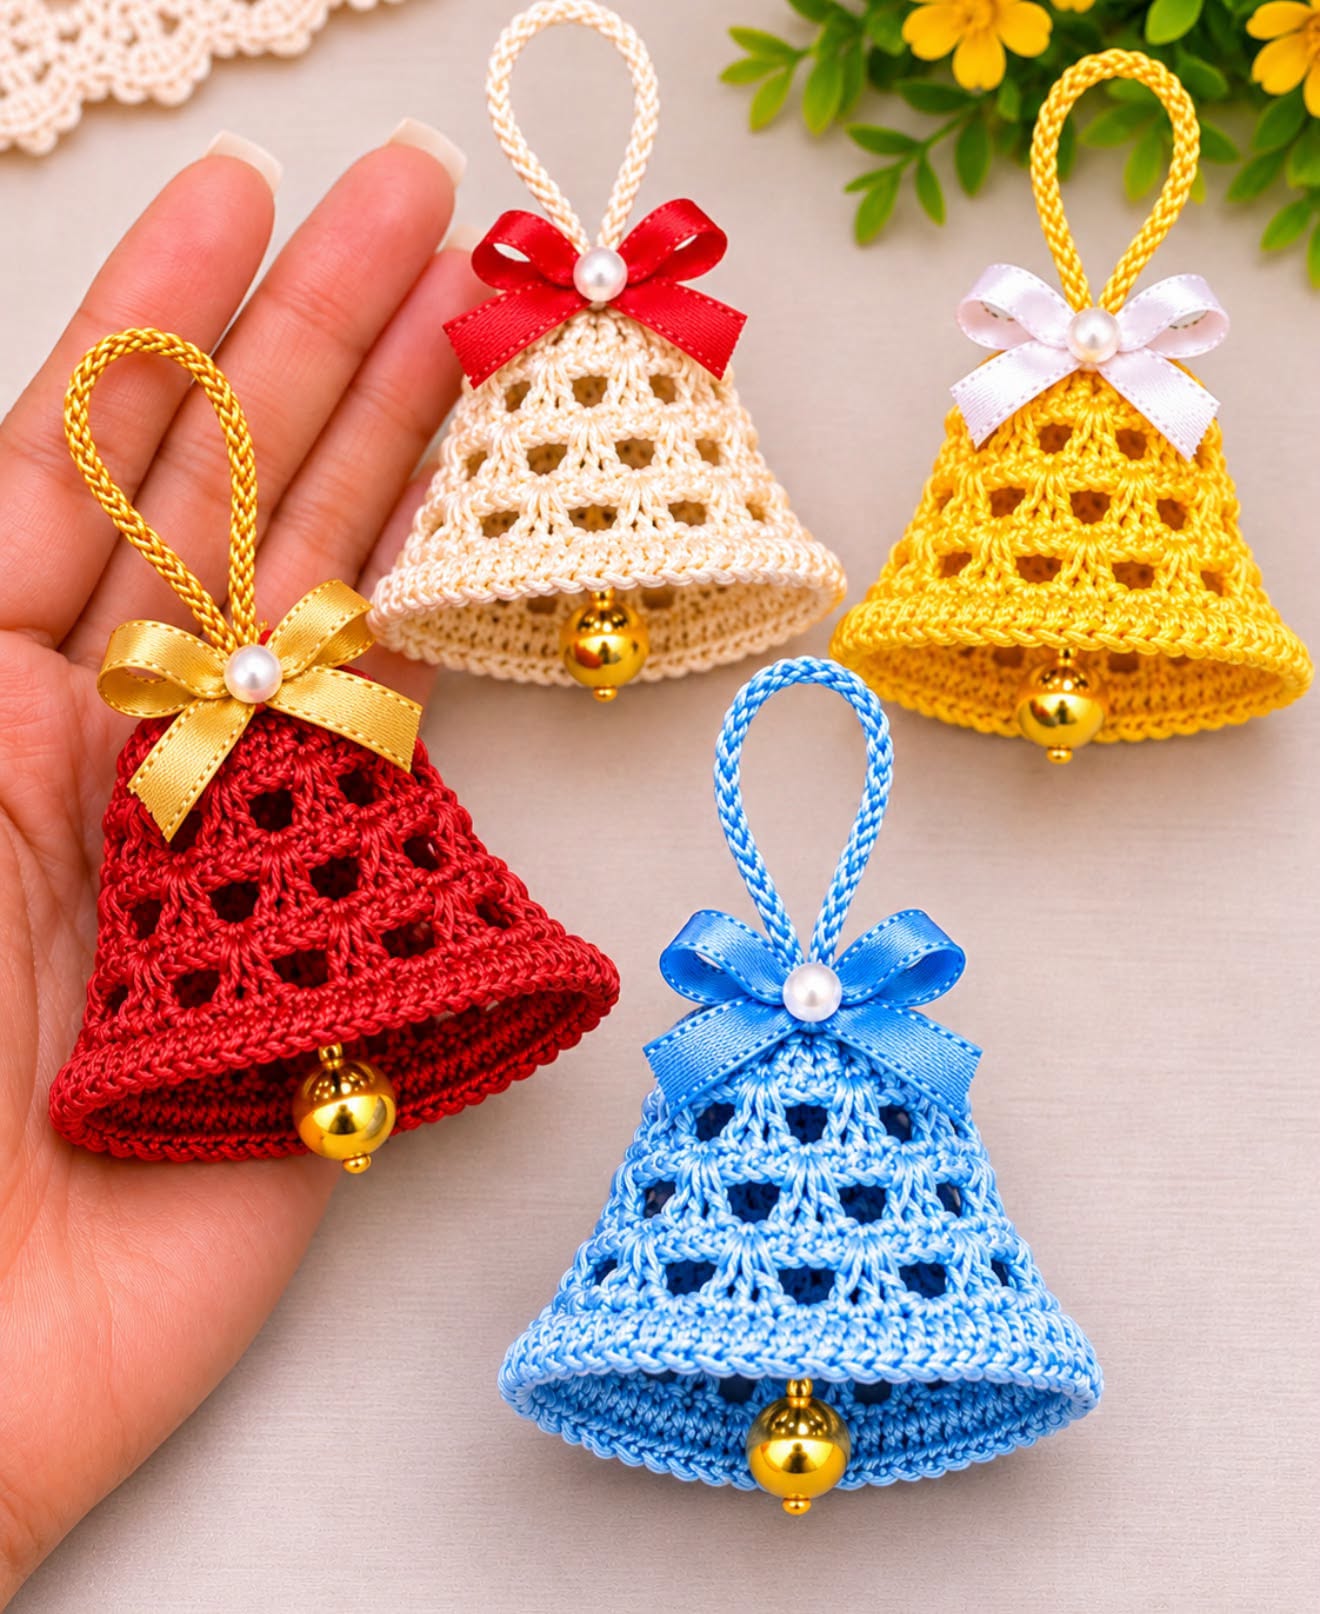
The handmade crochet Christmas bells featured in this project showcase four gorgeous color variations: bright red, soft ivory, cheerful golden yellow, and vibrant blue. Each bell features an airy lace design, a beautifully defined lower edge, and a small golden jingle bell hanging from the center. Satin bows and pearl accents complete the decorations, giving them a sophisticated appearance that makes them suitable for Christmas trees, wreaths, garlands, and thoughtful handmade gifts.
One of the wonderful advantages of this easy crochet Christmas ornament pattern is that it can be adapted to different skill levels and decorating styles. Beginners who are familiar with basic stitches can practice working in rounds, creating chain spaces, and shaping a three-dimensional ornament.
More experienced crocheters can experiment with different yarn textures, lace patterns, and embellishments. With a little patience and creativity, you can create an entire collection of festive bells that look coordinated while maintaining their own unique personalities.
Materials and Supplies for Crochet Christmas Bells
Creating these beautiful crochet bell ornaments requires only a few affordable materials. Most supplies are commonly found in craft stores, and many crocheters may already have everything needed in their yarn collection.
For the best results, choose a smooth cotton yarn that produces neat, defined stitches. Cotton is particularly suitable for decorative projects because it holds its shape beautifully and displays lace details clearly.
Materials needed:
-
Size 3 crochet cotton thread or fine sport-weight cotton yarn in red, ivory, yellow, and blue.
-
A 2.0 mm to 2.5 mm crochet hook, depending on your yarn.
-
Small golden jingle bells, approximately 10–14 mm in diameter.
-
Satin ribbon, approximately 6–10 mm wide.
-
Small decorative pearl beads.
-
Yarn needle for weaving in ends.
-
Small scissors.
-
Stitch markers.
-
Measuring tape.
-
Fabric stiffener or diluted white craft glue, optional.
-
A small cone-shaped form for shaping the bells.
The finished ornaments should measure approximately 7–9 cm tall and 8–10 cm wide at the bottom, excluding the hanging loop. These measurements are approximate and will vary according to yarn thickness, hook size, and personal tension.
Using thinner crochet cotton will create smaller, more delicate bells. Slightly thicker yarn produces larger ornaments with a softer appearance. Both options are beautiful when used with the appropriate hook.
The colors can also be customized. Traditional combinations such as red and gold, white and silver, and green and cream are excellent choices for classic Christmas decorations. For a modern holiday theme, consider ice blue, champagne, blush pink, or metallic-inspired yarn.
The decorative details play an important role in the finished appearance. Satin bows provide softness and elegance, while golden bells create a festive finishing touch. Small pearl accents placed at the center of each bow make the ornaments look professionally finished.
Before beginning, crochet a small sample to check your tension. The stitches should feel firm enough to hold the bell shape without becoming stiff or difficult to work. Consistent tension helps ensure that all ornaments in the collection have similar proportions.
Step-by-Step Crochet Christmas Bells Pattern
This crochet Christmas bell tutorial uses US crochet terminology. The design begins at the narrow top and gradually expands toward the bottom, creating the traditional flared bell shape shown in the inspiration image.
The pattern combines solid crochet rounds with open chain spaces. The result is a lightweight, decorative ornament with a delicate lace appearance and enough structure to maintain its shape.
US crochet stitch abbreviations:
| Abbreviation | Meaning |
|---|---|
| MR | Magic ring |
| ch | Chain |
| sl st | Slip stitch |
| sc | Single crochet |
| hdc | Half double crochet |
| dc | Double crochet |
| st | Stitch |
| sp | Space |
| rep | Repeat |
| FO | Fasten off |
Step 1 – Create the top of the bell
Begin with a magic ring. Chain 2, which does not count as a stitch, then work 12 double crochet stitches into the ring. Pull the ring closed and join with a slip stitch to the first double crochet.
This small circular piece forms the crown of the bell. It should remain slightly rounded rather than completely flat, allowing the ornament to develop its three-dimensional shape.
Round 2 – Establish the first lace openings
Chain 4, counting as one double crochet and one chain. Work one double crochet into the next stitch, followed by chain 1. Continue this sequence around.
Join with a slip stitch into the third chain of the beginning chain 4. You should have 12 double crochet stitches and 12 chain-1 spaces.
These openings begin the decorative lace structure. Keep the chain spaces even, since they help establish the repeating pattern throughout the bell.
Round 3 – Build the openwork pattern
Slip stitch into the first chain-1 space. Chain 3, counting as the first double crochet, then make one additional double crochet into the same space. Chain 2.
Work two double crochet stitches into the next chain-1 space, followed by chain 2. Repeat around and join to the top of the beginning chain 3.
At the end of this round, the lace pattern will begin to develop small clusters separated by open spaces.
Round 4 – Expand the bell gently
Slip stitch to the first chain-2 space. Chain 3 and work two additional double crochet stitches into that space. Chain 2.
Work three double crochet stitches into each remaining chain-2 space, followed by chain 2. Join at the end of the round.
The groups of three double crochet stitches make the fabric fuller and help produce the gentle outward shape associated with traditional Christmas bells.
Round 5 – Increase the width
Slip stitch into the first chain-2 space. Chain 3, then work three more double crochet stitches into the same space. Chain 2.
Continue with four double crochet stitches in every chain-2 space, separated by chain 2. Join as before.
The increase in the number of double crochet stitches creates a wider surface while preserving the decorative open spaces.
Round 6 – Form the lower lace section
Slip stitch into the first chain-2 space. Chain 3 and work four more double crochet stitches in that space. Chain 2.
Repeat five double crochet stitches in each chain-2 space, followed by chain 2, all the way around. Join neatly.
At this stage, the bell should have a clearly defined upper section and a lower section that begins spreading outward.
Round 7 – Strengthen the decorative edge
Slip stitch into the next chain-2 space. Chain 3, then make five more double crochet stitches into the same space. Chain 1.
Work six double crochet stitches in every remaining chain-2 space, followed by chain 1. Join the round.
The larger stitch groups create a fuller lower section while keeping small openings between them.
Round 8 – Shape the flared rim
Chain 1 and work one single crochet into each double crochet stitch and each chain-1 space around the entire bell.
Join with a slip stitch. This round stabilizes the lace section and prepares the fabric for a firm decorative border.
Round 9 – Create the final border
Chain 1 and work one half double crochet into every stitch around. Join and fasten off, leaving a yarn tail long enough to weave securely into the fabric.
For a slightly thicker border, repeat the half double crochet round once more. This creates a more noticeable rim similar to the structured edges visible in the finished ornaments.
Step 2 – Make the hanging loop
Cut a strand of matching cotton yarn approximately 25–30 cm long. Fold it in half and twist or braid it gently to create a decorative hanging cord.
Alternatively, crochet a chain approximately 15–18 cm long and slip stitch back along the chain for additional strength. Fold the cord into a loop and secure both ends to the top of the ornament.
A finished loop measuring approximately 6–8 cm tall is suitable for hanging the bell from a Christmas tree branch.
Step 3 – Attach the golden jingle bell
Thread a yarn needle with a strong piece of matching yarn. Secure one end to the center inside the crochet ornament and attach a small golden jingle bell.
Position the metal bell so it hangs approximately 1–2 cm below the lower edge of the crochet ornament, depending on the desired appearance.
Make several secure stitches and weave the yarn ends into the fabric. The jingle bell should hang freely without pulling the upper section out of shape.
Step 4 – Add the satin bow
Cut approximately 20–25 cm of satin ribbon and tie it into a small decorative bow. Adjust the loops until both sides look balanced.
Position the bow at the top of the crochet bell, immediately below the hanging cord. Secure it using a few discreet hand stitches.
Attach a small pearl bead to the center of the bow. This simple embellishment creates a polished, elegant finish and complements the golden jingle bell beautifully.
Creative Decorating Ideas and Professional Finishing Tips
One of the most enjoyable parts of making DIY crochet Christmas decorations is choosing colors and embellishments. Small changes can transform the entire appearance of a bell, making it easy to coordinate ornaments with different holiday decorating themes.
The red ornament looks especially festive when combined with a golden satin bow and a shiny gold jingle bell. This classic combination works beautifully with traditional Christmas decorations, including red ribbons, evergreen branches, and warm white lights.
For a softer and more elegant appearance, crochet the bell in ivory or warm cream. Add a bright red satin ribbon for contrast, or choose champagne ribbon for a neutral decorating style. These vintage-inspired crochet bells are particularly attractive on natural or rustic Christmas trees.
A golden yellow bell creates a cheerful and welcoming decoration. When finished with a white satin bow and pearl accent, the bright yarn becomes the main focal point. Yellow and gold ornaments also coordinate beautifully with green foliage and wooden holiday decorations.
The blue variation offers a refreshing alternative to traditional Christmas colors. Pairing bright blue crochet yarn with a matching satin ribbon creates a coordinated appearance, while silver or pearl embellishments can introduce a winter-inspired theme.
For bells that maintain a firm shape, use a light fabric-stiffening treatment. Mix a small quantity of fabric stiffener according to the manufacturer’s instructions and apply it evenly to the crochet fabric, avoiding the ribbon and metal components.
Place the damp ornament over a smooth, bell-shaped mold covered with plastic wrap. Adjust the lace openings and gently spread the lower edge until the shape is symmetrical. Allow the piece to dry completely before removing it from the mold.
Avoid applying too much stiffener, since excessive product may hide the delicate stitch definition. A light application is usually sufficient to provide structure while maintaining the graceful appearance of the lace design.
Another useful technique is blocking. Lightly dampen the completed crochet piece and shape it carefully over a suitable mold. This method can improve stitch alignment and help the lower edge sit evenly without making the fabric excessively rigid.
When creating several ornaments, use the same yarn brand, hook size, and number of rounds. This ensures that your handmade Christmas bell collection looks coordinated, even when the colors and ribbons are different.
How to Use, Gift, and Personalize Crochet Christmas Bells
These charming crochet Christmas ornaments can be used in many ways throughout the holiday season. Their lightweight construction makes them especially suitable for decorating Christmas trees without bending delicate branches.
Hang the bells at different heights to create visual interest. Combining red, ivory, yellow, and blue ornaments can produce a colorful holiday display, while using only two complementary colors creates a more coordinated and elegant appearance.
Crochet bells also make beautiful additions to Christmas wreaths. Attach several ornaments to an evergreen wreath using their hanging loops, positioning them between pinecones, ribbons, and decorative berries for a festive handmade arrangement.
Another lovely idea is to incorporate the bells into holiday garlands. String several ornaments along a decorative cord, leaving equal distances between them. Hang the garland across a mantel, doorway, or decorative shelf.
These ornaments are also excellent handmade Christmas gift ideas. A set of four bells in coordinating colors can be packaged in a small gift box lined with tissue paper and finished with a matching ribbon.
For personalized gifts, select colors that reflect the recipient’s favorite decorating style. Neutral ivory ornaments are ideal for minimalist interiors, while bright traditional colors work well for those who enjoy vibrant Christmas decorations.
Crochet bells can also be attached to wrapped gifts as reusable decorations. Instead of purchasing disposable bows, tie a handmade bell to the package ribbon. The recipient can remove the ornament and enjoy it on their Christmas tree for years.
For craft fairs or holiday markets, display the bells in coordinated collections. Sets containing different colors or matching ornaments can appeal to customers looking for unique, lightweight, and reusable holiday decorations.
When estimating the price of handmade ornaments, consider the cost of cotton yarn, metal bells, satin ribbons, decorative beads, and packaging. Remember to include the time required for crocheting, finishing, and assembling each piece.
The design can also be adapted for different occasions. White bells with pearl ribbons make delicate wedding favors, while pastel-colored versions can be used for spring decorations or handmade keepsakes.
For long-term storage, place the ornaments in a clean, dry box and separate them with soft tissue paper. Avoid compressing the bells, since pressure may distort the decorative lace and lower edges.
With proper care, these crochet bell decorations can remain beautiful for many holiday seasons, becoming cherished pieces that return to the Christmas tree year after year.
Frequently Asked Questions About Crochet Christmas Bells
Are crochet Christmas bells suitable for beginners?
Yes. Crocheters who understand basic stitches, chains, and working in joined rounds can complete this project. Beginners may find it helpful to practice the lace pattern before making their first ornament.
What is the best yarn for crochet Christmas ornaments?
Smooth cotton yarn or crochet cotton thread is an excellent choice. Cotton provides clear stitch definition and helps decorative pieces maintain their intended shape.
How long does it take to crochet one Christmas bell?
The time depends on individual experience and yarn thickness. Many crocheters can complete a small bell in approximately 45–90 minutes, with additional time needed for blocking, drying, and embellishing.
Can I make the crochet bells larger?
Yes. Use thicker yarn with a suitable hook or adapt the stitch counts and add additional shaping rounds. Keep the increases gradual so the ornament maintains a balanced bell shape.
Do crochet Christmas bells need fabric stiffener?
Not always. Firm cotton yarn and consistent tension may provide enough structure. However, a light stiffening treatment is helpful when you want a more defined, three-dimensional shape.
Can I wash handmade crochet Christmas bells?
If the ornament uses washable cotton yarn, the crochet portion may be gently cleaned. However, metal bells, glued embellishments, ribbons, and stiffening treatments can be damaged by water. Spot cleaning is usually the safest option for fully assembled ornaments.
What can I use instead of metal jingle bells?
You can use small wooden beads, decorative pearls, crocheted balls, or lightweight ornaments. Avoid detachable small components when making decorations intended for environments accessible to very young children.
Can these ornaments be sold at Christmas craft fairs?
Yes. Handmade crochet bells can be attractive seasonal craft products. Offering coordinated color sets, neat packaging, and consistent finishing can make the ornaments more appealing to customers.
Conclusion
Creating beautiful crochet Christmas bells is a wonderful way to combine creativity, traditional handcrafting, and festive decorating. With their delicate openwork texture, graceful bell shape, decorative bows, and golden accents, these ornaments can add warmth and elegance to almost any Christmas setting.
Whether you choose classic red, sophisticated ivory, cheerful yellow, or vibrant blue, each handmade bell becomes a small expression of personal style. The project is also an enjoyable opportunity to practice crochet techniques while creating decorations that can be treasured for years.
The most rewarding part of making DIY crochet Christmas bells is transforming simple cotton thread into meaningful holiday keepsakes. From Christmas trees and wreaths to handmade gifts and seasonal craft collections, these charming ornaments offer countless ways to celebrate the beauty of crochet and the joy of the holiday season.