
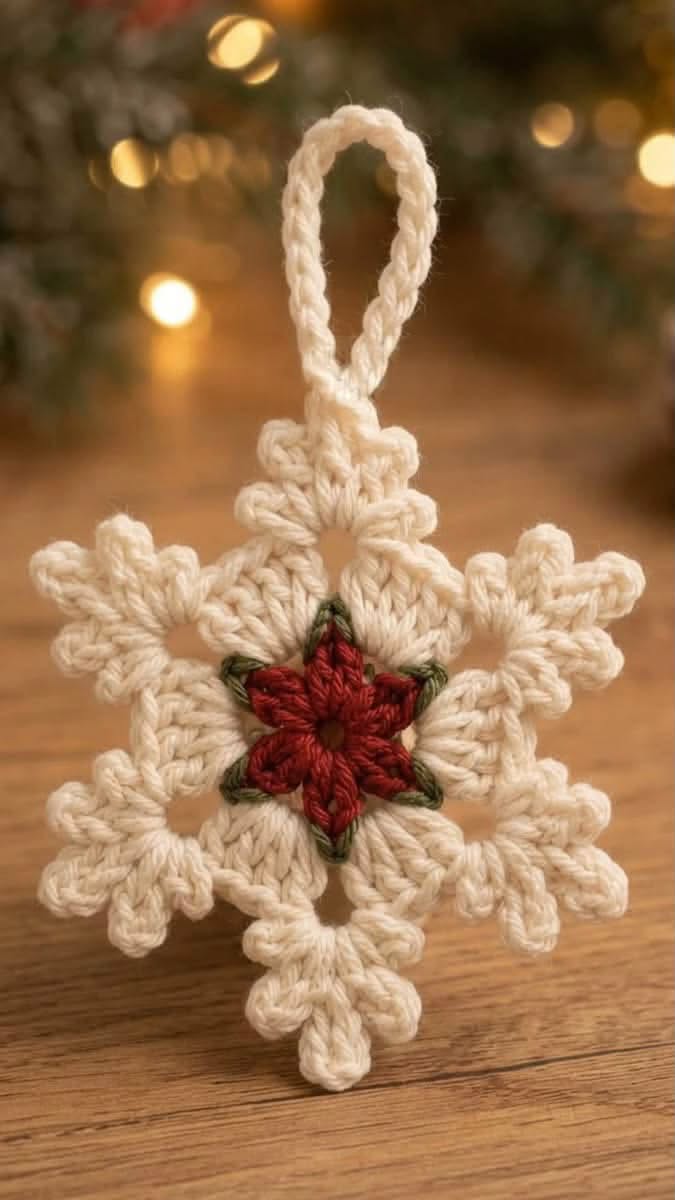
One of the most attractive features of this crochet snowflake pattern is its combination of intricate-looking stitches and a practical construction. The six decorative points create a beautifully balanced snowflake, while the small red flower adds a festive touch. A simple crocheted hanging loop makes the finished piece perfect for Christmas trees, holiday garlands, winter wreaths, and decorative gift wrapping.
Whether you are an experienced crocheter or an enthusiastic beginner looking to improve your skills, this handmade Christmas ornament is a wonderful project to explore. It uses familiar crochet techniques, including chains, single crochet, double crochet, slip stitches, and decorative picots.
In this tutorial, you will discover the materials, recommended measurements, construction methods, and finishing techniques needed to recreate a beautiful snowflake inspired by the ornament shown in the image.
Materials and Supplies for the Crochet Christmas Snowflake
Choosing the right materials is essential when creating a delicate yet sturdy crochet Christmas decoration. Although the project is relatively small, using consistent yarn thickness and maintaining even tension will help achieve a professional appearance.
The ornament features three main colors: warm ivory for the snowflake, deep Christmas red for the central flower, and a subtle olive-green accent surrounding the flower. This color combination creates a charming vintage Christmas aesthetic.
For a soft and textured finish, cotton yarn is an excellent choice. Cotton holds decorative stitches beautifully and provides the structure needed for the snowflake points to maintain their shape.
Materials Needed
-
Ivory cotton yarn: Approximately 20–25 grams of DK or light worsted yarn.
-
Christmas red yarn: Approximately 5 grams for the central flower.
-
Olive-green yarn: A small amount for decorative accents.
-
Crochet hook: 3.5 mm (E/4), or a suitable size for your yarn.
-
Yarn needle: For sewing and hiding yarn ends.
-
Sharp scissors: For clean finishing.
-
Stitch markers: Optional, but useful for marking six sections.
-
Fabric stiffener: Optional, for maintaining the snowflake shape.
-
Blocking pins and foam mat: For shaping the completed ornament.
Recommended Measurements
These measurements are approximate and may change depending on your yarn, hook size, and crochet tension.
The design can also be made with thinner cotton thread and a smaller hook to create miniature snowflakes. These smaller versions are especially suitable for Christmas cards, gift tags, or delicate tree decorations.
Step-by-Step Crochet Christmas Snowflake Pattern
The secret to creating this beautiful six-point crochet snowflake is maintaining symmetry throughout the project. Each point should contain approximately the same number of stitches, with matching decorative loops and picots.
This tutorial uses a suggested construction inspired by the image rather than an exact stitch chart of the photographed ornament. The snowflake is built around a central ring, with six large decorative arms and a separate red flower appliqué.
Crochet Abbreviations (US Terms)
| Abbreviation | Meaning |
|---|---|
| ch | Chain |
| sl st | Slip stitch |
| sc | Single crochet |
| hdc | Half double crochet |
| dc | Double crochet |
| tr | Treble crochet |
| st | Stitch |
| sp | Space |
| rep | Repeat |
| picot | Chain 3, slip stitch into the first chain |
Step 1: Create the Center Ring
Begin with ivory yarn and make a magic ring. If you prefer a more traditional method, chain 6 and join with a slip stitch to form a small circle.
Chain 3, which counts as the first double crochet. Work 11 more double crochet stitches into the ring, creating a total of 12 double crochets.
Pull the magic ring closed and join with a slip stitch to the top of the beginning chain 3. This circular foundation supports the six symmetrical sections of the snowflake.
Step 2: Establish Six Decorative Sections
Chain 3 and work 1 double crochet into the same stitch. Chain 2, then work 2 double crochets into the next stitch.
Chain 2 and skip the next stitch. Continue building six evenly spaced groups, adjusting the placement so the sections are distributed around the center.
For a more precise six-part foundation, you can instead work (2 dc, ch 3) six times into a magic ring and join. Each chain-3 space then becomes the base of one snowflake point.
The six-space foundation is particularly helpful for beginners because it makes the following rounds easier to organize.
Step 3: Build the Main Snowflake Arms
Join your ivory yarn into one of the six chain-3 spaces.
Work the following sequence into the space:
2 dc, ch 2, 2 tr, ch 3, 2 tr, ch 2, 2 dc
This creates a wide decorative cluster with a pronounced center.
Chain 1 and move to the next chain space. Repeat the same sequence around the snowflake until all six points are formed.
Join with a slip stitch and check that the snowflake lies reasonably flat. If the arms are pulling inward, use a slightly larger hook or loosen your tension.
Step 4: Create the Decorative Snowflake Tips
The outer border gives the ornament its beautiful winter-inspired appearance.
Using the existing stitches and chain spaces of each arm, work small decorative groups of single crochet, half double crochet, and picots.
For each point, crochet around the outer edge, placing a picot near the outermost tip.
You can create additional smaller picots on both sides of the main tip to imitate the detailed branching structure of a natural snowflake.
Repeat the same decorative edging on every arm. Consistency is essential for maintaining a symmetrical design.
Step 5: Crochet the Red Christmas Flower
The red flower creates a beautiful contrast against the soft ivory snowflake.
Using Christmas red yarn, make a magic ring and work 6 single crochet stitches inside. Pull the ring closed and join.
For each of the six petals, work into one stitch:
(ch 2, 2 dc, ch 2, sl st)
Repeat the petal sequence in each of the six stitches around the center.
Fasten off and leave a long yarn tail for sewing. Arrange the petals gently to create a balanced flower approximately 4–5 cm wide.
Step 6: Add Olive-Green Accents
The subtle green details surrounding the flower add depth and help separate the red petals from the ivory snowflake.
Using olive-green yarn, create six small chain loops around the flower’s outer edge. These loops can be positioned between the petals.
Another option is to crochet six tiny leaf shapes using chains and slip stitches.
Keep the green elements small so they enhance the flower without overwhelming the delicate snowflake design.
Sew the completed flower securely into the center of the ivory snowflake using a yarn needle.
How to Finish, Shape, and Decorate Your Christmas Snowflake
Finishing is one of the most important steps when making a professional-looking crochet ornament. Even beautifully executed stitches can lose their visual impact if the snowflake is uneven or the decorative points curl.
Start by carefully weaving in all yarn ends. Use a yarn needle to guide each tail through several stitches on the back of the ornament, ensuring the ends remain hidden.
Next, prepare the hanging loop. With ivory yarn, chain approximately 20–25 stitches, or enough to create the desired loop length. Fold the chain into a loop and attach both ends securely to the top snowflake point.
For a more substantial hanging cord, work slip stitches back along the chain before attaching the loop. This provides extra thickness and creates a neat braided appearance.
Blocking the Snowflake
Blocking helps the crochet snowflake ornament maintain its beautiful six-point shape.
Lightly dampen the ornament with water and place it on a foam blocking mat. Gently stretch each arm outward, making sure the distances between opposite points are similar.
Secure the points with rustproof blocking pins. Allow the piece to dry completely before removing the pins.
If you want a firmer ornament, apply a small amount of fabric stiffener according to the manufacturer’s instructions before pinning. Test the stiffener on a spare yarn sample first.
Creative Christmas Color Combinations
Ivory, deep red, and olive green.
Snow white, champagne gold, and silver.
Cream, burgundy, and sage green.
Baby blue, white, and icy blue.
For a traditional farmhouse Christmas style, ivory and muted red remain excellent choices. These colors work beautifully with natural wood, pine branches, cinnamon sticks, and warm Christmas lights.
If you enjoy brighter holiday decorations, consider combining emerald green with crisp white and ruby red. These colors produce a cheerful appearance while preserving the classic snowflake shape.
Beautiful Ways to Use Handmade Crochet Snowflakes at Christmas
One of the biggest advantages of a DIY crochet Christmas snowflake is its versatility. The finished ornament is lightweight, reusable, and suitable for a wide variety of holiday decorating ideas.
Perhaps the most traditional use is hanging the snowflake on a Christmas tree. Its textured stitches stand out beautifully against green branches, especially when illuminated by warm white Christmas lights.
Another wonderful idea is to create a handmade Christmas garland. Crochet several matching snowflakes and connect them with a simple chain or decorative ribbon. Hang the garland across a fireplace mantel, window, or shelf.
These ornaments also make lovely additions to gift wrapping. Attach a small snowflake to a wrapped present with rustic twine, and the recipient receives both a beautiful package and a reusable handmade decoration.
For a festive table arrangement, place several snowflakes around a centerpiece featuring pinecones, greenery, and LED candles. The ivory yarn creates a soft winter atmosphere that complements traditional Christmas decorations.
Handmade snowflakes can also become thoughtful gifts for friends, family members, teachers, and neighbors. Since they require relatively small amounts of yarn, they are suitable for using leftover materials from larger crochet projects.
Tips for Making Several Matching Snowflakes
When producing multiple ornaments, consistency becomes especially important.
Use the same yarn brand, hook size, stitch count, and blocking measurements for every piece. This helps ensure that all snowflakes have a matching appearance.
Consider crocheting the project in stages. Make all the ivory bases first, then create the red flowers, add the green accents, and finish each hanging loop.
This method can make the process more organized and is particularly useful when preparing handmade gifts or items for a craft fair.
For an additional decorative touch, attach a small wooden bead near the top of the hanging loop. A satin ribbon or metallic thread can also enhance the festive appearance.
Frequently Asked Questions About Crochet Christmas Snowflakes
Is this crochet snowflake suitable for beginners?
Yes. Beginners who already know how to chain, work double crochet stitches, and make slip stitches can practice the basic construction. The decorative edging requires a little patience, but it becomes easier with repetition.
What yarn works best for Christmas snowflake ornaments?
Cotton yarn is an excellent option because it gives the stitches definition and helps the ornament maintain its shape. Acrylic yarn can also work, although it may require additional blocking or stiffening.
How long does it take to crochet one snowflake?
Depending on your experience and the complexity of the edging, a snowflake may take approximately 45 minutes to 2 hours to complete.
Can I make the snowflake larger?
Absolutely. Use thicker yarn and a larger crochet hook to increase the finished dimensions. You can also adapt the length of the decorative arms, provided the six sections remain symmetrical.
How do I prevent the snowflake from curling?
Check your stitch tension and make sure you have enough chain spaces between decorative sections. Blocking can help flatten small irregularities, but significant curling may require adjusting the stitch counts.
Can these ornaments be washed?
Many cotton snowflakes can be gently hand-washed in cool water. Always check the yarn care instructions, especially if the ornament includes stiffener, beads, or other decorative accessories.
Can I use this pattern for Christmas gifts or craft fairs?
Yes. Handmade crochet snowflakes are lovely seasonal gifts and can be made in coordinating colors for holiday collections. When preparing items for sale, pay close attention to finishing quality and secure attachment of decorative elements.
Conclusion
The Crochet Christmas Snowflake Ornament Pattern is a beautiful way to combine traditional holiday decorating with the creativity of handmade crochet. Its six delicate points, rich red central flower, subtle green details, and elegant ivory texture create a timeless Christmas decoration that can be enjoyed year after year.
With simple crochet materials, careful stitch placement, and a little attention to finishing, you can make a lovely ornament inspired by the photograph. Whether displayed on a Christmas tree, included in a handmade garland, or given as a thoughtful holiday gift, this beautiful crochet snowflake adds warmth and personality to the festive season.
Most importantly, each handmade ornament carries something special: the time, creativity, and care of the person who made it. That personal touch is what makes handmade Christmas crochet decorations so meaningful and memorable.