
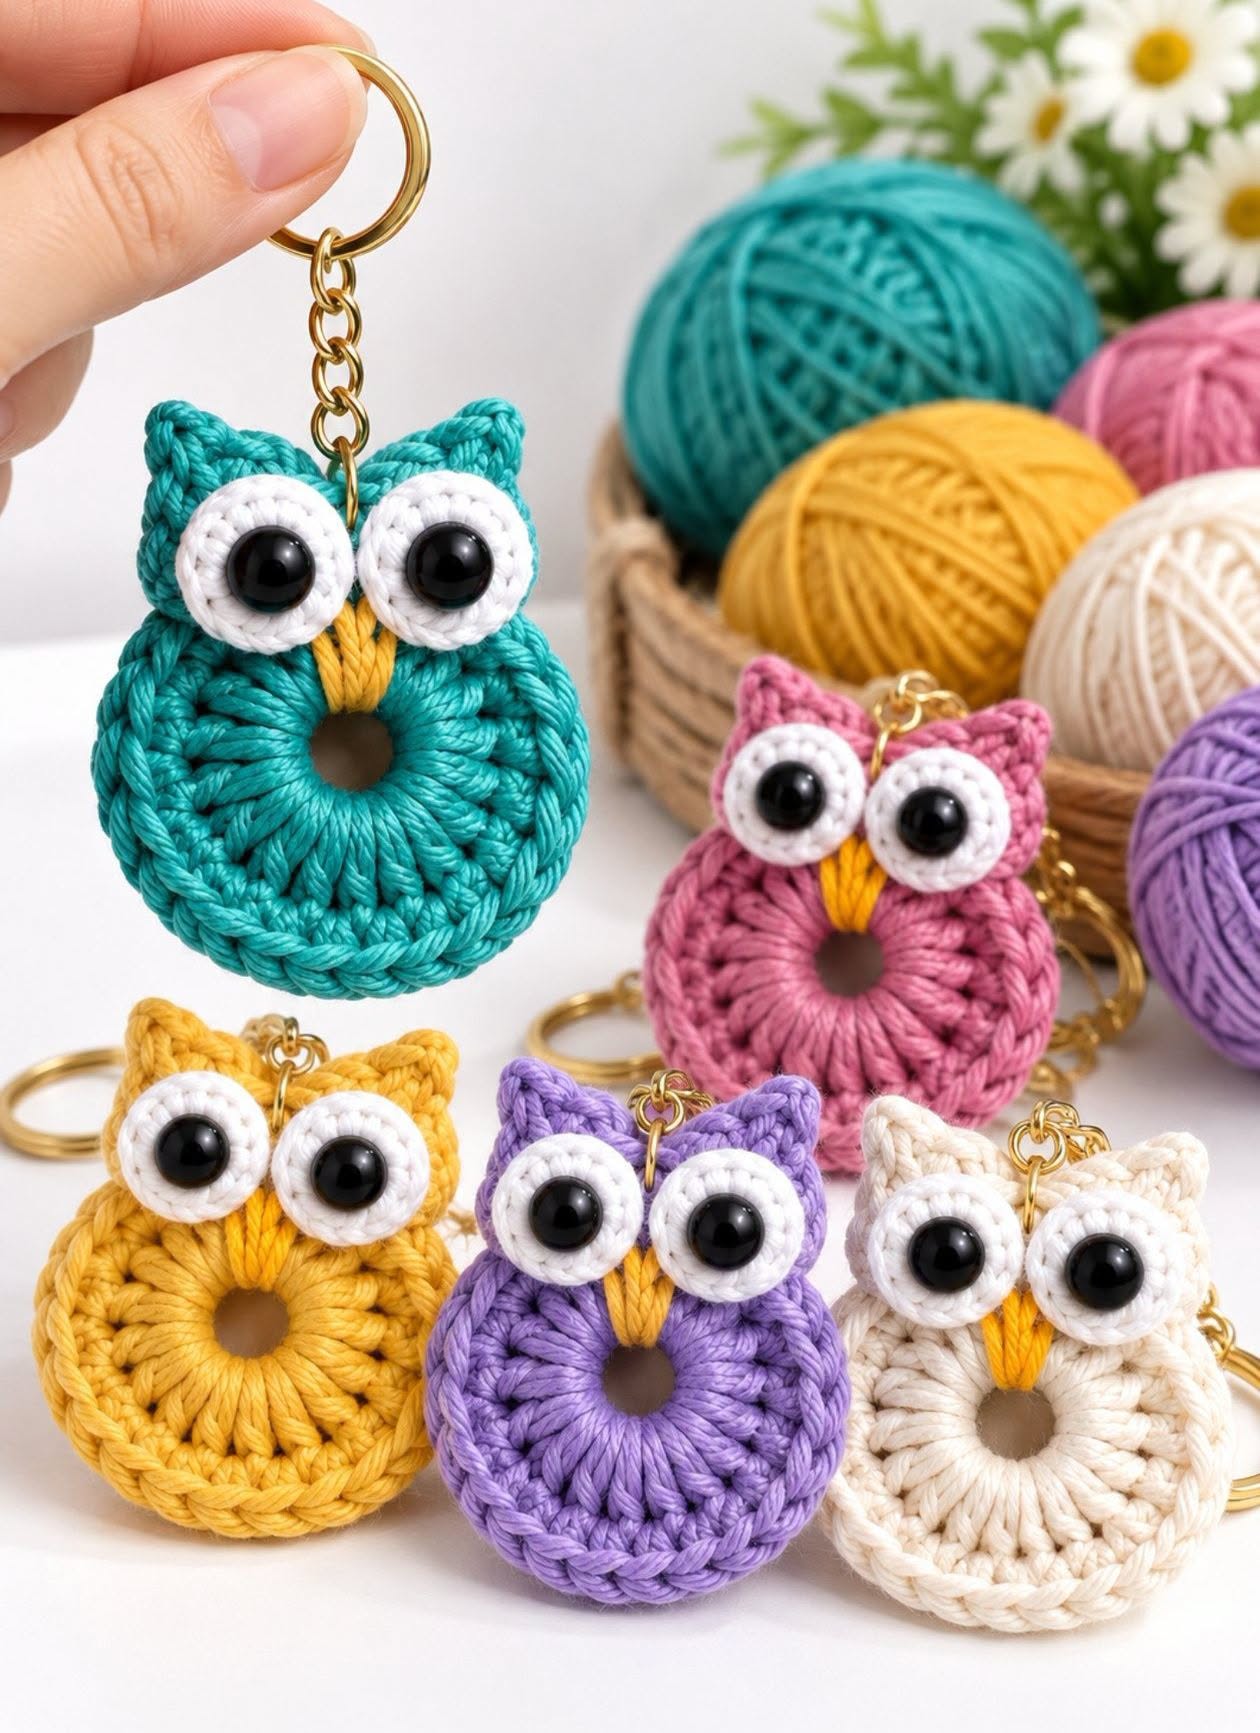
One of the most attractive features of these crochet owl keychains is their combination of simple stitches and playful details. The rounded body is constructed around a small central opening, creating a decorative donut-like shape.
Large white crocheted eyes with shiny black centers give each owl an expressive personality, while the carefully shaped ears complete its recognizable silhouette. Bright colors such as turquoise, pink, yellow, lavender, and cream make every finished piece look unique and delightful.
Whether you are a beginner hoping to expand your skills or an experienced crocheter searching for a fun project, this easy crochet owl keychain tutorial offers an enjoyable opportunity to experiment with color, texture, and decorative finishing techniques. These miniature owls require relatively little yarn, making them excellent for using leftover materials. With the right supplies, accurate stitch placement, and a little patience, you can create a beautiful collection of handmade owl accessories for personal use, gifts, craft fairs, or small business collections.
Materials and Preparation for the Crochet Owl Keychain
Creating a beautiful mini crochet owl begins with choosing suitable materials. Because these accessories are small, selecting a yarn that produces well-defined stitches is particularly important. Smooth cotton yarn is an excellent choice because it provides structure, durability, and a neat appearance. Cotton also helps the owl maintain its shape when attached to keys or bags.
For a colorful collection, consider combining turquoise, mustard yellow, soft pink, lavender, and ivory. Each owl can have a different body color while sharing identical white eyes, black pupils, and a yellow beak. This creates a coordinated handmade set without making every keychain look the same.
Materials Needed
-
Cotton yarn, approximately 10–15 g per owl, in your preferred body color.
-
Small amounts of white cotton yarn for the eyes.
-
Yellow or golden yarn for the beak.
-
A 2.5 mm or 3.0 mm crochet hook, depending on yarn thickness.
-
Two black safety eyes, approximately 8–10 mm in diameter.
-
Metal keychain rings with small connecting chains.
-
Yarn needle for sewing and finishing.
-
Sharp scissors.
-
Stitch markers.
-
Optional small amount of fabric glue for securing decorative elements.
The finished crochet owl keychain can measure approximately 6–8 cm in height and 5–6 cm in width, depending on yarn weight, hook size, and tension. These measurements are approximate because different crocheters naturally create stitches with slightly different levels of tightness.
For best results, maintain even tension throughout the project. Loose stitches can cause the body to lose definition, while excessively tight stitches may make it difficult to work into the center opening. A smooth and consistent stitch pattern creates the polished texture that makes these small owls especially attractive.
Crochet Abbreviations – US Terms
| Abbreviation | Meaning |
|---|---|
| MR | Magic ring |
| ch | Chain |
| sl st | Slip stitch |
| sc | Single crochet |
| hdc | Half double crochet |
| dc | Double crochet |
| tr | Treble crochet |
| st | Stitch |
| inc | Increase |
| BLO | Back loop only |
| FO | Fasten off |
This project uses US crochet terminology. The instructions below provide a practical pattern inspired by the owl design shown in the image. Because the exact original stitch counts cannot be determined from a photograph, the pattern is designed to reproduce a similar appearance rather than claim to be an exact reconstruction.
Step-by-Step Instructions for Crocheting the Owl Body
The most distinctive element of this crochet owl keychain pattern is its circular body with an open center. Unlike traditional stuffed amigurumi animals, this design stays relatively flat and does not require stuffing. The decorative circular construction gives the owl a lightweight appearance while highlighting the texture of the stitches.
Begin by selecting your preferred body color. Turquoise creates a vibrant modern owl, while pink and lavender produce softer, playful designs. Mustard yellow offers a cheerful autumn-inspired appearance, and cream provides a neutral alternative suitable for minimalist accessories.
Step 1: Create the Central Ring
Make a foundation chain of 12 stitches using your chosen body color. Join the final chain to the first chain with a slip stitch, making sure the chain does not twist. This creates the central opening that will remain visible in the finished owl.
Round 1: Chain 1, work 24 single crochet stitches evenly around the foundation ring, and join with a slip stitch to the first single crochet. The stitches should completely cover the foundation chain while leaving a small hole in the middle.
Round 2: Chain 2, work 2 half double crochet stitches in each stitch around, and join with a slip stitch. You should have 48 half double crochet stitches. Keep your tension consistent so the expanded circle remains as flat as possible.
Step 2: Build the Rounded Body
Round 3: Chain 1, work 1 single crochet in each of the 48 stitches around, and join with a slip stitch. This round strengthens the outer edge and helps define the circular silhouette.
If the body begins to ripple noticeably, return to Round 2 and replace some increases with single half double crochet stitches. The correct number of increases can vary with yarn thickness and stitch height.
For a more pronounced textured appearance, work a decorative round of reverse single crochet, also called the crab stitch, around the outer edge. This produces a twisted, rope-like border similar to the attractive edging visible on the owls.
Step 3: Shape the Owl’s Ears
Flatten the finished circle and identify the upper left and upper right positions. Each ear is constructed directly along the upper edge, helping the owl achieve its characteristic pointed shape.
For the first ear, join the yarn approximately six stitches to the left of the top center. Work 1 sc, 1 hdc, 1 dc, 1 tr, 1 dc, 1 hdc, and 1 sc across seven consecutive stitches. Fasten off and weave in the yarn.
Repeat the same sequence on the opposite side, leaving a short space between the two ears. The treble crochet creates the highest point of each ear, while the surrounding stitches provide a smooth triangular transition.
To make the ears firmer, you can add a second layer of slip stitches along their edges. This is particularly helpful for keychains that will be used frequently and exposed to movement inside handbags or backpacks.
Step 4: Create the White Crocheted Eyes
The oversized eyes are one of the most recognizable features of this cute crochet owl pattern. Their generous proportions give the owls an amusing and expressive appearance, making them suitable for gifts and decorative collections.
Using white cotton yarn, create a magic ring and work 6 single crochet stitches into the center. Pull the ring closed, then join with a slip stitch.
Round 2: Chain 1, work 2 single crochet stitches into each stitch around, creating 12 stitches. Join with a slip stitch.
Round 3: Chain 1, repeat 1 sc, 1 increase six times, creating 18 stitches. Join with a slip stitch and fasten off, leaving a long sewing tail.
Make a second identical eye. If you want larger eyes, add another round with evenly distributed increases. The completed eye circles should be large enough to occupy much of the owl’s upper body.
Insert one black safety eye into the center of each white crocheted circle before attaching the eyes to the body. Secure the safety-eye washers firmly. For accessories intended for babies or young children, embroidered black pupils are a safer alternative because detachable parts can present a choking hazard.
Step 5: Crochet and Attach the Beak
The tiny yellow beak creates an attractive contrast between the white eyes and the colorful body. It can be made with a few simple embroidery stitches or as a separate miniature triangular piece.
For an embroidered beak, thread a yarn needle with yellow cotton yarn. Position the needle between the two eyes, directly above the central opening.
Make three or four long vertical stitches that gradually narrow toward the bottom. This forms a small pointed beak resembling the golden details shown in the reference image.
Alternatively, create a chain of three stitches, work a single crochet and a slip stitch back along the chain, and sew this small piece between the eyes. Both techniques produce a charming result.
Once the beak is attached, arrange the two white eye circles on either side. Slightly overlapping the eyes helps create the friendly, wide-eyed expression that makes the owl design so distinctive.
Step 6: Assemble the Owl
Lay the completed body on a flat surface and position both eye pieces across the upper portion. Ensure that the eyes are symmetrical and that the yellow beak remains centered.
Using the long white yarn tails, sew each eye securely to the body. Work small stitches through the back loops of the eye circles so the seams are less noticeable from the front.
After attaching the eyes, weave in all remaining yarn tails. Gently shape the ears with your fingers and check that the body remains circular.
The completed crochet owl should now feature a small open center, rounded textured body, pointed ears, large white eyes, and a miniature yellow beak.
How to Add the Keychain Hardware and Customize Your Owls
Transforming your handmade owl into a functional accessory requires attaching a metal keychain ring. Although this step is simple, the connection must be strong enough to withstand everyday use. A securely attached ring helps prevent the crocheted ornament from separating from keys or handbags.
Choose a metal keyring with a short connecting chain. Gold-colored hardware complements warm shades such as yellow, pink, and cream, while silver-colored rings look attractive with turquoise, lavender, and other cool tones.
Attaching the Metal Keychain Ring
Use a yarn needle and a sturdy strand of matching cotton yarn to create a reinforced attachment loop between the ears. Pass the yarn through several upper-body stitches, then wrap it around the final chain link of the keychain hardware.
Repeat the connection several times to distribute tension evenly. Tie a secure knot on the back and weave the yarn tail through nearby stitches.
If you prefer a more professional finish, attach a small metal jump ring to a reinforced crocheted loop. Open the jump ring sideways using jewelry pliers, insert the loop and chain, then close it completely.
Check the connection by gently pulling on the keyring. The ornament should remain securely attached without distorting the crocheted ears or the circular body.
Beautiful Color Combinations
Turquoise Owl
Turquoise body, white eyes, golden yellow beak
Rose Pink Owl
Rose pink body, white eyes, mustard beak
Sunshine Yellow Owl
Mustard yellow body, white eyes, orange-gold beak
Lavender Owl
Lavender body, white eyes, bright yellow beak
Color customization is one of the biggest advantages of this pattern. You can crochet several owls using the same stitch instructions while giving each one a completely different personality through its color palette.
For seasonal designs, consider orange and brown for autumn, red and green for Christmas, or pastel pink and pale blue for spring. A carefully coordinated collection can become an attractive display for handmade craft sales.
Creative Uses for Crochet Owl Keychains
These handmade crochet keychains are useful beyond carrying keys. Their compact shape makes them suitable for purse charms, zipper decorations, backpack accessories, and personalized gift tags.
You can also create matching owl sets for friends, teachers, coworkers, and family members. Choosing colors that reflect each person’s preferences adds a thoughtful handmade touch.
For craft fairs, display the owls on small cardboard backing cards with simple packaging. Grouping them by color makes the collection visually appealing and helps customers appreciate the variety of handmade options.
A matching set of five colorful owls can also become a lovely gift collection. Their small size makes them easy to arrange in a decorative box with tissue paper and a personalized note.
Finishing Tips, Common Mistakes, and Care Instructions
A successful crochet owl keychain project depends on more than following the stitch instructions. Neat finishing, balanced proportions, and secure assembly significantly influence the final appearance. Taking a few extra minutes to adjust the eyes and ears can make a noticeable difference.
One common mistake is placing the eyes too far apart. Since the design relies on oversized, closely positioned eyes, excessive spacing can change the owl’s expression. Before sewing, use removable stitch markers to test different eye positions until the face looks balanced.
Another issue is uneven body tension. If the circle becomes distorted, check whether the increases are distributed consistently. Using the same hook and yarn weight throughout the entire body helps maintain an even shape.
How to Make Your Owl Look Professional
Keep the white eye circles symmetrical and make sure the black pupils face forward. When sewing the eyes, use small, evenly spaced stitches to avoid visible gaps along the edges.
For a clean border, work slowly around the outer edge and avoid pulling the yarn too tightly. A consistent decorative border gives the body a well-defined, finished appearance.
When creating the ears, compare their heights before fastening off. If one ear appears smaller, carefully adjust the stitch tension or remake it so both points match.
Finally, trim loose yarn fibers and hide all ends securely. These small finishing touches create a polished accessory suitable for gifts and handmade product displays.
Cleaning and Maintaining Crochet Keychains
Because keychains are handled frequently, they may collect dirt or dust over time. Cotton yarn is generally easy to maintain, although the exact care method depends on the yarn label and hardware used.
For routine cleaning, gently wipe the crochet surface with a slightly damp cloth. Avoid soaking the keychain if the metal hardware may tarnish or corrode.
If a deeper cleaning is necessary, use a small amount of mild soap and cool water. Keep moisture away from metal parts when possible, rinse carefully, and allow the ornament to air-dry completely.
Avoid twisting or wringing the owl, as this may distort the circular shape. Instead, place it on a dry towel and gently reshape the body and ears before drying.
With proper care, your crochet owl keychain can remain attractive and functional for a long time, making it a practical accessory as well as a delightful handmade keepsake.
Frequently Asked Questions About Crochet Owl Keychains
Is this crochet owl keychain suitable for beginners?
Yes. This beginner-friendly crochet pattern uses basic stitches such as single crochet, half double crochet, double crochet, and slip stitches. Beginners may need some additional practice when shaping the ears and attaching the oversized eyes, but the overall construction is approachable.
How long does it take to crochet one owl keychain?
Many crocheters can complete one owl in approximately 45–90 minutes. The time depends on experience, yarn thickness, and the amount of detail added during finishing.
What is the best yarn for this project?
Smooth cotton yarn is an excellent option because it provides clear stitch definition and helps maintain the ornament’s shape. Lightweight cotton or cotton-blend yarn can also work well with an appropriately sized hook.
Can I make the owl without safety eyes?
Absolutely. Black yarn embroidery, small crocheted black circles, or carefully sewn fabric pupils can replace plastic safety eyes. Embroidered details are especially useful when making accessories for younger children.
Can I make a larger crochet owl using this pattern?
Yes. You can increase the overall dimensions by using thicker yarn and a larger crochet hook. You may also expand the circular body with additional rounds and enlarge the eyes proportionally.
Do I need stuffing for this crochet owl?
No. The design shown here uses a relatively flat, circular structure. The raised stitches create decorative texture without requiring traditional amigurumi stuffing.
Are crochet owl keychains good items to sell?
These miniature accessories can be attractive items for handmade collections because they use modest quantities of materials and offer many customization possibilities. When pricing them, account for yarn, hardware, packaging, labor, and selling fees.
How can I make the keychain more durable?
Use tightly worked stitches, reinforce the attachment loop, and sew the eyes securely. Cotton yarn and sturdy metal hardware can help the finished ornament withstand regular handling.
Conclusion
The Crochet Owl Keychain Pattern combines creativity, colorful yarn, and simple crochet techniques in one adorable miniature project. With its rounded textured body, expressive oversized eyes, pointed ears, and bright yellow beak, this little owl is a delightful accessory that adds personality to everyday objects.
Whether you choose turquoise, pink, lavender, yellow, or cream, each handmade owl offers a new opportunity to explore colors and finishing details. You can personalize the design with different yarn textures, decorative borders, or coordinating keychain hardware.
Best of all, these cute crochet owl keychains are enjoyable to make, economical in their use of yarn, and suitable for thoughtful gifts or handmade collections. With a few basic supplies and careful attention to detail, you can transform simple crochet stitches into a charming collection of colorful owl companions.