
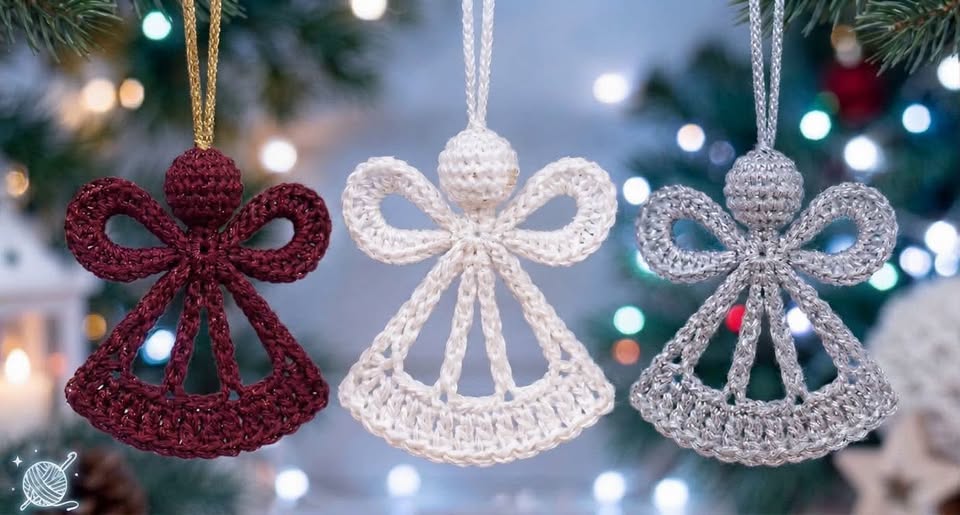
The beautiful crochet angel ornaments featured in this project showcase three enchanting colors: deep burgundy, snowy white, and shimmering silver. Each angel features a small crocheted head, two symmetrical wings, and a delicate bell-shaped skirt with an airy lace appearance.
The carefully arranged stitches create an elegant silhouette while keeping the ornament lightweight enough to hang from Christmas tree branches. Although these angels look intricate, their construction uses familiar crochet techniques that can be learned with patience and a little practice.Making a handmade crochet Christmas angel is also a meaningful way to celebrate the holidays. These ornaments can become treasured family keepsakes, thoughtful gifts for loved ones, or beautiful handmade decorations for seasonal celebrations.
You can customize the colors, yarn textures, and sizes to create a collection that matches your personal Christmas style. In this complete tutorial, you will discover the materials, recommended measurements, essential stitches, and detailed instructions needed to recreate these charming angels using American crochet terminology.
1. Materials and Preparation for Crochet Christmas Angel Ornaments
Before beginning your crochet Christmas angel pattern, gather the supplies needed to produce a neat and delicate finish. Choosing the right yarn is especially important because these decorations rely on defined stitches, graceful curves, and lightweight construction.
For ornaments similar to those pictured, fine cotton crochet thread provides excellent stitch definition. Metallic crochet thread can also create a festive sparkle, particularly for silver and gold decorations.
Materials needed:
-
Size 3 crochet cotton thread or lightweight cotton yarn
-
Burgundy, white, and silver yarn or crochet thread
-
2.0 mm or 2.5 mm crochet hook
-
Yarn needle for weaving in ends
-
Small scissors
-
Stitch markers
-
Polyester fiberfill for the angel’s head
-
Optional metallic thread for decorative details
-
Fabric stiffener or diluted white craft glue
-
Rustproof pins and a foam blocking board
-
Measuring tape
The finished ornament should measure approximately 10–12 cm (4–4.7 inches) tall and 8–10 cm (3.1–4 inches) wide, depending on the yarn, hook size, and tension. The openwork skirt should remain proportional to the wings for a balanced appearance.
For the color arrangement, burgundy creates a luxurious traditional Christmas appearance. White represents a peaceful winter atmosphere, while silver offers a sparkling finish that looks especially beautiful under Christmas lights.
If you prefer a softer appearance, consider cream, champagne, blush pink, or pale gold. These colors work beautifully with vintage-style Christmas decorations and neutral interiors.
The recommended gauge is approximately 6 single crochet stitches per 2.5 cm (1 inch), although exact gauge is less important than maintaining consistent stitch tension.
Because the angel contains several narrow openwork sections, avoid using extremely loose tension. Even stitches will make the wings more symmetrical and help the dress maintain its elegant shape.
Crochet abbreviations (US terminology)
| Abbreviation | Meaning |
|---|---|
| ch | Chain |
| sl st | Slip stitch |
| sc | Single crochet |
| hdc | Half double crochet |
| dc | Double crochet |
| tr | Treble crochet |
| inc | Increase (2 sc in one stitch) |
| dec | Invisible single crochet decrease |
| st(s) | Stitch(es) |
| rnd | Round |
| FO | Fasten off |
The construction described below is an original interpretation of the photographed ornament. It is designed to achieve a similar overall appearance rather than reproduce an unseen stitch chart exactly.
2. Step-by-Step Crochet Christmas Angel Pattern
The crochet Christmas angel ornament is constructed in separate sections: a rounded head, a central body, two decorative wings, and an openwork skirt. The components are joined carefully to create a balanced angel silhouette.
Step 1: Crochet the angel’s head
Begin with your selected yarn and a 2.0 mm crochet hook. The head is a small stuffed sphere that sits at the top of the ornament.
Head pattern:
-
Round 1: Make a magic ring and work 6 sc into the ring. (6)
-
Round 2: Work 2 sc in each stitch. (12)
-
Round 3: 1 sc, inc; repeat around. (18)
-
Rounds 4–6: Work 1 sc in each stitch. (18)
-
Round 7: 1 sc, dec; repeat around. (12)
-
Gently stuff the head with a small amount of fiberfill.
-
Round 8: Dec 6 times. (6)
Fasten off, leaving a long tail for sewing. Use a yarn needle to close the remaining opening.
The head should measure approximately 2–2.5 cm in diameter. Avoid overstuffing, because the finished angel should remain lightweight and retain a delicate appearance.
Step 2: Create the central body
The central section connects the head, wings, and skirt. It also forms the angel’s narrow upper silhouette.
Chain 7 using the same yarn. Beginning in the second chain from the hook, work 6 sc across.
Chain 1, turn, and work another row of 6 sc. Repeat for a total of three rows, creating a narrow rectangular body.
Fasten off, leaving a long tail. Position this section vertically underneath the head and sew the upper edge securely to the bottom of the sphere.
The central body should measure approximately 2.5 cm long. Small differences are acceptable, but the wings should eventually be attached symmetrically to its upper section.
Step 3: Crochet the angel wings
The wings are among the most recognizable features of this Christmas angel crochet pattern. Their soft oval openings create the elegant, bow-like appearance seen in the image.
Make the first wing by chaining 15. Work 2 sc in the second chain from the hook, then 1 sc in each of the next 11 chains.
Work 3 sc in the final chain to turn around the end. Continue along the opposite side of the foundation chain with 1 sc in each available chain space.
Work 1 sc and 1 sl st near the beginning to close the oval. The foundation chain forms an open center, while the surrounding stitches create the decorative border.
For a fuller wing, work an additional round of sc around the oval, placing extra stitches at the outer curve whenever necessary to keep the shape flat.
Fasten off and make a second identical wing.
Gently shape both wings with your fingers. Each wing should measure approximately 3.5–4 cm long when using fine cotton yarn.
Step 4: Make the openwork angel skirt
The delicate skirt is the focal point of the design. Instead of a solid fabric surface, the crochet angel dress consists of several vertical chain arches connected by a decorative lower edge.
First, make five separate strands, each beginning with a foundation chain. Use approximately 12–16 chains per strand, adjusting the length to create a gentle bell-shaped outline.
The center strands should hang almost vertically, while the outer strands should angle outward to form the sides of the dress.
Attach the upper ends of the strands to the lower portion of the central body. Arrange them evenly, maintaining symmetrical spacing.
Next, join the lower ends by crocheting a gently curved foundation edge. Work 2–3 sc into each strand connection, adding chains between the connections if extra width is needed.
For the decorative bottom band, work a row of dc stitches along the lower edge. Increase at evenly spaced intervals to create a softly flared hem.
Finish with a row of sc, or use a decorative shell border for a more elaborate appearance.
The skirt should measure approximately 5–6 cm from the waist to the hem. Its bottom width should be around 7–8 cm.
Step 5: Assemble the angel
Place all crocheted sections on a flat surface before sewing them together. Arrange the wings at the upper sides of the central body, just beneath the head.
Use a yarn needle and matching thread to sew each wing in place. Make several small stitches at the center to prevent the wings from twisting.
Check that the wings are positioned at the same height and angle. A symmetrical arrangement is especially important for Christmas ornaments that hang freely.
Attach the upper portion of the skirt to the lower body. Ensure that the skirt falls naturally beneath the wings and that the outer strands form a balanced, triangular shape.
Weave in all remaining yarn ends. Avoid bulky knots on the back because they may become visible when the ornaments are suspended from Christmas tree branches.
Step 6: Add the hanging loop
Cut a piece of matching crochet thread approximately 20 cm long. Fold it in half to create a loop.
Attach both ends securely to the top of the angel’s head with a yarn needle. Adjust the loop until the finished hanging length is approximately 7–9 cm.
Test the ornament by suspending it from your fingers. If it tilts forward or sideways, adjust the loop attachment point before securing the ends.
For the silver angel, metallic thread creates a particularly elegant finish. Burgundy and white ornaments can use matching cotton thread for a coordinated appearance.
3. Finishing Techniques and Creative Christmas Decoration Ideas
Proper finishing can transform a simple crochet angel ornament into an elegant Christmas decoration. Because the design contains open spaces and lightweight strands, shaping and stiffening are essential for maintaining the intended silhouette.
Start by gently dampening the completed ornament with clean water. Place it on a foam blocking board covered with a protective cloth or plastic sheet.
Arrange the wings, skirt, and central body into the desired shape. Use rustproof pins to hold the outer edges of the wings and the bottom hem in place.
For extra firmness, apply a small amount of fabric stiffener to the wings and dress, keeping it away from the stuffed head. Allow the ornament to dry completely according to the product instructions.
Once dry, remove the pins and check the overall appearance. The wings should remain gently rounded, while the skirt should preserve its decorative openwork shape.
If you want a more sparkling Christmas ornament, incorporate a subtle metallic thread into the outer wing edges or the lower skirt border. A delicate shimmer is often more elegant than excessive decoration.
You can also personalize the design by adding tiny bows, embroidered stars, miniature beads, or a small decorative halo. Any embellishments should be securely attached, particularly if the ornaments will be displayed around children or pets.
Beautiful ways to display crochet angels
One of the most traditional uses for these handmade Christmas decorations is hanging them directly on a Christmas tree. Their lightweight construction allows them to rest beautifully among evergreen branches and decorative lights.
A collection of white crochet angels looks especially elegant on a tree decorated with warm white lighting, pearl ornaments, and champagne-colored ribbons.
Burgundy angels create a richer appearance when paired with gold decorations, velvet bows, and traditional red Christmas ornaments.
Silver crochet angels are ideal for winter-themed displays featuring frosted greenery, glass ornaments, and cool-toned lighting.
These decorations also make charming additions to Christmas gift wrapping. Attach one angel to a package with a satin ribbon to create a keepsake the recipient can enjoy long after the gift has been opened.
For a decorative wall hanging, suspend several angels from a natural wooden branch using strings of different lengths. Add evergreen sprigs or small battery-operated lights to complete the arrangement.
Another creative possibility is to build an entire crochet angel Christmas garland. Make several ornaments in complementary colors and attach them to a length of braided cotton cord.
The finished garland can be displayed along a mantel, staircase, window frame, or holiday shelf. Choose ornaments of similar dimensions to keep the arrangement visually balanced.
4. Tips for Customizing and Perfecting Your Crochet Angel Pattern
One of the greatest advantages of making crochet Christmas angels is the freedom to customize their appearance. Small changes in color, yarn weight, stitch texture, or decorative finishing can produce entirely different results.
For an elegant traditional collection, create angels in burgundy, ivory, and antique gold. These warm shades complement wooden furniture, evergreen garlands, and classic Christmas decorations.
If you enjoy modern holiday decorating, experiment with silver, icy blue, white, and pale gray. These colors create a peaceful winter-inspired atmosphere.
A vintage-inspired collection can feature cream cotton thread, dusty rose, sage green, and muted champagne. These softer shades work particularly well with handmade lace decorations.
For a more luxurious appearance, use fine metallic crochet thread. Work slowly and maintain consistent tension, as metallic fibers can be less forgiving than regular cotton.
You can also modify the size of the ornaments. Using thicker yarn and a larger hook will produce bigger angels, while finer thread and a smaller hook will create miniature decorations.
When resizing the design, adjust the wing length and skirt proportions together. This helps prevent the head or wings from looking oversized compared with the dress.
Common crochet mistakes and how to avoid them
Uneven wings are one of the most common difficulties when making this design. Count the stitches carefully and use the same hook, yarn, and tension for both wings.
If one wing curls more than the other, gently block them into matching shapes before attaching them to the body.
Another common challenge is an uneven skirt. To correct this, lay the angel on a flat surface and measure the distances between the vertical strands before securing the lower border.
If the dress appears too narrow, increase the length of the outer strands or add a few chain stitches along the bottom edge.
Loose hanging loops can cause the ornament to tilt. Always attach the loop through several stitches at the top of the head and secure the thread firmly.
For long-lasting decorations, store completed angels flat in a dry container, separating them with tissue paper. Avoid crushing the wings or folding the stiffened skirt.
Frequently Asked Questions About Crochet Christmas Angels
Is this crochet Christmas angel pattern suitable for beginners?
Yes, confident beginners can make these angels if they already understand basic stitches such as chain, single crochet, double crochet, and slip stitch. The openwork skirt and symmetrical wings may require additional patience.
What yarn is best for crochet angel ornaments?
Fine cotton thread is an excellent option because it provides neat stitch definition and holds its shape after blocking. Metallic thread is also suitable for decorative Christmas angels.
How long does it take to crochet one angel?
A small angel may take approximately 1–3 hours, depending on your experience, yarn selection, and finishing technique. Beginners may need additional time.
Can I make these angels without stuffing?
You can create a flattened decorative head, but it will look different from the rounded head shown in the image. A small amount of fiberfill is recommended for this version.
How do I make the crochet angels stand out on a Christmas tree?
Choose contrasting yarn colors, place the ornaments near warm Christmas lights, and keep the wings carefully shaped. Metallic yarn can add a beautiful festive sparkle.
Can crochet angels be washed?
If made with washable cotton thread, they may be gently hand-washed. However, stiffened ornaments may lose their shape and require blocking and stiffening again after washing.
Can I use this pattern to make handmade Christmas gifts?
Absolutely. These ornaments are wonderful for gift exchanges, holiday party favors, decorative packages, and personalized Christmas keepsakes.
How can I make the angel skirt more decorative?
Add a picot border, small scallops, or a contrasting row of fine metallic thread. Keep the decorative elements lightweight to preserve the elegant openwork appearance.
Conclusion
Creating your own crochet Christmas angel ornaments is a wonderful way to add handmade charm and personal meaning to the holiday season. Their delicate wings, graceful openwork skirts, and elegant color combinations make them beautiful decorations that can be enjoyed year after year.
Whether you choose rich burgundy, classic white, shimmering silver, or your own favorite Christmas colors, each handmade crochet angel can become a unique expression of creativity and festive tradition.
With simple materials, basic crochet stitches, and careful finishing, you can create an entire collection of beautiful Christmas angels for your home, family, and friends. These timeless ornaments are more than seasonal decorations—they are small handmade treasures that celebrate the beauty of Christmas and the joy of creating something special with your own hands.