
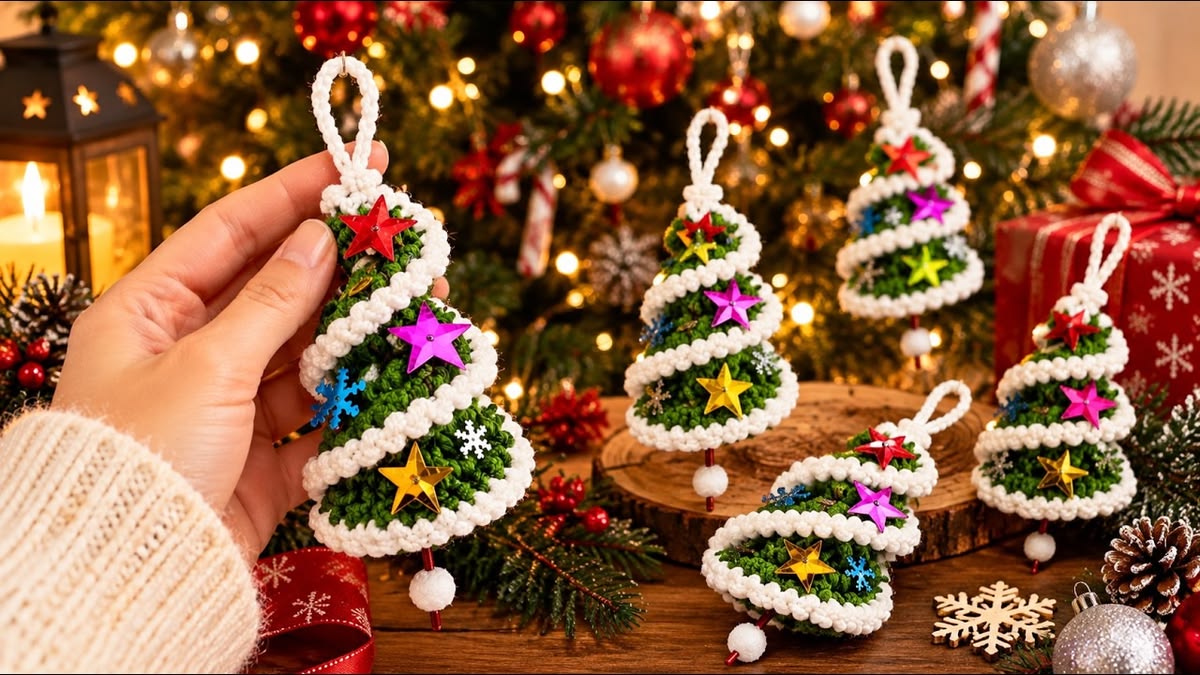
The beautiful mini crochet Christmas trees featured in this design have a festive green body decorated with a swirling white garland, colorful stars, and a delicate hanging loop. Their three-dimensional appearance gives them a playful, elegant look that stands out among traditional Christmas decorations. The combination of green and white yarn creates the feeling of a snow-covered evergreen tree, while the bright stars bring cheerful holiday sparkle.
Another wonderful feature of this easy crochet Christmas ornament pattern is its versatility. You can make several trees using different yarn colors, adjust their sizes, and personalize them with tiny bells, sequins, beads, or decorative snowflakes.
These handmade ornaments are ideal for Christmas trees, holiday wreaths, festive garlands, gift packages, and seasonal home decorations. With a few basic crochet techniques and some patience, you can create an entire collection of beautiful decorations that will be treasured for years.
Materials and Supplies for Crochet Christmas Tree Ornaments
Before beginning your handmade crochet Christmas trees, it is important to gather the necessary materials. Selecting the right yarn and crochet hook will help produce firm stitches, attractive details, and a well-defined tree shape.
For this project, medium-weight cotton or acrylic yarn is an excellent choice. Cotton yarn provides structure and clear stitch definition, while acrylic yarn creates a softer, lightweight finish. Both options work well for decorative ornaments.
Choose a rich forest green for the main tree and a soft white or cream yarn for the spiral garland. You can also experiment with emerald green, sage green, or traditional Christmas red to create different combinations.
Materials needed:
-
Worsted-weight yarn (#4) in forest green and white.
-
3.5 mm (E/4) crochet hook.
-
Small amount of brown or burgundy yarn for the trunk.
-
Polyester fiberfill for light stuffing.
-
Yarn needle for sewing and finishing.
-
Stitch markers.
-
Small scissors.
-
Decorative stars, snowflakes, or sequins.
-
Small white pom-poms.
-
Fabric-safe craft glue or needle and thread.
-
Optional metallic embroidery thread.
The finished ornament in this tutorial measures approximately 10–12 cm tall, excluding the hanging loop, and 7–8 cm wide at the base. The exact dimensions will depend on your yarn, hook size, and crochet tension.
For a smaller ornament, use lightweight yarn and a 2.5 mm hook. For a larger decorative tree, choose thicker yarn and adjust your hook accordingly.
Crochet stitches and abbreviations (US terms)
| Abbreviation | Meaning |
|---|---|
| MR | Magic ring |
| ch | Chain |
| sc | Single crochet |
| inc | Increase (2 sc in one stitch) |
| sl st | Slip stitch |
| st | Stitch |
| BLO | Back loop only |
| FO | Fasten off |
The main tree is worked using single crochet stitches in continuous rounds, making it suitable for crocheters who already understand basic amigurumi techniques.
Step-by-Step Crochet Christmas Tree Pattern
Creating these 3D crochet Christmas tree ornaments begins with a simple cone-shaped structure. Gradual increases widen the tree from its pointed top toward its rounded base.
This original construction is designed to recreate the general appearance of the ornament shown in the image. The tree is made first, followed by its white spiral garland and decorative finishing details.
Step 1: Crochet the green Christmas tree
Using forest green yarn and a 3.5 mm crochet hook, begin at the top of the tree.
Tree body pattern:
| Round | Instructions | Total |
|---|---|---|
| 1 | 4 sc in MR | 4 |
| 2 | (sc, inc) repeat twice | 6 |
| 3 | sc in each st | 6 |
| 4 | (sc, inc) repeat 3 times | 9 |
| 5 | sc in each st | 9 |
| 6 | (2 sc, inc) repeat 3 times | 12 |
| 7 | sc in each st | 12 |
| 8 | (3 sc, inc) repeat 3 times | 15 |
| 9 | sc in each st | 15 |
| 10 | (4 sc, inc) repeat 3 times | 18 |
| 11 | sc in each st | 18 |
| 12 | (5 sc, inc) repeat 3 times | 21 |
| 13 | sc in each st | 21 |
| 14 | (6 sc, inc) repeat 3 times | 24 |
| 15 | sc in each st | 24 |
| 16 | (7 sc, inc) repeat 3 times | 27 |
| 17 | sc in each st | 27 |
| 18 | (8 sc, inc) repeat 3 times | 30 |
| 19 | sc in each st | 30 |
| 20 | (9 sc, inc) repeat 3 times | 33 |
| 21 | sc in each st | 33 |
| 22 | (10 sc, inc) repeat 3 times | 36 |
| 23 | sc in each st | 36 |
| 24 | (11 sc, inc) repeat 3 times | 39 |
| 25 | sc in each st | 39 |
| 26 | (12 sc, inc) repeat 3 times | 42 |
| 27 | sc in each st | 42 |
| 28 | (13 sc, inc) repeat 3 times | 45 |
| 29 | sc in each st | 45 |
| 30 | (14 sc, inc) repeat 3 times | 48 |
After completing Round 30, fasten off and weave in the yarn end. The result should be a small, pointed crochet cone with an open bottom.
Keep your stitches firm but comfortable. A consistent tension helps the cone maintain a smooth shape and prevents stuffing from showing through.
Step 2: Create the circular base
To give the ornament a finished three-dimensional appearance, crochet a matching circular base using green yarn.
Begin with a magic ring and follow these rounds:
-
Round 1: 6 sc in MR (6).
-
Round 2: inc in every st (12).
-
Round 3: (sc, inc) repeat 6 times (18).
-
Round 4: (2 sc, inc) repeat 6 times (24).
-
Round 5: (3 sc, inc) repeat 6 times (30).
-
Round 6: (4 sc, inc) repeat 6 times (36).
-
Round 7: (5 sc, inc) repeat 6 times (42).
-
Round 8: (6 sc, inc) repeat 6 times (48).
Leave a long yarn tail for sewing.
Place a small amount of polyester fiberfill inside the green cone. Avoid overstuffing because the tree should remain light enough to hang comfortably.
Align the 48 stitches of the base with the 48 stitches at the bottom of the cone. Sew them together using a yarn needle, matching one stitch to one stitch all the way around.
The finished shape should resemble a miniature evergreen tree with a gently rounded base.
Step 3: Make the white spiral Christmas garland
The white spiral is one of the most attractive features of this crochet Christmas ornament. It wraps around the green tree, creating the appearance of a fluffy garland or fresh snow resting on evergreen branches.
Using white yarn, create a chain approximately 55–65 cm long. The exact length depends on the size and shape of your finished tree.
Work 2 sc into the second chain from the hook, then continue working 2 sc into each remaining chain. This creates a slightly ruffled strip that naturally curls.
Fasten off, leaving a long tail for attaching the garland.
Start near the pointed top of the tree and wrap the white strip downward in a loose spiral. Position each turn approximately 2–3 cm below the previous one, adjusting the spacing to suit the cone.
Use small stitches with a yarn needle to secure the garland to the green tree. Attach it at regular intervals so the spiral remains in position.
For a fuller, more textured appearance, gently spread the white stitches with your fingers. The resulting trim should resemble a soft snowy ribbon winding around the Christmas tree.
Step 4: Add the hanging loop
A sturdy hanging loop is essential for displaying your handmade ornament.
Using white yarn, chain approximately 25 stitches or enough to create a loop measuring around 5–6 cm when folded.
Fasten off and leave long yarn tails on both ends.
Fold the chain into a loop and carefully attach both ends to the top of the Christmas tree. Sew through several stitches to reinforce the attachment.
Make sure the loop is centered so the ornament hangs vertically without tilting.
For extra strength, you can reinforce the loop with a second strand of yarn.
Step 5: Crochet the decorative trunk
The small trunk adds a beautiful finishing touch to the ornament, especially when paired with the white pom-pom shown in the inspiration image.
Using brown or burgundy yarn, make a magic ring with 6 single crochet stitches.
Work one additional round of 6 sc, then fasten off, leaving a long tail for sewing.
Lightly stuff the tiny cylinder if desired and attach it to the center of the tree’s underside.
You can also use a small piece of burgundy cord instead of a crocheted trunk for a slimmer appearance.
Attach a miniature white pom-pom to the bottom using sewing thread or yarn. This adds a cheerful decorative detail and makes the ornament look especially festive.
Step 6: Decorate with colorful Christmas stars
Now comes the most creative part of the entire project: decorating your mini Christmas tree ornament.
Choose small lightweight stars in traditional Christmas colors such as red, gold, silver, green, blue, and pink.
Arrange the decorations across the green surface, leaving sections of the white spiral clearly visible.
For a balanced appearance, place one bright star near the upper portion of the tree, another around the middle, and one or two near the lower section.
Sew decorations securely whenever possible. Fabric-safe glue may be used for ornaments intended only for display, but follow the adhesive manufacturer’s instructions and allow it to cure completely.
Small embroidered snowflakes or crocheted stars are another wonderful alternative.
Keep the decorations lightweight to prevent the ornament from leaning or losing its shape.
Creative Decoration Ideas and Holiday Uses
One of the reasons crochet Christmas tree decorations are so popular is that they can be customized in endless ways. Even when you follow the same basic tree pattern, changing the yarn colors or embellishments can create a completely different appearance.
A traditional Christmas version looks beautiful with dark green yarn, white spiral trim, and red and gold decorations. This timeless combination works especially well on Christmas trees decorated with warm lights, wooden ornaments, and rustic holiday accents.
For a winter wonderland theme, use pale mint green, icy blue, and white. Add silver snowflakes and pearl-like embellishments for an elegant snowy appearance.
If you enjoy vintage-inspired Christmas decorations, try olive green yarn with cream trim, burgundy stars, and antique gold details. These colors create a warm, nostalgic look.
You can also create a playful collection using different shades of green and multicolored stars. Hang several ornaments at different heights to make your Christmas tree look cheerful and handmade.
Another lovely idea is to attach these decorations to wrapped Christmas presents. A handmade crochet ornament can serve as both a gift topper and a keepsake that the recipient can use year after year.
Decorating your home with crochet Christmas trees
These ornaments are not limited to traditional Christmas trees. Their small size makes them useful for many seasonal decorating projects.
Attach several to a handmade garland and display it across a mantel, staircase, or shelf. Alternating the crochet trees with tiny bells and ribbons creates an inviting holiday arrangement.
You can also hang them from cabinet handles in the kitchen, incorporate them into a Christmas wreath, or display them on decorative branches inside a vase.
For festive table decorations, place a few ornaments around a centerpiece with pinecones, evergreen branches, and battery-powered candles.
If you are preparing holiday gifts for friends, neighbors, or family members, these miniature trees are thoughtful handmade keepsakes that can be personalized with favorite colors.
Because the ornaments are lightweight, they are also easy to store after the holidays. Place them in a dry container and protect delicate embellishments with tissue paper.
Helpful Crochet Tips, Common Mistakes, and Frequently Asked Questions
When making easy crochet Christmas tree ornaments, paying attention to a few small details can significantly improve the final result.
The most important factor is stitch tension. If your stitches are too loose, the tree may appear uneven or reveal the fiberfill inside. Using a slightly smaller crochet hook can help create a firmer fabric.
Another useful tip is to check the cone’s shape regularly while crocheting. Gradual increases should create a smooth silhouette without sudden bumps or irregular sections.
The white spiral should follow the natural shape of the tree rather than being pulled too tightly. Tightening the garland excessively can distort the green body and make the ornament look uneven.
Finally, make sure every decorative element is securely attached. This is particularly important if the ornaments will be stored and reused for multiple Christmas seasons.
Frequently Asked Questions
Is this crochet Christmas tree pattern suitable for beginners?
Yes. Crocheters familiar with magic rings, single crochet, increases, and basic sewing techniques should find this project manageable. The construction is straightforward and uses repetitive rounds.
How long does it take to make one crochet Christmas ornament?
Most crocheters can complete one ornament in approximately 1–3 hours. The exact time depends on experience, yarn choice, and the number of decorative details.
Can I use leftover yarn for this project?
Absolutely. These miniature decorations are excellent for using leftover green, white, and colorful yarn from previous crochet projects.
Can I make the Christmas trees larger?
Yes. Thicker yarn and a larger crochet hook will produce a larger tree. You can also continue the established increase sequence for additional rounds to create a wider cone.
How can I make the white garland look fluffier?
Try using textured white yarn or adding more stitches into each chain. A slightly ruffled trim gives the garland a fuller, snow-covered appearance.
Can I wash the finished ornaments?
If the ornament contains only washable yarn and securely sewn embellishments, gentle handwashing may be possible. Ornaments with glued stars, metallic decorations, or delicate accessories are better cleaned with a soft, dry cloth.
Are these ornaments safe for homes with young children or pets?
Small stars, sequins, beads, and pom-poms can become choking hazards if detached. For homes with children or pets, use embroidered decorations and keep ornaments out of reach.
Can I make these Christmas trees as handmade gifts?
Yes. Their festive appearance, lightweight structure, and customizable colors make them wonderful presents for family members, friends, teachers, and fellow crochet lovers.
Conclusion
Making your own crochet Christmas tree ornaments is a delightful way to combine creativity, tradition, and holiday spirit. These miniature green trees, decorated with fluffy white spirals and colorful stars, bring personality and warmth to any Christmas celebration.
The pattern is simple enough to enjoy as a relaxing seasonal project while offering plenty of opportunities for customization. From elegant vintage colors to bright and playful combinations, every ornament can reflect your individual style.
Best of all, handmade Christmas decorations carry a special meaning. Each stitch represents time, care, and creativity, turning an ordinary ball of yarn into a keepsake filled with holiday memories.
Whether you make just one beautiful ornament or an entire collection, these DIY crochet Christmas decorations are sure to add a charming handmade touch to your holiday home.