
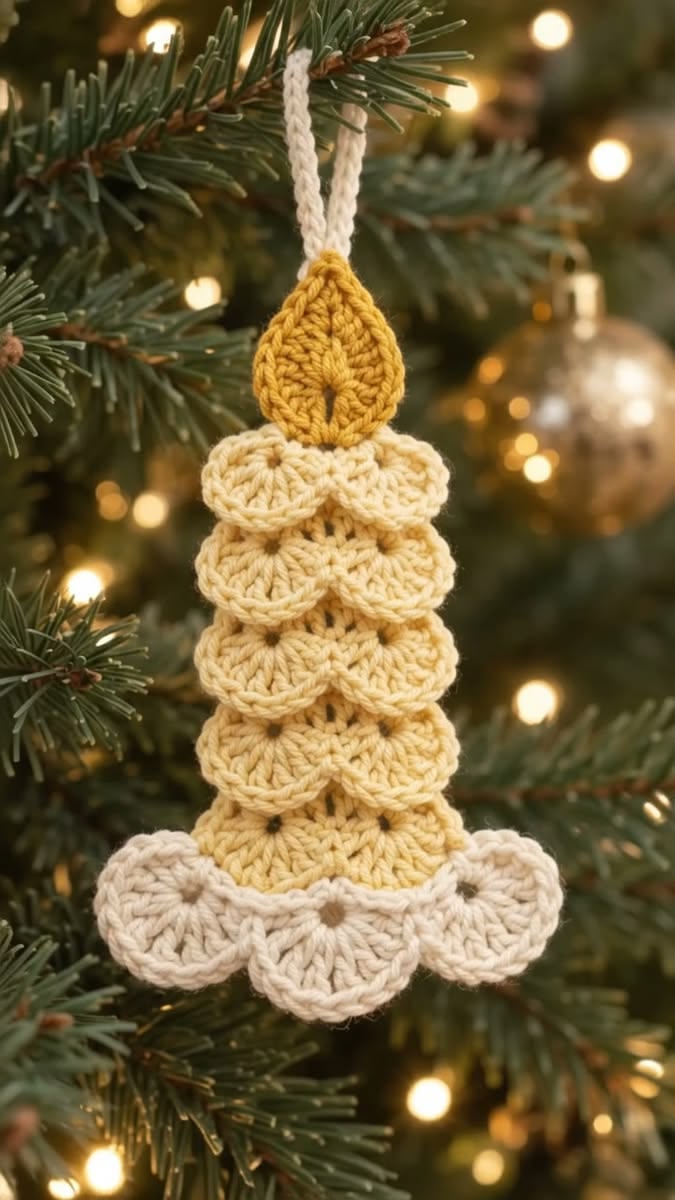
One of the most attractive features of this handmade crochet Christmas ornament is its layered design. The candle body features overlapping shell-like stitches that resemble decorative wax dripping gently down the sides. The rich golden color gives the project a warm appearance, while the ivory details at the bottom create an elegant contrast. A simple crocheted hanging loop completes the design, allowing the finished candle to hang beautifully from a Christmas tree branch.
Whether you are an experienced crocheter or someone looking for a new holiday craft, this crochet candle decoration is a delightful project to explore. It requires only a small amount of yarn, making it a practical choice for using leftover materials from other projects.
These charming ornaments can decorate Christmas trees, embellish wrapped gifts, brighten holiday wreaths, or become thoughtful handmade presents for friends and family.
Materials and Preparation for Your Crochet Christmas Candle
Before beginning this beautiful Christmas crochet project, gather your supplies and choose a comfortable workspace. Since the ornament contains several decorative layers, using yarn with good stitch definition will help showcase its intricate texture.
Cotton yarn is an excellent choice because it maintains the shape of the scalloped sections. Acrylic yarn can also work beautifully, especially when you prefer a softer and slightly fuller ornament. The most important consideration is selecting yarn that produces neat stitches without making the decoration excessively heavy.
For a traditional Christmas appearance, choose warm golden yellow for the candle body, mustard gold for the flame, and soft ivory for the decorative base and hanging loop. These colors create a sophisticated combination that works especially well with natural greenery and warm white Christmas lights.
Materials Needed
-
Worsted-weight cotton or acrylic yarn in golden yellow, ivory, and mustard gold
-
3.5 mm crochet hook (US E/4), or a size that produces firm stitches
-
Yarn needle for joining pieces and weaving in ends
-
Small scissors
-
Stitch markers
-
Measuring tape
-
Optional fabric stiffener for additional structure
Suggested Finished Measurements
| Component | Approximate size |
|---|---|
| Candle body | 10–12 cm tall |
| Candle width | 5–6 cm |
| Decorative base | 8–9 cm wide |
| Flame | 3–4 cm tall |
| Hanging loop | 5–6 cm long |
| Total ornament height | 17–20 cm |
These measurements are approximate and may vary depending on yarn thickness, hook size, and individual crochet tension.
Crochet Abbreviations (US Terms)
| Abbreviation | Meaning |
|---|---|
| ch | Chain |
| sl st | Slip stitch |
| sc | Single crochet |
| hdc | Half double crochet |
| dc | Double crochet |
| tr | Treble crochet |
| st | Stitch |
| sp | Space |
| rep | Repeat |
| FO | Fasten off |
A small gauge swatch is optional for this project. However, crocheting with consistent tension will make the layered sections easier to arrange and help the finished ornament maintain its shape.
Step-by-Step Crochet Christmas Candle Ornament Tutorial
The decoration shown features a tapered candle shape, overlapping scalloped layers, a pointed flame, and a decorative three-scallop base. The following instructions provide an original method for creating a similar ornament rather than an exact stitch-by-stitch reconstruction of the photographed piece.
For beginners, the easiest method is to create a flat candle foundation and attach separate decorative crochet pieces. This approach makes the ornament lightweight, helps maintain its shape, and allows each scalloped layer to be positioned neatly.
Step 1: Crochet the Candle Foundation
Begin with the golden-yellow yarn and make a foundation chain of 13 stitches.
Row 1: Work 1 sc in the second chain from the hook and in each remaining chain. You should have 12 sc. Chain 1 and turn.
Rows 2–4: Work 1 sc in each stitch across. Chain 1 and turn at the end of each row.
Row 5: Work a sc decrease over the first two stitches, sc across until two stitches remain, then work another decrease. You should have 10 stitches.
Continue working four rows evenly, then decrease once at each end of the next row to create a gently tapered body.
Repeat this shaping process until the upper portion measures approximately 5–6 stitches wide. Continue for another two rows before fastening off.
The finished foundation should have a slightly wider bottom and a narrower upper edge. This shape supports the decorative layers and creates the classic silhouette of a holiday candle.
Step 2: Create the Decorative Scalloped Layers
The overlapping scalloped sections are the most distinctive elements of this crochet Christmas candle pattern. They add dimension and give the ornament a soft, decorative appearance.
Using ivory yarn for the upper decorative section, make a magic ring.
Work ch 3, 3 dc into the ring, ch 2, and sl st into the ring. Repeat this sequence twice more to create three small rounded petals.
Pull the ring closed and fasten off, leaving a long yarn tail for sewing.
For the golden candle layers, use the same technique with golden-yellow yarn. Increase the number of double crochet stitches in each petal to five or six when you want a fuller, more pronounced scallop.
Create approximately five or six decorative sections, depending on the desired height and fullness of your candle.
Arrange these pieces vertically over the foundation, beginning near the lower section and working toward the top. Overlap each section slightly so the petals form a continuous textured surface.
Step 3: Attach the Scalloped Sections
Place the candle foundation on a flat surface and position the decorative pieces before sewing them into place.
Begin by attaching the lower golden scallop. Use the long yarn tail and a yarn needle to secure the center of the piece to the foundation.
Continue attaching each additional scallop above the previous one, allowing the rounded edges to overlap naturally.
For the upper section, position the ivory scallop just below the area where the flame will be attached. This creates the appearance of a lighter decorative wax layer.
Avoid pulling the sewing stitches too tightly. Keeping the scallops slightly raised preserves the dimensional texture that makes this Christmas ornament so appealing.
Step 4: Crochet the Golden Flame
The small pointed flame gives the decoration its recognizable candle appearance. It should be narrow at the top, rounded along the sides, and slightly wider near the lower portion.
Using mustard-gold yarn, chain 7.
Round 1: Work 1 sc in the second chain from the hook, 1 hdc in the next stitch, 1 dc in each of the next two stitches, 1 hdc in the next stitch, and 3 sc in the last chain.
Continue working along the opposite side of the foundation chain with 1 hdc, 2 dc, 1 hdc, and 1 sc.
Join with a slip stitch and fasten off, leaving a long tail.
Gently shape the piece into a teardrop silhouette, with the narrow end pointing upward. If desired, create a second identical flame and sew the pieces together for a slightly thicker appearance.
Attach the completed flame to the upper center of the candle foundation. Secure the lower portion carefully so the flame stands upright when the decoration is hanging.
Step 5: Create the Decorative Ivory Base
The bottom of the ornament features soft ivory scallops that provide visual balance and make the candle appear more elegant.
Begin with ivory yarn and make a magic ring.
Work ch 3, 6 dc into the ring, ch 2, and sl st into the ring. Repeat twice to form three rounded scallops.
Pull the center ring closed, adjust the petals, and fasten off with a long sewing tail.
Position the ivory base across the bottom edge of the candle. Allow the three scallops to extend slightly beyond the golden foundation.
Sew the center securely, followed by the upper edges of the side scallops. Leave the rounded lower edges free to maintain their decorative appearance.
Step 6: Add the Hanging Loop
Using ivory yarn, chain approximately 25–30 stitches, depending on your preferred hanging length.
Fold the chain into a loop and join the ends with a slip stitch. Fasten off, leaving enough yarn to sew the loop securely to the back of the ornament.
Attach the loop behind the upper flame and candle body, ensuring that the weight is distributed evenly.
Before completing the attachment, hold the ornament by its hanging loop to check that the candle remains straight.
If the decoration tilts to one side, adjust the attachment point before weaving in the remaining yarn ends.
Creative Ways to Decorate and Personalize Your Crochet Candle
One of the wonderful qualities of this crochet Christmas ornament is the flexibility to experiment with colors, textures, and decorative details. Although the golden and ivory combination is especially elegant, many other color palettes can create beautiful holiday effects.
For a traditional Christmas tree, consider making the candle body in rich red with white scalloped accents. This color combination brings a festive atmosphere and coordinates beautifully with green branches and gold ornaments.
A winter-inspired version can feature icy blue yarn, white decorative layers, and a silver-gray hanging loop. These softer shades are perfect for Christmas trees decorated with snowflakes, frosted greenery, and shimmering white lights.
For a more luxurious appearance, combine cream-colored yarn with metallic gold accents. A delicate strand of metallic thread can be worked alongside the main yarn to create a subtle shimmer without overwhelming the handmade texture.
Another lovely idea is to create several candle ornaments in different sizes. Smaller candles can decorate miniature Christmas trees, while larger versions can become focal points on wreaths or festive wall hangings.
You can also personalize these decorations with tiny embroidered stars, subtle bead accents, or miniature crochet bows. When adding embellishments, ensure they are attached securely, especially if the ornaments will be used in homes with small children or pets.
Tips for a Professional Handmade Finish
The difference between a simple crochet decoration and a beautifully finished ornament often comes down to small details.
First, maintain consistent tension throughout the project. Uneven stitches can make the scallops appear irregular or cause the ornament to lean.
Second, weave in all loose yarn ends carefully. Because the candle is designed to hang freely, both sides should look neat and attractive.
Third, lightly block the individual decorative pieces before assembly if they curl excessively. This helps the scalloped edges retain their rounded shape.
Finally, remember that a crocheted candle is decorative only. Never place it near an actual candle flame, hot light bulb, or other heat source. Battery-powered LED lights are a safer choice for creating a glowing holiday display.
Handmade Christmas Gift Ideas and Frequently Asked Questions
Handmade ornaments have a special charm because they reflect the creativity, time, and attention of the person who made them. A crochet Christmas candle ornament can become a meaningful holiday keepsake that families enjoy displaying year after year.
These decorations are especially suitable for holiday gift exchanges, classroom presents, handmade Christmas markets, and thoughtful additions to gift baskets. Their compact size makes them easy to package, store, and transport.
Another delightful idea is to create a matching set of ornaments using coordinated colors. A collection of golden candles, crocheted stars, miniature Christmas trees, and snowflakes can give any holiday display a cohesive handmade theme.
For gift wrapping, place the finished ornament inside a small decorative box lined with tissue paper. Add a handwritten holiday message to make the present feel even more personal.
Because this project uses relatively small amounts of yarn, it can also be an economical way to create numerous Christmas decorations. Experienced crocheters may enjoy preparing several ornaments in advance for seasonal celebrations.
The most rewarding aspect of making these little candles is the opportunity to create something beautiful using simple materials and familiar crochet techniques. Each finished piece carries its own handmade character.
Frequently Asked Questions
Is this crochet Christmas candle suitable for beginners?
Yes. Crocheters familiar with chains, single crochet, double crochet, and slip stitches can complete this project. The most challenging part is arranging and attaching the overlapping scalloped layers.
What is the best yarn for this Christmas ornament?
Cotton yarn is an excellent option because it provides clear stitch definition and helps the candle maintain its shape. Acrylic yarn is also suitable if you prefer a softer texture.
How long does it take to crochet one candle ornament?
Depending on experience and the number of decorative layers, the project may take approximately one to three hours to complete.
Can I make the ornament larger?
Absolutely. Use thicker yarn and a larger crochet hook, or increase the foundation dimensions and number of decorative scallops. Remember to adjust the flame and base proportionally.
Can the candle ornament be washed?
Most cotton and acrylic versions can be gently hand-washed in cool water with mild detergent. Avoid twisting the ornament, and reshape it before allowing it to dry flat.
Do I need to use fabric stiffener?
No. Fabric stiffener is optional. Firm crochet tension, proper assembly, and careful blocking are usually enough to maintain the shape of a small ornament.
Can I sell finished ornaments made from this project?
You can generally sell handmade items created from your own work. When using a particular designer’s written pattern, check whether that designer has specified any applicable conditions.
Conclusion
The Crochet Christmas Candle Ornament is a beautiful way to celebrate the holiday season through creativity and traditional handmade craftsmanship. With its golden flame, textured scalloped body, delicate ivory details, and simple hanging loop, this charming decoration captures the warm and welcoming spirit of Christmas.
Whether you make one ornament for your own tree or create an entire collection to share with loved ones, this project offers a wonderful opportunity to enjoy the relaxing art of crochet while preparing for the holidays.
Every stitch contributes to a little decoration filled with warmth, personality, and festive charm. With a few basic supplies, your favorite yarn colors, and a touch of imagination, you can transform simple yarn into a meaningful Christmas keepsake that brings joy to your home for many holiday seasons to come.