
One of the most appealing features of this crochet Christmas pillow is its textured appearance. The soft green stitches create a cozy surface, while the contrasting red and white hat adds a traditional holiday touch. The oversized white pom-pom makes the design especially charming, giving the finished pillow a whimsical appearance that children and adults can appreciate.
Whether you enjoy making seasonal decorations, preparing handmade gifts, or exploring creative crochet techniques, this project offers an enjoyable opportunity to practice basic stitches and decorative embroidery.
The following tutorial presents an original, beginner-friendly interpretation of the pictured design, with practical instructions, approximate measurements, and customization ideas to help you create your own festive pillow.
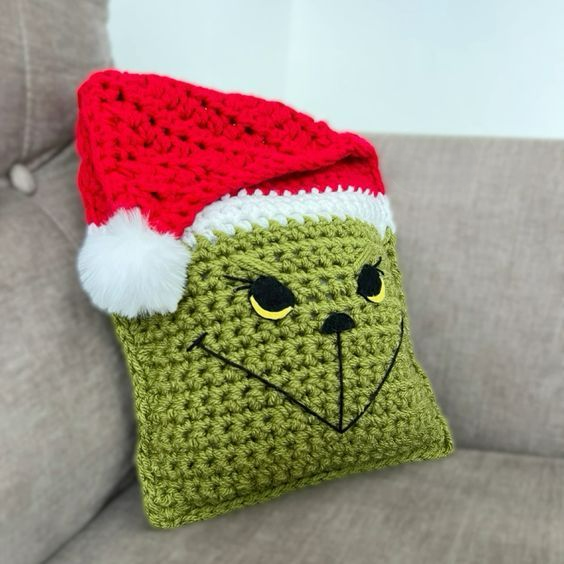
Materials and Supplies for the Christmas Grinch Crochet Pillow
Before beginning your Grinch-inspired crochet pillow, gather the necessary materials and choose your preferred yarn colors. Using soft, medium-weight yarn will produce a comfortable pillow with clearly defined stitches and enough structure to maintain its shape.
The main pillow uses a festive olive-green shade, while the Santa hat combines bright Christmas red with a white trim. Small amounts of black and yellow yarn create the expressive facial features, giving the pillow its recognizable holiday personality.
Materials needed:
-
Worsted-weight yarn (Category 4): approximately 180–220 yards of olive green.
-
Worsted-weight red yarn: approximately 80–110 yards.
-
White yarn: approximately 20–30 yards.
-
Small amounts of black and yellow yarn for facial details.
-
5.0 mm (H/8) crochet hook, or size needed for a firm fabric.
-
Polyester fiberfill or a pillow insert.
-
Yarn needle for sewing and embroidery.
-
Stitch markers.
-
Scissors and measuring tape.
-
One fluffy white pom-pom, approximately 7–9 cm in diameter.
The recommended finished pillow measures approximately 30 × 30 cm (12 × 12 inches), although the size can be adjusted by changing the number of stitches and rows. A slightly smaller pillow is particularly suitable for decorative chairs, while a larger version can become a cheerful accent for a sofa.
For the main body, choose a yarn that holds its shape without becoming excessively stiff. Acrylic yarn is an excellent option because it is affordable, widely available, and generally easy to care for. Cotton blends can also work well if you prefer a more structured appearance.
The Santa hat benefits from a softer yarn that drapes naturally over the pillow. Avoid working the hat too tightly, since the folded upper section should have enough flexibility to create the relaxed shape visible in the inspiration image.
Crochet abbreviations (US terms):
-
ch: Chain.
-
sc: Single crochet.
-
hdc: Half double crochet.
-
dc: Double crochet.
-
sl st: Slip stitch.
-
st(s): Stitch(es).
-
inc: Two stitches worked into the same stitch.
-
dec: Decrease.
-
FO: Fasten off.
The pattern uses primarily single crochet and half double crochet stitches, making it approachable for confident beginners. Basic sewing and embroidery skills are also helpful when attaching the facial features and assembling the finished pillow.
How to Crochet the Green Pillow Base Step by Step
The foundation of this Christmas crochet pillow pattern consists of two green square panels. These panels are worked separately and later joined together to create the pillow cover. Keeping the stitch tension consistent will help both pieces remain the same size.
Begin by creating a small gauge swatch before working on the full pillow. A suggested gauge is approximately 14 half double crochet stitches and 11 rows per 10 cm (4 inches). Your actual gauge may vary depending on your yarn, hook size, and personal tension.
Step 1: Make the front panel.
Using olive-green yarn, chain 43.
Row 1: Work 1 hdc into the third chain from the hook and into each remaining chain. You should have 41 hdc stitches.
Row 2: Chain 2, turn, and work 1 hdc into each stitch across. The turning chain does not count as a stitch.
Repeat Row 2 until the panel measures approximately 30 cm in height. Measure both width and height, and adjust the number of rows or your hook size as necessary.
Step 2: Crochet the back panel.
Create a second square using the same instructions as the front panel. Work carefully to ensure both pieces have matching dimensions before proceeding with assembly.
For a more textured appearance, you can alternate rows of single crochet and half double crochet. This creates additional surface interest while preserving the soft, handmade texture that makes decorative crochet pillows so appealing.
Step 3: Prepare the facial embroidery.
Place the front panel on a flat surface with the right side facing upward. Identify the approximate positions of the eyes, nose, and smiling mouth using removable stitch markers.
The eyes should sit near the upper third of the pillow, leaving enough room for the hat to overlap the top edge. Position them symmetrically, approximately 8–10 cm apart, depending on the final dimensions.
Step 4: Create the eyes and nose.
Using black yarn, make two small oval-shaped eyes with embroidery stitches or separate crochet appliqués.
For each crocheted eye, chain 5, work 1 sc in the second chain from the hook, 1 hdc in each of the next two chains, and 3 sc in the final chain. Continue around the opposite side of the foundation chain, working 1 hdc in each of the next two chains and 2 sc in the final available chain space. Join and fasten off.
Adjust the oval shapes with a yarn needle and sew them securely to the front panel. Add a curved yellow accent beneath each eye to create the playful expression.
Create a small black triangular nose using embroidery stitches. Keep the shape centered between the eyes and slightly lower than their bottom edges.
Step 5: Embroider the mischievous smile.
Thread a yarn needle with black yarn and begin embroidering a wide, gently curved smile. Start near the lower outside edge of one cheek, curve downward toward the center, and continue upward toward the opposite cheek.
Add a short vertical line connecting the nose to the center of the smile. Small upward curves at the corners of the mouth help create the characteristic mischievous expression.
For a polished appearance, use small, consistent embroidery stitches rather than pulling long strands tightly across the surface. This prevents the crochet fabric from puckering and allows the pillow to maintain its natural shape.
Step 6: Assemble the pillow.
Place the front and back panels together with their wrong sides facing inward. Join the pieces using single crochet stitches around three sides, working approximately one stitch per row or edge stitch as needed to keep the seam flat.
Insert a 30 × 30 cm pillow form or add polyester fiberfill gradually until the pillow feels comfortably firm. Avoid overstuffing, as excessive filling can distort the square shape and facial features.
Finish crocheting the final side closed, then fasten off and weave in all loose ends. If you prefer a removable cover, consider adding a simple envelope-style back instead of permanently closing the pillow.
Creating the Red Santa Hat and Decorative Details
The bright red Santa hat is the defining finishing touch of this holiday crochet pillow. Its soft, folded appearance contrasts beautifully with the green pillow body, while the white brim creates a neat transition between the two colors.
To achieve a similar appearance, crochet a tapered hat piece separately and attach it to the top of the completed pillow. Working it as a separate component allows you to adjust the position and create the natural side fold.
Step 1: Crochet the white brim.
Using white yarn, chain enough stitches to create a strip approximately 30–32 cm long.
Work rows of single crochet until the strip measures approximately 3–4 cm wide. Fasten off, leaving a long tail for attaching the brim to the front of the pillow.
For additional texture, work the single crochet stitches through the back loops only. This produces subtle horizontal ridges that resemble the soft trim of a traditional Santa hat.
Step 2: Begin the red hat.
With red yarn, chain a foundation approximately 30–32 cm long, matching the width of the white brim.
Work one row of half double crochet across the foundation chain, then continue in turned rows.
The hat should gradually taper toward one side. To create this effect, decrease one stitch at each edge of every other row, adjusting the frequency as the piece becomes narrower.
Step 3: Shape the upper portion.
Continue working decrease rows until the hat reaches approximately 22–25 cm in height and only a few stitches remain.
Fasten off and weave in the ends. The finished piece should resemble a long tapered triangle with a relatively wide base.
For a softer appearance, lightly stretch and shape the crocheted fabric by hand. Avoid excessive blocking because the hat should retain enough texture to match the pillow.
Step 4: Attach the hat to the pillow.
Position the red hat along the top edge of the green pillow, allowing the lower portion to overlap the top of the face slightly.
Sew the hat securely along its lower edge and selected side sections. Leave the upper portion flexible so it can fold naturally toward one side.
Next, attach the white brim across the base of the hat, concealing the joining seam and creating a clean, finished appearance.
Step 5: Add the fluffy pom-pom.
Create a large white pom-pom using a pom-pom maker, a cardboard template, or your preferred method.
Trim the pom-pom evenly until it looks round and full. Sew it firmly to the tapered tip of the hat, using several strong stitches to secure it.
Fold the end of the hat toward one side of the pillow so the pom-pom hangs near the upper corner. This simple adjustment gives the finished project the relaxed, playful appearance shown in the inspiration design.
Step 6: Complete the finishing details.
Inspect the pillow carefully, making sure the facial embroidery lies flat and the hat remains securely attached.
Weave in all remaining yarn ends and gently reshape the pillow with your hands. If necessary, add a little extra fiberfill through a small opening before completing the final seam.
A light steaming treatment may help relax the stitches, but always follow your yarn manufacturer’s care recommendations. Avoid placing a hot iron directly on acrylic yarn or fluffy decorative components.
Creative Decorating Ideas, Customization, and Care Tips
One of the greatest advantages of this handmade Christmas crochet pillow is its versatility. The pattern can be adapted to different holiday color schemes, pillow sizes, and decorating styles without losing its cheerful character.
For a traditional Christmas arrangement, combine the green pillow with red plaid blankets, white faux-fur accents, and warm decorative lighting. The contrasting textures create a cozy setting that feels especially inviting during the winter season.
If you prefer a more elegant holiday palette, replace the bright red hat with deep burgundy yarn and use ivory instead of pure white for the brim. These subtle changes create a sophisticated variation that complements farmhouse and vintage-inspired interiors.
The project can also become a thoughtful handmade gift. Pair the pillow with a matching crochet blanket, holiday mug, or personalized gift tag to create a festive present for someone who enjoys unique Christmas decorations.
For households with young children, consider embroidering all facial details directly into the fabric instead of using buttons or plastic safety eyes. Sew the pom-pom securely, and avoid detachable decorations that could present a choking hazard. Decorative pillows with loose attachments should not be placed in infant sleeping spaces.
When cleaning your pillow, check the care instructions for the yarn and stuffing used. Gentle spot cleaning is often the safest approach for a finished piece with embroidered details and a fluffy pom-pom.
If the pillow has a removable insert, wash the cover separately when appropriate. Lay the crocheted fabric flat to dry, gently restoring its original shape to prevent stretching or distortion.
Frequently Asked Questions About the Christmas Grinch Crochet Pillow
Is this crochet pillow suitable for beginners?
Yes. The main pillow uses basic crochet stitches, including single crochet and half double crochet. Beginners with some experience in maintaining even tension and sewing pieces together should be able to complete the project successfully.
How long does it take to make this Christmas pillow?
Most crocheters can complete the project in approximately 6–10 hours, depending on their experience, stitch speed, and the amount of decorative detail they include.
Can I make the pillow larger or smaller?
Absolutely. Increase or decrease the foundation chain and the total number of rows to adjust the dimensions. Remember to resize the Santa hat and facial features proportionally.
What yarn works best for this design?
Medium-weight acrylic yarn is an excellent choice because it provides softness, stitch definition, and easy maintenance. Cotton blends are another option for crocheters who prefer a firmer decorative finish.
Can I use a pillow insert instead of polyester stuffing?
Yes. A ready-made square pillow insert helps maintain a consistent shape and may produce a more professional appearance. Choose an insert that closely matches the measurements of your finished cover.
How can I make the Santa hat look more realistic?
Use a flexible stitch pattern, avoid overly tight tension, and allow the tapered upper section to fold naturally. A full white pom-pom and a textured brim will also enhance the finished appearance.
Conclusion
The Christmas Grinch Crochet Pillow Pattern is a wonderful way to bring humor, creativity, and handmade charm into your holiday decorating. Its combination of green textured crochet, expressive facial embroidery, and a festive Santa hat makes it a memorable seasonal project.
From crocheting the square pillow panels to adding the final fluffy pom-pom, each stage provides an opportunity to practice useful crochet techniques while creating something special for the Christmas season.
Whether displayed on a sofa, tucked into a cozy reading chair, or given as a handmade holiday present, this festive crochet pillow is sure to add a cheerful touch to winter celebrations and become a favorite decoration year after year.