
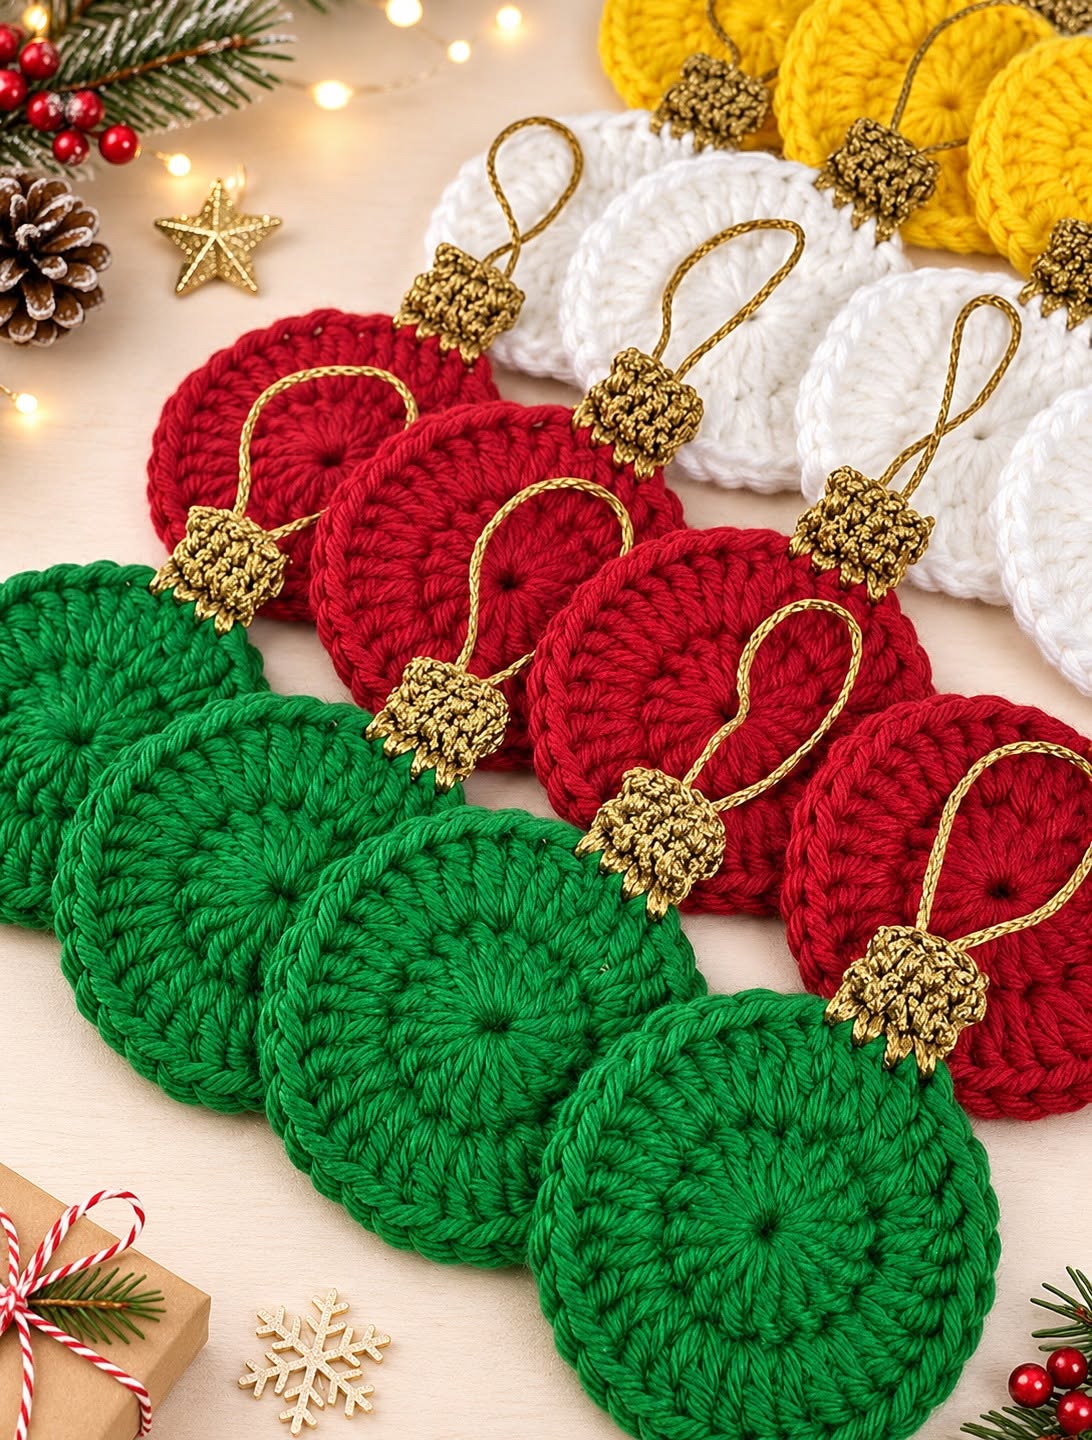
The Crochet Christmas Ornament Pattern featured here combines rich Christmas red, evergreen, snowy white, and cheerful golden yellow. Each ornament has a textured circular body, a decorative metallic gold cap, and a delicate hanging loop. The combination creates a festive appearance that resembles classic Christmas baubles while maintaining the cozy softness of handmade crochet. These ornaments are lightweight, reusable, and easy to customize, making them especially attractive for Christmas decorating.
Another wonderful feature of this easy Christmas crochet project is its versatility. You can make several ornaments in one afternoon, experiment with different colors, or create matching sets for family and friends.
Whether you are an experienced crocheter or a beginner looking to practice working in rounds, this project offers an enjoyable opportunity to create something beautiful. With a few basic crochet stitches and simple finishing techniques, you can make decorations that become cherished parts of your holiday traditions.
Materials and Supplies for Crochet Christmas Ornaments
Before beginning your handmade crochet Christmas decorations, gather the necessary materials. Choosing suitable yarn and a comfortable crochet hook will help you produce ornaments with neat stitches and a beautiful finish.
For this project, medium-weight cotton yarn is an excellent option because it provides good stitch definition and helps the circular ornaments maintain their shape. Acrylic yarn also works well, particularly when you prefer lightweight decorations.
The colors shown in this design are especially suitable for traditional Christmas decorating. Deep red creates a warm, classic appearance, green represents evergreen trees, white brings a snowy winter feeling, and yellow adds a cheerful touch. Metallic gold yarn gives the finishing details a more elegant appearance.
Materials Needed
- Worsted-weight yarn (Category 4) in Christmas red, evergreen green, snow white, and golden yellow.
- Metallic gold yarn or gold-colored crochet thread for the ornament caps and hanging loops.
- 4.0 mm (G/6) crochet hook, or a size appropriate for your yarn.
- Yarn needle for weaving in ends.
- Sharp scissors.
- Stitch marker, if desired.
- Fabric stiffener or diluted fabric glue, optional.
- Measuring tape.
Crochet Abbreviations (US Terms)
- MR: Magic ring
- ch: Chain
- sl st: Slip stitch
- sc: Single crochet
- hdc: Half double crochet
- dc: Double crochet
- st(s): Stitch(es)
- sp: Space
- rep: Repeat
- FO: Fasten off
The finished ornaments can measure approximately 8–10 cm (3.1–3.9 inches) in diameter, depending on the yarn, hook size, and tension.
For a smaller version, choose fine cotton yarn and a 2.5 mm or 3.0 mm crochet hook. For larger ornaments, use thicker yarn and a corresponding larger hook.
If you want your Christmas decorations to look especially coordinated, make several ornaments using the same yarn weight. Keeping the stitch tension consistent will help every piece have a similar shape.
How to Crochet the Christmas Ornament Step by Step
The centerpiece of this pattern is a circular crochet motif made with several rounds of double crochet stitches. The raised texture creates a decorative appearance without requiring complicated techniques.
The instructions below describe a practical, beginner-friendly version inspired by the circular ornaments in the image. Because the exact original stitch counts cannot be confirmed from a photograph, this is a reconstructed pattern rather than a verified copy.
Step 1: Create the Magic Ring
Choose your first yarn color and make a magic ring.
Chain 3, which counts as your first double crochet stitch.
Work 11 additional double crochet stitches into the center of the ring.
Pull the yarn tail gently to close the center opening.
Join with a slip stitch to the top of the beginning chain 3.
You should now have 12 double crochet stitches in the first round.
Step 2: Crochet the Second Round
Chain 3 to begin the next round.
Work one additional double crochet into the same stitch.
Make two double crochet stitches into every stitch around the circle.
Join with a slip stitch to the top of the beginning chain 3.
At the end of this round, you should have 24 stitches.
Your crochet piece will begin developing a small circular shape. Keep the stitches relaxed enough to prevent the fabric from curling.
Step 3: Increase the Diameter
Chain 3 and work one double crochet into the same stitch.
Work one double crochet into the next stitch.
Continue repeating the following sequence around the circle:
2 dc in the next stitch, 1 dc in the following stitch.
Join with a slip stitch to finish the round.
You should now have 36 stitches.
This additional round increases the diameter while maintaining a smooth circular structure.
Step 4: Complete the Outer Round
Chain 3 and work one double crochet into the same stitch.
Work one double crochet into each of the next two stitches.
Continue repeating:
2 dc in the next stitch, 1 dc in each of the following 2 stitches.
Join with a slip stitch.
You should have 48 stitches.
For additional decoration, you may work a final round of single crochet stitches around the outside edge.
If you want a slightly scalloped finish, work a small decorative edging using groups of three half double crochet stitches spaced evenly around the circle.
Fasten off and weave in the yarn ends securely.
Step 5: Make the Golden Ornament Cap
The metallic gold cap is an important decorative feature because it transforms the circular crochet motif into a recognizable Christmas ornament.
Using gold yarn, chain 9.
Beginning in the second chain from the hook, work one single crochet into each chain.
Chain 1 and turn.
Work another row of single crochet stitches.
Repeat until you have a small rectangular piece approximately 2–2.5 cm wide.
For additional texture, work a final row of half double crochet stitches.
Fasten off, leaving a long yarn tail for attaching the cap.
Position the golden piece at the top edge of the circular ornament.
Use a yarn needle to sew the cap securely into place.
Step 6: Add the Hanging Loop
Cut approximately 18–22 cm of metallic gold yarn.
Fold it in half and thread both ends through the top of the ornament cap.
Tie the ends securely on the back of the ornament.
Adjust the loop to your desired hanging length.
Alternatively, crochet a chain of approximately 25–30 stitches using metallic gold yarn.
Fold the chain into a loop and sew both ends behind the cap.
This creates a stronger hanging cord that matches the handmade appearance of the ornament.
Step 7: Shape and Finish Your Ornament
Lay the completed ornament on a flat surface.
Gently adjust the outer edge with your fingers until the circle appears even.
If necessary, lightly dampen the ornament and pin it into shape on a blocking mat.
Allow it to dry completely before removing the pins.
For ornaments that need extra firmness, apply a small amount of fabric stiffener following the manufacturer’s directions.
Once completely dry, your crochet Christmas bauble ornament is ready to hang.
Creative Christmas Color Combinations and Decorating Ideas
One of the most enjoyable parts of making crochet Christmas tree ornaments is choosing the colors. Traditional Christmas shades always look beautiful, but there are many other combinations worth exploring.
Red and metallic gold create a luxurious, classic holiday appearance. These ornaments look especially lovely on green Christmas trees surrounded by warm white lights. The gold caps add just enough sparkle to make each piece stand out.
Green and white decorations provide a softer, nature-inspired look. They coordinate beautifully with wooden ornaments, pinecones, natural ribbons, and rustic farmhouse Christmas decorations. You can also alternate green and white ornaments along a handmade garland.
Golden yellow and white offer a bright, cheerful variation. This combination works well with neutral Christmas trees, gold ribbons, cream-colored stockings, and elegant holiday table settings. Using a soft buttery yellow instead of a bright shade can create a vintage-inspired effect.
For a modern holiday theme, try blush pink, champagne gold, ivory, or sage green. These delicate colors give traditional crocheted ornaments a fresh appearance while preserving their handmade charm. They are also excellent choices for thoughtful Christmas gifts.
Another creative idea is to make a complete ornament collection using different sizes. Small ornaments can decorate miniature Christmas trees, while medium-sized pieces work beautifully on standard trees. Larger circles can become decorative accents on wreaths or festive wall hangings.
You can even personalize each decoration with embroidery, tiny beads, or simple decorative stitches. Small pearl beads around the outer edge can produce an elegant appearance, while contrasting yarn details can make every ornament unique. Always attach embellishments securely, particularly if decorations will be accessible to young children or pets.
Tips for Beautiful Results and Frequently Asked Questions
Creating attractive DIY crochet Christmas ornaments becomes easier when you pay attention to stitch tension, yarn selection, and finishing techniques. Small details can make a significant difference in the final appearance.
Try to use the same hook size throughout your ornament collection. If one ornament is crocheted with a smaller hook, its diameter and texture may look different from the others. Consistent tools help produce a coordinated decorative set.
If the circular motif starts curling inward, your stitches may be too tight or the circle may need additional increases. If the ornament becomes wavy, there may be too many increases. A flat circle should lie comfortably on a table without excessive stretching.
For a more pronounced textured appearance, consider experimenting with front post double crochet stitches. These stitches create raised lines that can make the ornament look more dimensional. Practice the technique on a small sample before incorporating it into your final pieces.
When working with metallic yarn, crochet slowly and avoid pulling the stitches too tightly. Metallic fibers can sometimes be less flexible than ordinary cotton or acrylic yarn. A slightly larger hook may make the decorative caps easier to work.
Finally, store finished ornaments in a clean, dry container after the holiday season. Place tissue paper between the pieces if necessary, and avoid compressing delicate decorations. Proper storage helps handmade crochet ornaments retain their shape for many Christmas seasons.
Frequently Asked Questions
Are these crochet Christmas ornaments suitable for beginners?
Yes. The circular body uses basic crochet techniques, including the magic ring, chains, double crochet stitches, and slip stitches. Beginners can complete the project with a little practice.
How long does it take to make one ornament?
A simple ornament may take approximately 30–60 minutes, depending on your crochet experience, yarn choice, and finishing details.
Can I use leftover yarn?
Absolutely. These small Christmas decorations are an excellent way to use yarn scraps from previous projects. You only need a modest amount of each color.
Do the ornaments need stuffing?
No. This design is a flat crochet ornament, so stuffing is unnecessary. The circular texture creates its decorative appearance without additional filling.
Can I make these ornaments larger?
Yes. You can increase the size by using thicker yarn and a larger hook or by continuing the circular increase pattern. For a fifth double crochet round, repeat two double crochet stitches in one stitch followed by one double crochet in each of the next three stitches, producing 60 stitches.
Can I wash crochet Christmas ornaments?
Many cotton and acrylic yarns are washable, but always follow the yarn care instructions. If you use metallic fibers, beads, glue, or fabric stiffener, gentle spot cleaning may be preferable.
What is the best way to hang these ornaments?
Crocheted gold loops, thin satin ribbons, or soft decorative cords work beautifully. Make sure the hanging loop is firmly attached before placing the ornament on the Christmas tree.
Can these ornaments be used for Christmas gifts?
Yes. Handmade crochet ornaments make thoughtful presents for friends, family members, teachers, neighbors, and fellow craft enthusiasts. You can package several matching pieces together as a festive gift set.
Conclusion
Making your own Crochet Christmas Ornament Pattern is a wonderful way to combine creativity, tradition, and the joy of handmade holiday decorating. These charming circular ornaments bring together beautiful crochet texture, traditional Christmas colors, and elegant golden accents in a project that is both accessible and enjoyable.
Whether you choose classic red, evergreen green, snowy white, or cheerful golden yellow, each ornament can become a special part of your Christmas celebration. Their lightweight construction makes them suitable for trees, wreaths, garlands, gift wrapping, and countless other festive displays.
Best of all, handmade ornaments carry something that store-bought decorations cannot always provide: the love and time invested in making them. With every stitch, you create a little piece of Christmas magic that can be shared, displayed, and treasured year after year.